happyDomain is an interface that centralize your domain names and reduces the usual friction points.
Our interface centralizes your domains and includes all the features you’d expect in 2025 for effortless domain management.
We built happyDomain because we want to save operational teams time by giving them superpowers:
to have all the power of domain names, without having to read and learn all the new standards, by staying focused on needs.
Here’s an overview of happyDomain’s main features:
consolidate domain names from over 45 domain name providers or authoritative servers,
abstract all technical complexity into a logical view,
group records by services/needs: email, website, delegation, load balancing, etc.
guide administrators with clear forms,
review the details of your changes before publishing, and pick exactly which ones to apply,
keep a history of changes and roll back to a previous zone state with a single click,
monitor your domains and services with automatic checks (expiration, DNSSEC, response time, etc.),
get notified as soon as a check changes state,
check whether a domain is available for registration and inspect any domain (WHOIS, DNS resolver),
import/export the zone as a standard file (BIND format),
keep track of actions for later auditing,
automate tasks via a REST API.
We are a free and open source project: you can use the official interface available at www.happydomain.org, or install it at home.
The source code is available on framagit, GitLab or GitHub: you can consult it, copy it, give your opinion, report bugs or make modifications, as you wish.
Join us on Matrix! 💬
We’re building a community of users who want to regain control of their DNS zones.
Join us!
happyDomain is a service that centralizes the management of your domain names from different registrars, hosts or authoritative DNS servers.
It’s a web interface and a REST API that offer a simpler domain experience than most of the interfaces we usually see for managing domains, including features we’d expect to see in 2025.
At happyDomain, we want to make sure that domain names and DNS are no longer a daunting experience, but instead give you all the tools you need to understand and make changes in peace.
Can’t wait to get started? Follow the guide!
1. Online or on premise
happyDomain is free (as in free speech) software.
This means, among other things, that you can install it at home.
If you’re not familiar with the command line, or if you’d like to evaluate the software quickly, we recommend that you create an account on our online service.
happyDomain will connect to your hosting provider (or local authoritative server).
Your domain remains hosted where it is today; using happyDomain does not imply any transfer or change of ownership.
When you log on to happyDomain for the first time, a wizard will guide you through the process of linking your first domain.
Depending on your hosting provider, the procedure will differ.
But for most, you’ll need to go to your host’s customer account, and request an API key.
For OVH, the procedure is simplified, as all you have to do is follow the instructions and authorize happyDomain to access the domain-related part of your account.
If you have your own authoritative server, you’ll need to get the keys to interact with it either from the administrator or by looking in the configuration.
Once the connection between happyDomain and your first host or server has been established, all you have to do is select the domains you want happyDomain to manage.
3. Consult the DNS zone
The DNS zone refers to the technical content of your domain.
To view the zone corresponding to a domain, click on the domain name that appears on the happyDomain home page.
After a few seconds of fully automatic import and analysis, you’ll immediately see a list of registrations or services as they are currently distributed to your visitors.
About the “services”
The complexity of DNS stems in part from the mismatch between purely technical constraints and the actual use of records.
happyDomain tries to simplify this by grouping technical records under their concrete uses. This is what we call “service”.
4. Modify a record
In the zone display screen, click on a record to view its details.
Each DNS record has particular characteristics and constraints.
Context-sensitive help tries as far as possible to give you the essential information to guide you through the modifications you need to make.
When you make a modification to a record, it is not directly published to your host or server.
5. Distribute your changes
Once you’ve made all the changes you need, click on the “Distribute my changes” button.
A dialog box will appear showing you the exact changes that will be applied to your host.
At this point, there’s still time to select the changes you don’t want/no longer want to be applied.
Before validating the window, you can add a message that will be recorded in the log, enabling you to quickly recall the reason for the change.
So now you know how to use happyDomain’s main features.
If you encounter any problems or have any ideas for improvement, please let us know.
Installation and deployment
Depending on your concerns, happyDomain can be deployed in different kind of environment.
Thanks to some modularity, there is certainly a path to your needs.
Follow this installation guide if you want to use happyDomain directly on your machine, as simply as possible, without user management.
This is a simple configuration, suitable for evaluating happyDomain or for using it without authentication on your own machine, or with authentication provided by a reverse proxy.
You can deploy it using Docker or by downloading one of the available executables. Both methods are described below.
Via Docker/podman
If you are familiar with Docker (or podman), you can have happyDomain up and running in seconds with the following command:
docker container run -e HAPPYDOMAIN_NO_AUTH=1 -p 8081:8081 happydomain/happydomain
If you want to make the data persistent, you need to add a volume:
Start by downloading the executable matching your processor architecture from: https://get.happydomain.org/master/.
The darwin versions are for macOS, while the linux versions are for GNU/Linux. All distributed versions are static and should work regardless of your libc (GNU libc in most cases, musl for Alpine, …).
Make the binary you downloaded executable: chmod +x happydomain-OS-ARCH.
Run the binary: HAPPYDOMAIN_NO_AUTH=1 ./happydomain-OS-ARCH.
The HAPPYDOMAIN_NO_AUTH=1 option is a parameter that tells happyDomain not to require authentication: domains are shared among all incoming connections. In practice, this automatically creates a default user and disables all login, account registration, and related features.
Can I expose it on the Internet like this?
No! It is essential that you do not expose your happyDomain instance on the Internet without authentication.
Without it, all its content would be accessible to anyone, and they could take control of your domain(s).
Always use a reverse proxy such as nginx, Apache, HAproxy, Traefik, … adding a filtering or basic authentication step.
For example, you can filter the IPs that can access the service.
Here is a sample nginx configuration filtering IPs (using the allow directive):
happyDomain ships every checker built-in, but several of them rely on
external tools (DNSViz, Zonemaster, Matrix federation tester) that are
packaged in their own container images. Running these as separate services
gives you the full checker experience and better isolation.
The recommended approach is docker compose. Save the following file as
docker-compose.yml and run docker compose up -d.
Each checker runs as a standalone HTTP service. happyDomain delegates check
requests to the matching container via the HAPPYDOMAIN_CHECKER_<ID>_ENDPOINT
environment variable. When an endpoint is not set, the corresponding checker
runs locally inside the happyDomain process instead.
Two checkers rely on additional third-party backends:
Zonemaster (checker-zonemaster) queries the zonemaster/backend
service. The HAPPYDOMAIN_CHECKER_ZONEMASTER_ZONEMASTERAPIURL variable tells
the checker where that backend listens.
Matrix federation tester (checker-matrix) queries the
matrixdotorg/federation-tester-backend service. The
HAPPYDOMAIN_CHECKER_MATRIXIM_FEDERATIONTESTERSERVER variable points to its
report endpoint.
Optional: happyDeliver
If you run a happyDeliver instance for mail-flow
monitoring, uncomment the HAPPYDOMAIN_CHECKER_HAPPYDELIVER_ENDPOINT line and
add the corresponding service:
The checker-blacklist service works without API keys (it uses DNS-based
blocklists by default), but you can enable additional sources — Google Safe
Browsing, VirusTotal, abuse.ch URLhaus — by configuring the matching admin
options from the happyDomain administration interface once the stack is running.
Admin interface
happyDomain exposes administration commands through a Unix socket. The
container includes the hadmin wrapper:
hadmin is a thin wrapper around curl — start with the URL path, then add
any curl options after it.
Using a configuration file
Instead of environment variables, you can place a configuration file either in
/data/happydomain.conf (inside the data volume) or bind-mount it to
/etc/happydomain.conf:
docker run -v happydomain.conf:/etc/happydomain.conf -p 8081:8081 happydomain/happydomain
Configuration
happyDomain respects the methodology 12 factor and allows to act on the application configuration in several ways.
How do I configure happyDomain?
It is possible to configure happyDomain in three different ways: configuration file, environment, command line. All options are available for each of these mechanisms.
The precedence, when an option is defined by several mechanisms simultaneously, is that an option present in a configuration file will be overwritten by the environment, which will be overwritten by an option passed on the command line
Configuration by file
When the application is launched, the first configuration file from the following list will be used:
./happydomain.conf
$XDG_CONFIG_HOME/happydomain/happydomain.conf
/etc/happydomain.conf
Only the first existing file is taken into account. It is not possible to have part of its options in /etc/happydomain.conf and part in ./happydomain.conf, only the latter configuration file will be taken into account.
It is possible to specify a custom path by adding it as an additional parameter to the command line. Thus, to use the configuration file located at /etc/happydomain/config, we would use :
./happydomain /etc/happydomain/config
Configuration file format
Comments line has to begin with #, it is not possible to have comments at the end of a line, by appending # followed by a comment.
Place on each line the name of the config option and the expected value, separated by =. For example:
The complete list of configurable items can be listed by calling happyDomain with the -h or --help option.
Here is a list of the main options:
General parameters
bind
Bind port/socket to use to expose happyDomain.
admin-bind
Bind port/socket to use to expose the administration API.
default-ns
Address and port of the name resolver server to be used by default when name resolution is required.
dev
URL to which all requests related to the graphical interface will be returned.
externalurl
URL of the service, as it should appear in emails and content to the public.
disable-providers-edit
Disallow all actions on provider (add/edit/delete), eg. for demo mode.
Page layout
custom-head-html
String to be placed before the end of the HTML header.
custom-body-html
String to be placed before the end of the HTML body.
hide-feedback-button
Hide the icon on page that permit to give feedback.
msg-header-text
Custom message banner to add at the top of the app.
msg-header-color
Background color class of the banner added at the top of the app (default “danger”, can be primary, secondary, info, success, warning, danger, light, dark, or any bootstrap color class).
Data storage
storage-engine
Allows you to choose the data storage mechanism among all supported mechanisms.
LevelDB (storage-engine=leveldb)
leveldb-path
Path to the folder containing the LevelDB database to use.
Defines the name and address of the sender of emails sent by the service.
Note that without the mail-smtp-* options, happyDomain will use the sendmail binary to send mail. This can be coupled with the msmtp or ssmtp packages, for example, to set the parameters for the whole system.
mail-smtp-host
IP or host name of the SMTP server to use.
mail-smtp-port
Port to use on the remote server.
mail-smtp-username
When authentication is required on the remote server, username to use.
mail-smtp-password
When authentication is required on the remote server, password to use.
Authentication
no-auth
Disables the notion of users and access control. A default account is used.
disable-embedded-login
Disables the internal user/password login in favor of external-auth or OIDC.
disable-registration
Forbids new account creation through public form/API (still allow registration from external services).
external-auth
URL base of the authentication and registration service to be used instead of the embedded login system.
happyDomain supports user authentication via the OpenID Connect protocol. If you have an authentication provider (Auth0, Okta, …) or Identity Provider (IdP) software such as Keycloak, Authentik, Authelia, … you can use it with happyDomain, and possibly dispense with the embedded registration and authentication system.
Configuration
To enable OpenID Connect, you’ll need to set the following options:
The PROVIDER_URL setting should be defined to the base URL of your authentication service.
The service should expose a settings discovery endpoint (at /.well-known/openid-configuration).
OpenID Connect provider settings
You’ll need to setup a new application in your authentication provider, with the following settings:
This documentation will guide you through configuring BIND to enable Dynamic DNS and connect your domains to happyDomain.
Configure BIND to enable Dynamic DNS
First, you need to edit the main BIND configuration file (usually /etc/named.conf or /etc/bind/named.conf depending on your distribution) to add a secret that will be shared between happyDomain and BIND to authenticate the changes. Then you must indicate which domains will be managed by happyDomain.
Adding a Shared Secret
Under the main key section of your configuration, add the following key:
Replace <SOME_SECRET> with a string obtained using openssl rand -base64 48.
Creating an Authorization Rule for happyDomain
In addition to the key, you must specify how the key can be used by defining an ACL and allowing updates from it.
Add the following ACL to your configuration:
acl "happydomain_acl" {
    key happydomain;
};
Allowing Updates for Each Zone
Now that you have created a rule allowing the happydomain key to make changes, you need to indicate to which zones this rule applies.
For each zone, you must add an update-policy statement referencing the happydomain_acl ACL:
For example, for an existing happydomain.org zone, add the update-policy statement as follows:
zone "happydomain.org" {
    type master;
    file "/var/named/happydomain.org.db";
    update-policy {
        grant happydomain_acl name happydomain.org. ANY;
    };
};
The update-policy statement is a list, so you may already have other policies in this list. In this case, just add the grant statement for happydomain_acl.
Allowing Updates for All Zones
If you manage many zones, it may be more convenient to set the default authorization for all zones. In this case, you can use a globalupdate-policy in the options section:
options {
    update-policy {
        grant happydomain_acl zonesub ANY;
    };
};
This will apply the update-policy to all zones, allowing the happydomain_acl to update any record.
Apply the Configuration
After modifying the configuration file, reload the BIND service to apply the changes:
First, you have to edit the main knot configuration file (usually /etc/knot/knot.conf) to add a secret that will be shared between happyDomain and knot to authenticate the changes. Then you have to indicate which domains will be managed by happyDomain.
Adding a shared secret
Under the main key section of your configuration, add the following key:
The acl element is a list, so you may already have other acl elements in this list. In this case you just need to add the acl_happydomain element to the already existing list.
You have to add this acl element for each zone, unless you use the following trick.
Associate the authorization to all zones
If you manage many zones, it may be more convenient to set the default authorization for all zones. In this case, instead of the previous section, we will modify the default template:
Key Name : corresponds to id in knot’s configuration ;
Key Algorithm : corresponds to algorithm ;
Secret Key : corresponds to secret.
Once the provider is added, it does not allow you to list existing domains, but you can still manually add all your domains.
OVH API configuration
In order to manage domains hosted by OVH, an additional configuration step is required.
Authentication to the OVH API works in 2 stages:
First, you need to register an application (e.g. happyDomain). An application has an identifier and a secret that must be entered as a happyDomain parameter.
For each OVH account you wish to manage, the happyDomain interface redirects you to the OVH page for creating the Consumer key.
The application must be created from an existing OVH account, regardless of whether it has domains or not; it is a matter of identifying the person responsible for implementing the designated application.
Access to account data, and in particular to the domains they manage, is via the Consumer key.
Fill in the form with a name and description that reflects the name and use of your application, e.g. happyDomain.
Once the form has been validated, you’ll get a key and a secret.
This information must be specified in the happyDomain configuration:
ovh-application-key
Application key pour l’API d’OVH
ovh-application-secret
Clef secrète pour l’API d’OVH
Features
This section walks through happyDomain feature by feature, following the path a new user
takes: from creating an account to publishing a fully managed zone.
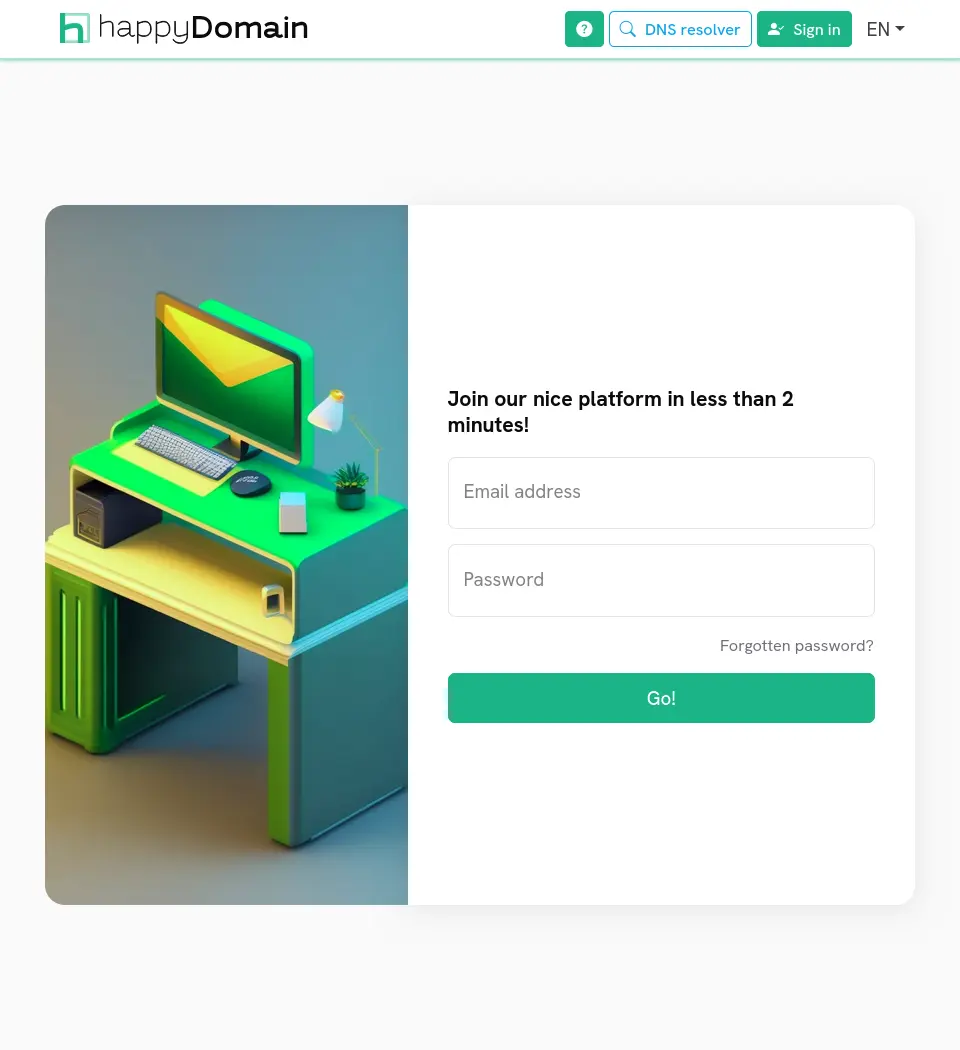
Before you can manage your domains, you need a happyDomain account. Creating one takes less than two minutes and only requires an email address and a password.
Filling in the sign-up form
From the home page, follow the link to register, then fill in the form:
Email address – this address identifies you on the platform and is used to contact you for security-related operations (password recovery, important notices). It must contain a valid @.
Password – choose a strong password (see below).
Password confirmation – retype the exact same password to avoid typos.
Keep me informed of future big improvements – an optional checkbox to subscribe to the project newsletter. Leave it unchecked if you do not wish to receive these updates.
The interface language you are currently using is automatically recorded with your account, so the emails you receive will be in that language.
Password requirements
A password is accepted only if it contains at least 8 characters, including at least one uppercase letter, one lowercase letter and one digit. It must also contain a special character, or be at least 11 characters long.
Some servers display an anti-bot challenge (captcha) below the form. If so, complete it before submitting.
When everything is filled in correctly, click Sign up!.
Validating your email address
On most servers, an email is sent to the address you provided right after registration. Open your mailbox and click the validation link it contains to activate your account.
If you did not receive the message (check your spam folder first), you can request a new one from the email validation page by entering your address again and clicking Send again.
Servers without email
Some happyDomain instances run without an email service. On these servers, no validation message is sent: your account is usable immediately and you can log in right away.
Once your address is validated, you are redirected to the login page where you can sign in with your new credentials.
Log in
Once you have created an account and validated your email address, you can sign in to access your domains.
Signing in
On the login page, enter the email address and password you chose at registration, then click Go.
If the credentials are correct, you are taken to your dashboard. If they are not, an error message is displayed: double-check your address and password and try again.
Repeated attempts
For security reasons, the server may ask you to complete an anti-bot challenge (captcha) after a few failed attempts, or temporarily rate-limit further tries. Wait a moment, then retry.
Signing in with an external provider
When the server is configured for it, an additional button lets you sign in through an external identity provider (for example Google, GitLab, GitHub, Microsoft or Apple). Click it to be redirected to that provider and authenticate there.
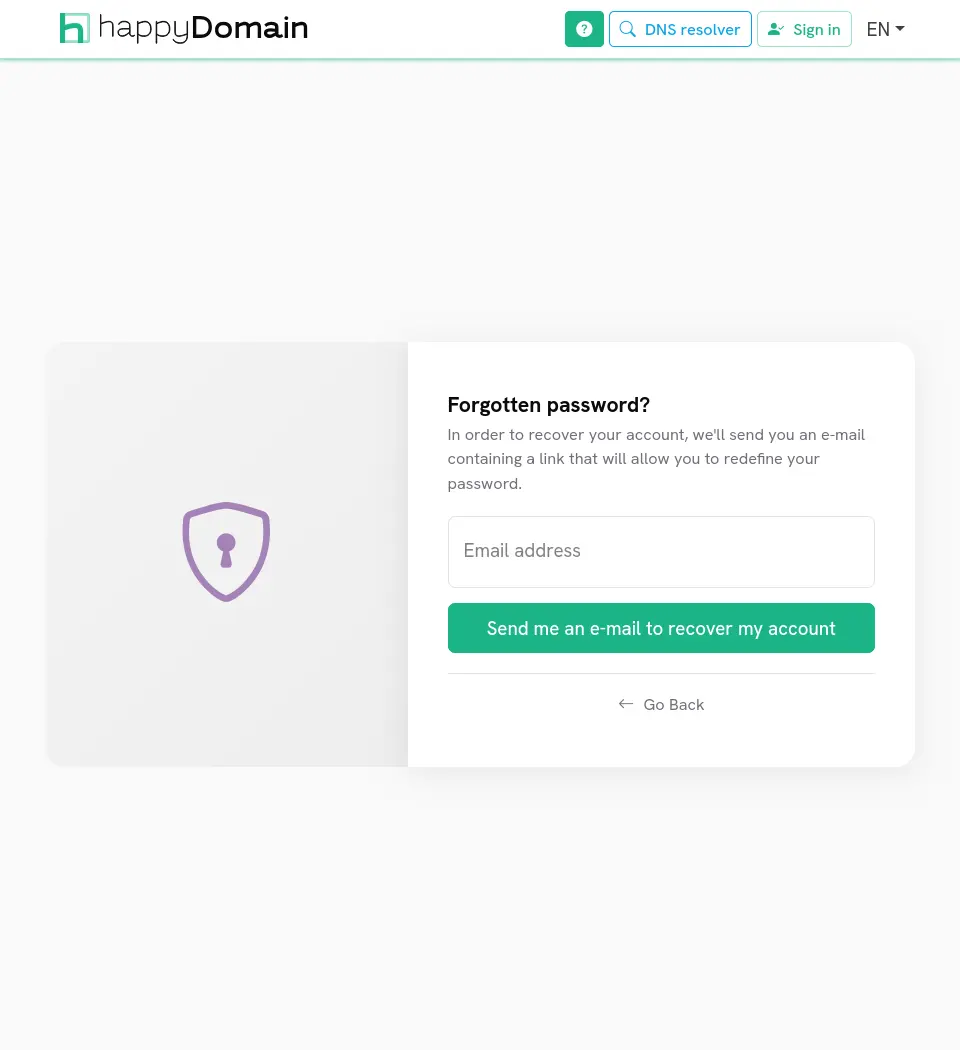
Forgotten password
If you no longer remember your password, click Forgotten password? below the login form.
Enter the email address of your account and click Send the recovery link. If an account matches, a message containing a recovery link is sent to that address.
Open the link from your mailbox to reach the account recovery form, where you can set a new password:
Type your new password (it must meet the same strength requirements as at sign-up).
Retype it in the confirmation field.
Click Redefine my password.
Once the password is redefined, you are redirected to the login page to sign in with your new credentials.
Servers without email
On instances that run without a mail service, password recovery is not available: clicking Forgotten password? displays a notice inviting you to contact the server administrator to reset your password.
Centralize your domains
happyDomain provides you with a unified graphical interface with modern features, regardless of where your domain names are hosted. They can be on a DNS server (PowerDNS, bind, knot, …) of your own, or with one or several providers (around 50 are currently supported).
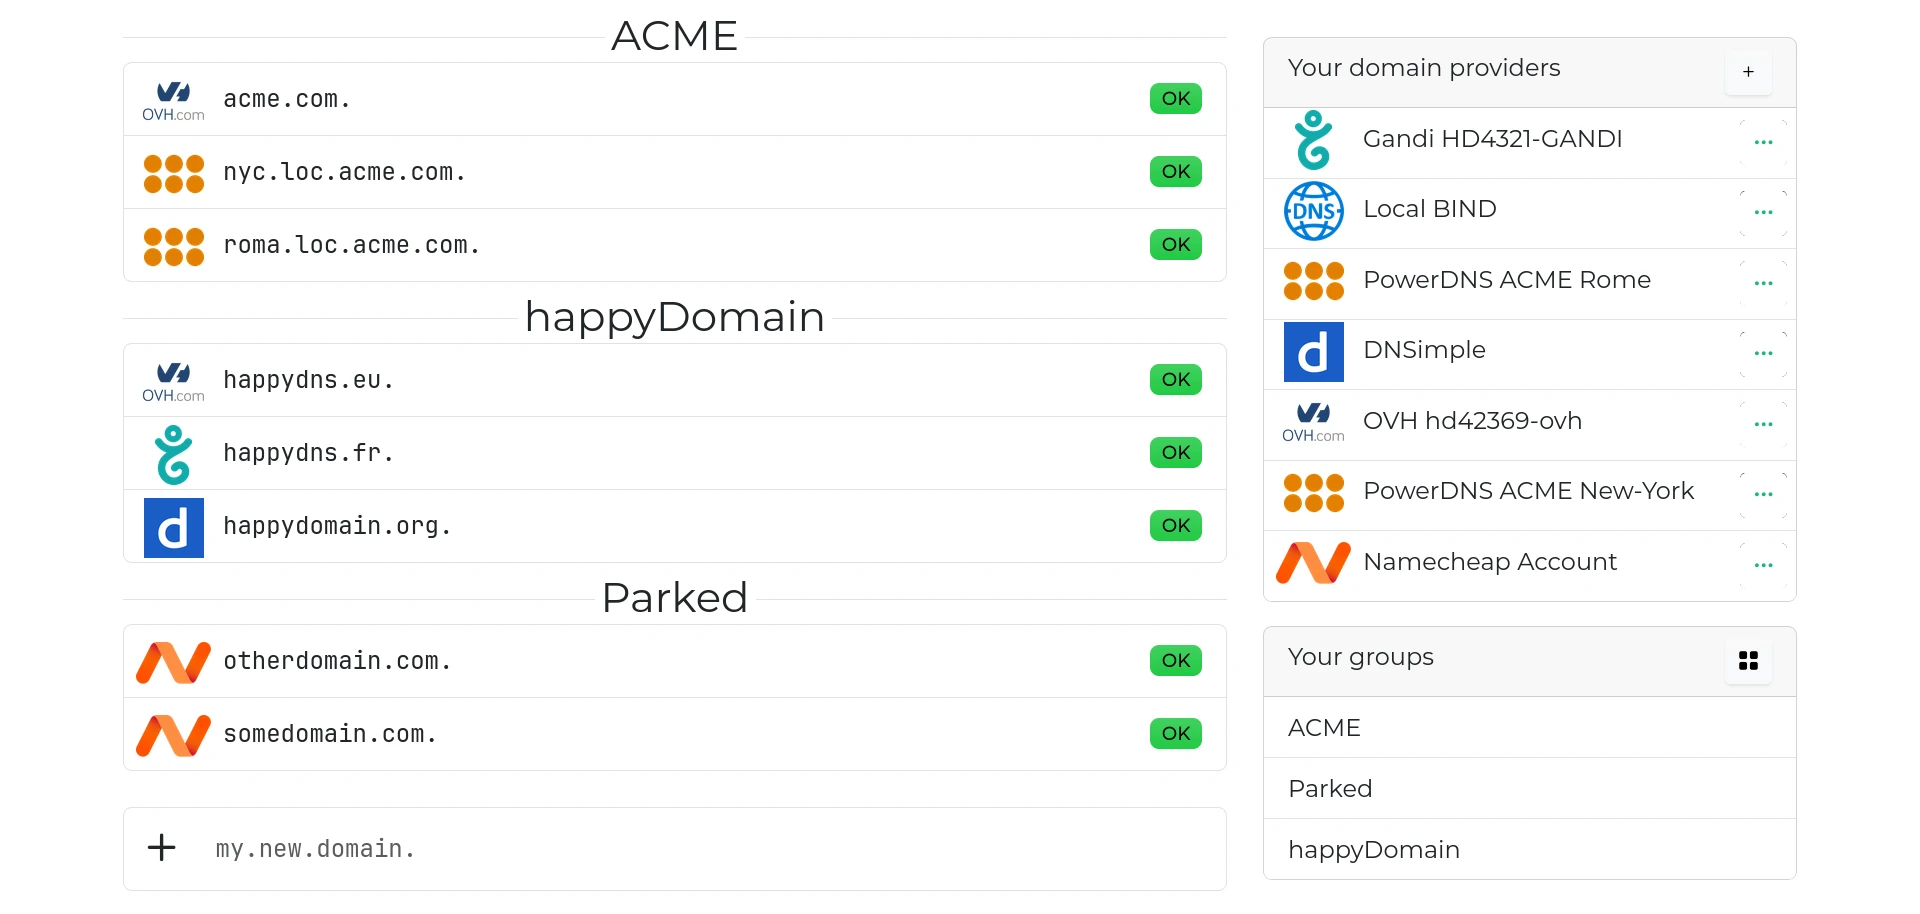
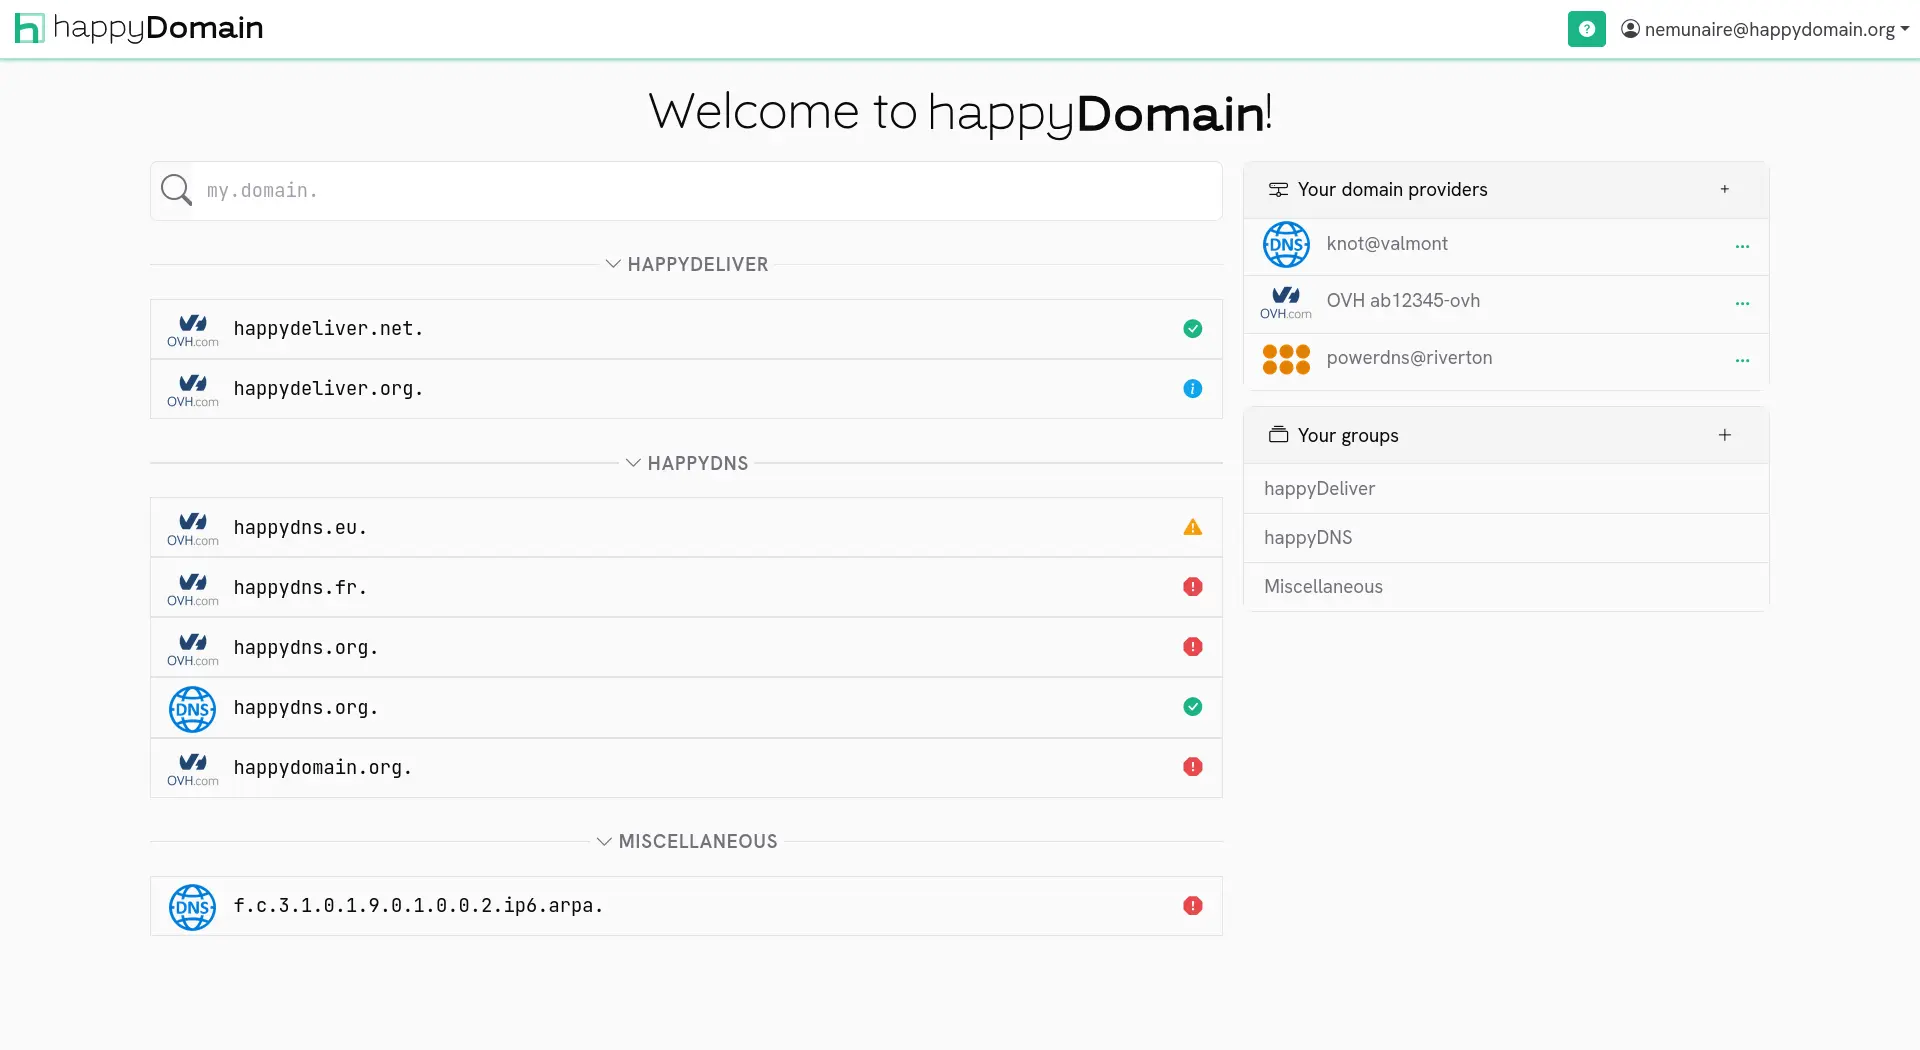
Your domains
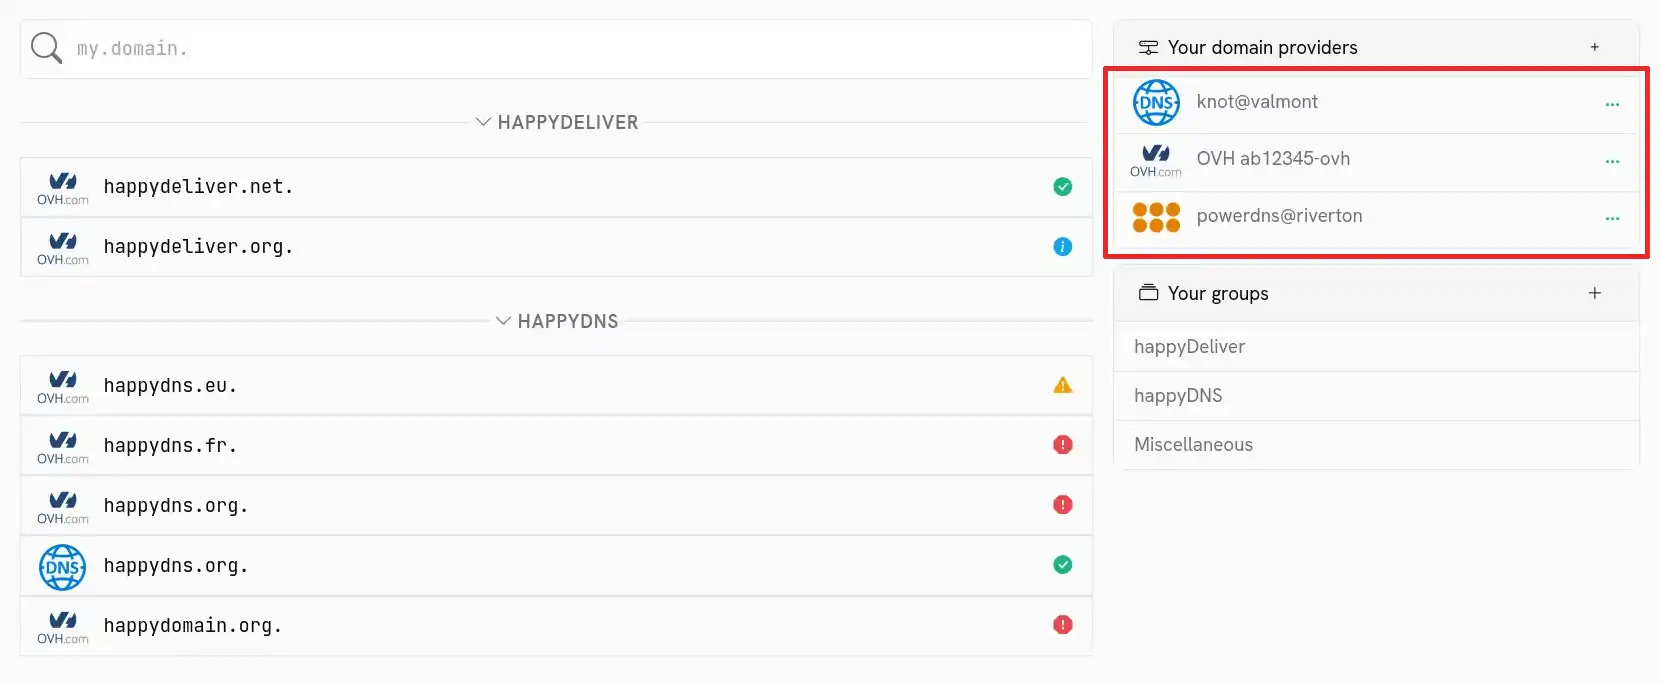
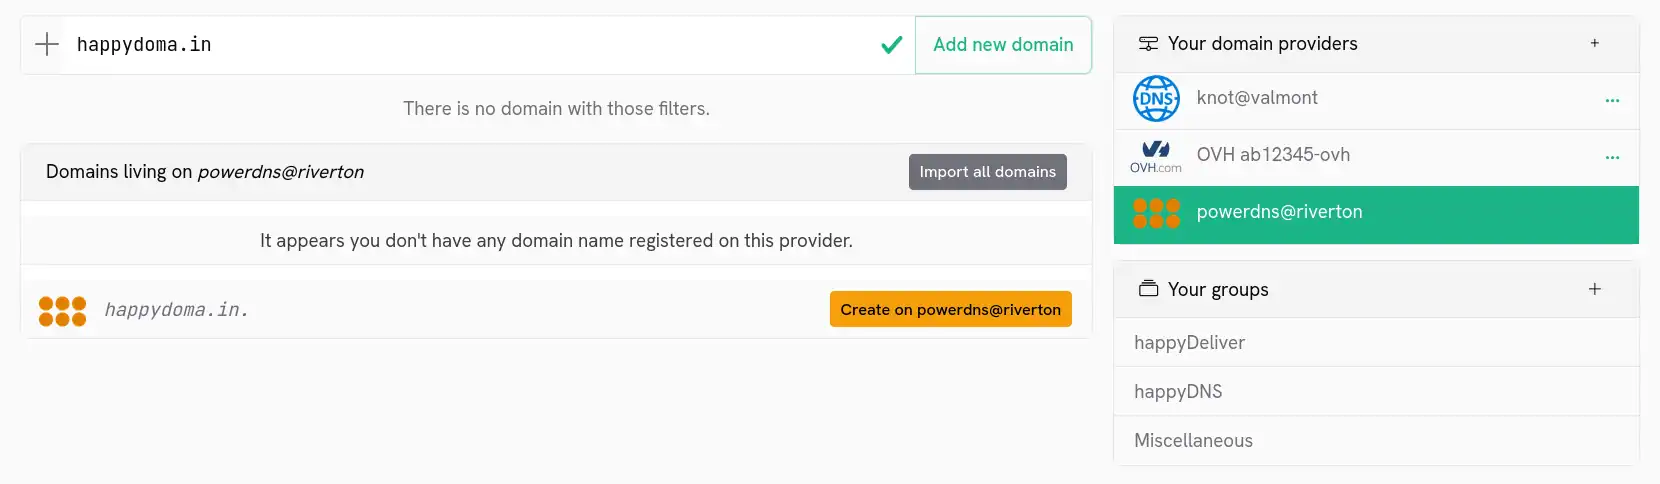
The home page presents the list of all the domains managed by happyDomain, whatever their host:
Click one of the domains to start make changes (add a sub-domain, add a service, …).
Your registries and domain hosts
On the right, you can see the list of the different hosting providers for your:
You can add new host by clicking on the + button in the table header.
Clicking on a row in this table will filter the list of domains to show only domains managed by this host.
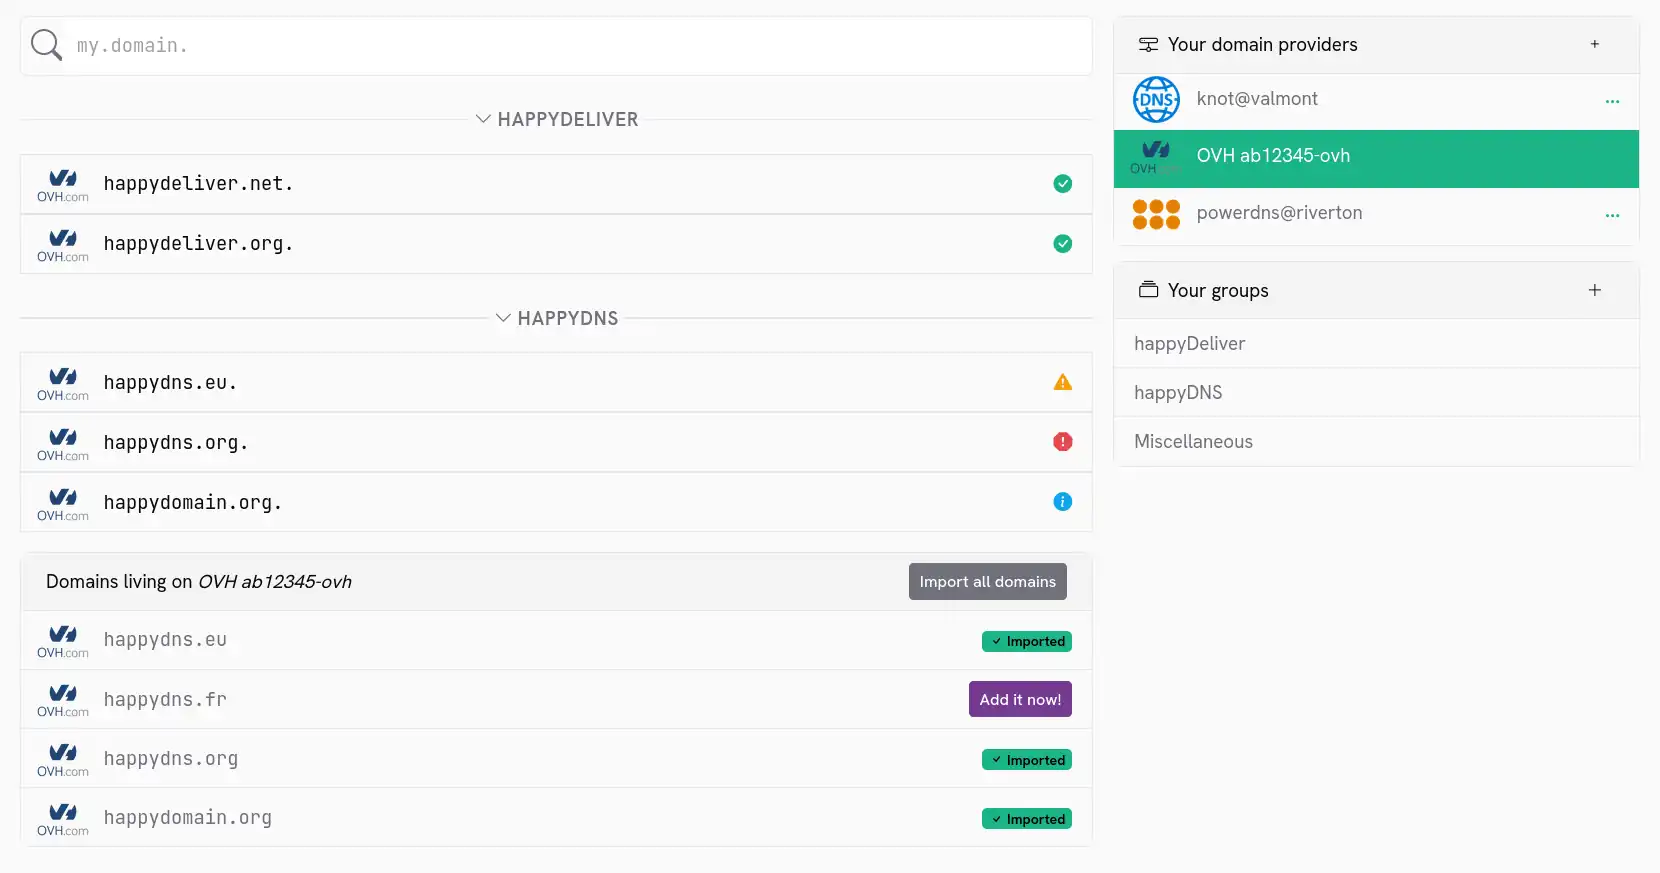
You will also see, if the host allows you to list the domains that belong to you, the domains that you can add to happyDomain:
To view the entire list again, simply click on the selected host again.
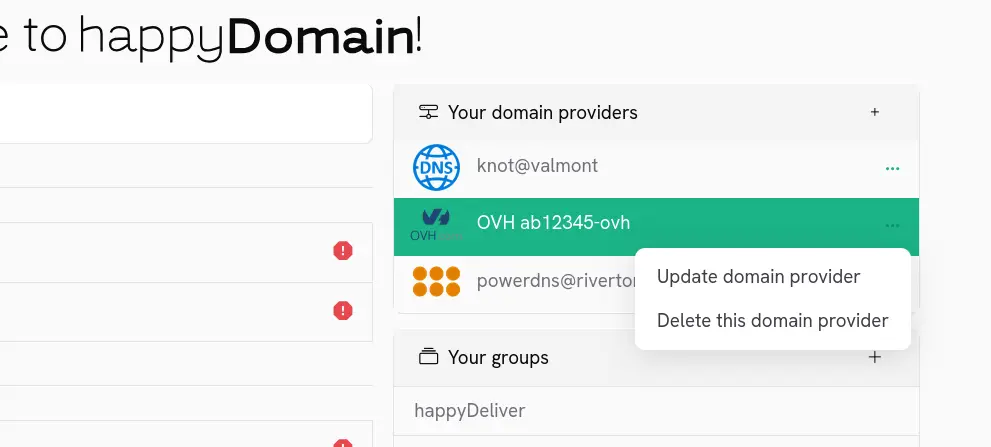
Modify or remove a host
If you find an error or no longer need a hosting provider, click on the … on the line of the host concerned. You will then be able to choose between update information or delete the host:
Note that you will not be able to remove the host as long as domains referring to it exist in the list on the left.
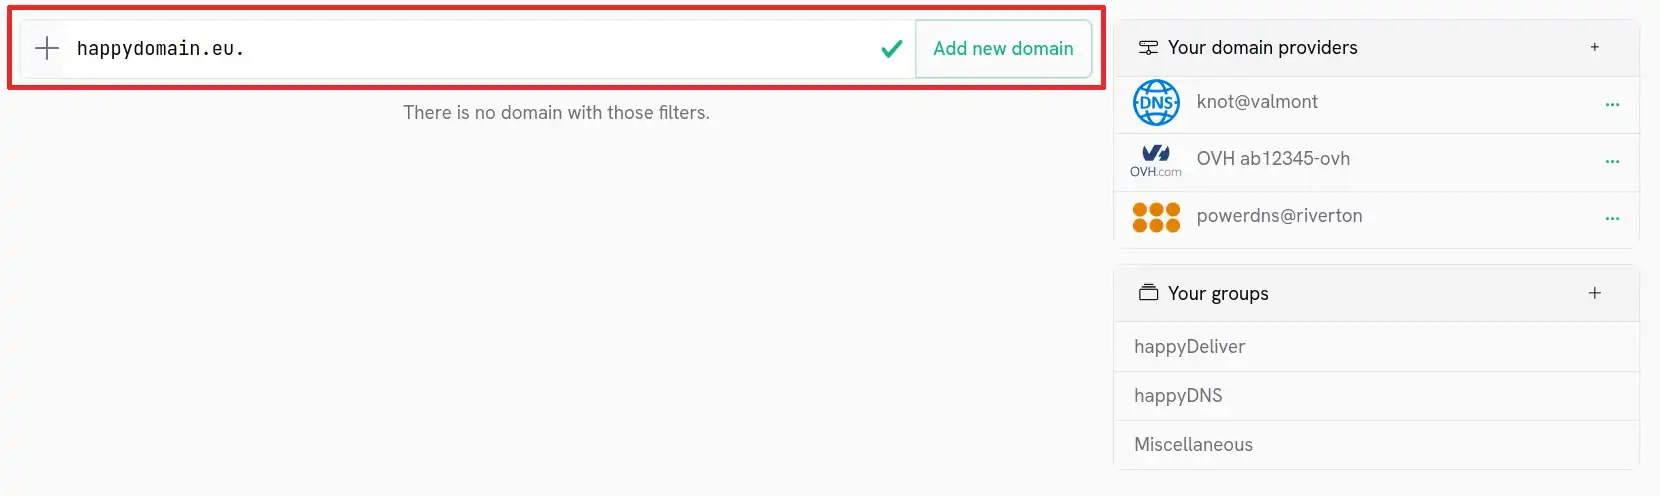
Add a domain
You have a new domain you want to manage in happyDomain? Start by entering its name in the field above the list. You will then be guided to the screen to choose the host.
Some DNS providers allows you to create a domain directly in their database, even if it was not already registered. First, you’ll need to select the right provider. You’ll see a dedicated “Create on” button.
Some providers could charge you for this action, so pay attention if this implies to realy buy the domain.
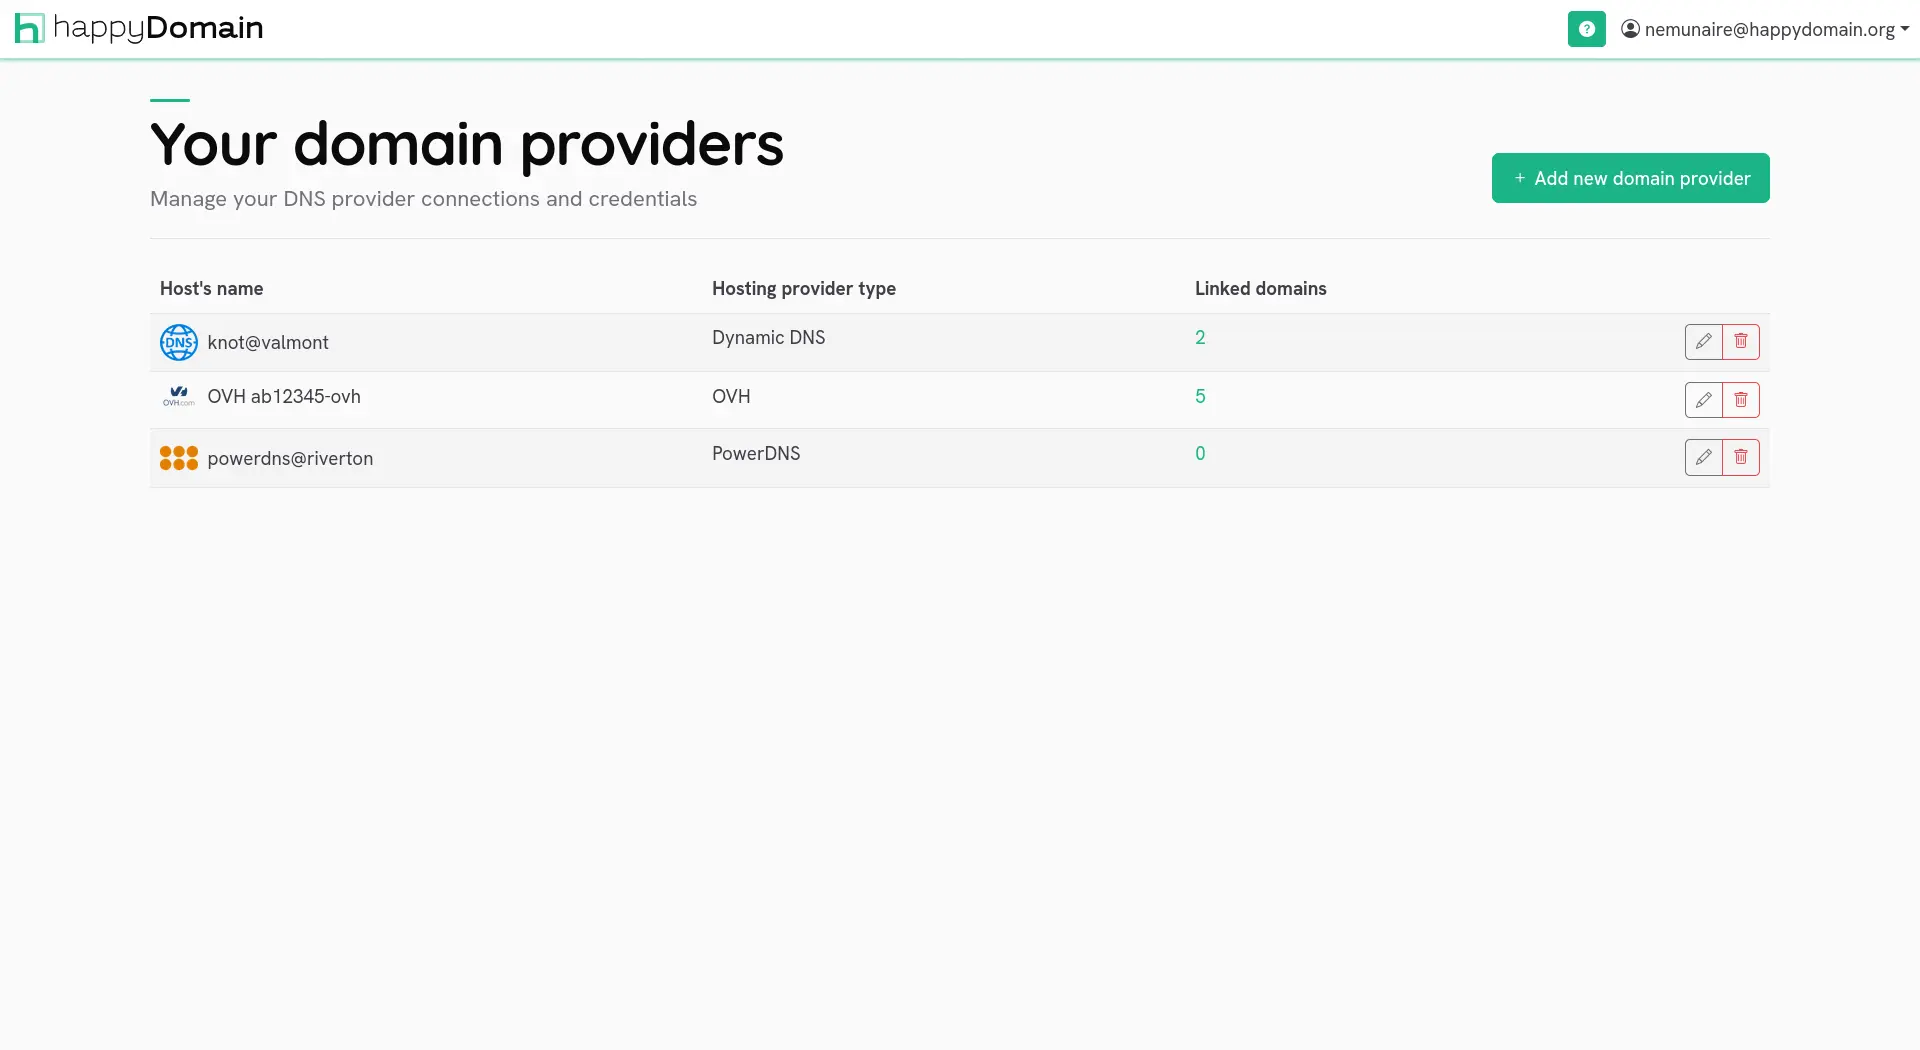
List your name providers
You can access this page by clicking on the the top menu link “The hosts of my domains”.
Your registries and domain hosts
This page shows only the list of registries and domain hosts you have added to your account, and allows you to add more.
You can add a new host by clicking on the “+” button at the top of the page.
By clicking on a row of the table, you will access the parameters used by happyDomain to contact this host.
This is where you’ll be able to modify the name you gave to this host, and where you’ll be able to modify the access parameters.
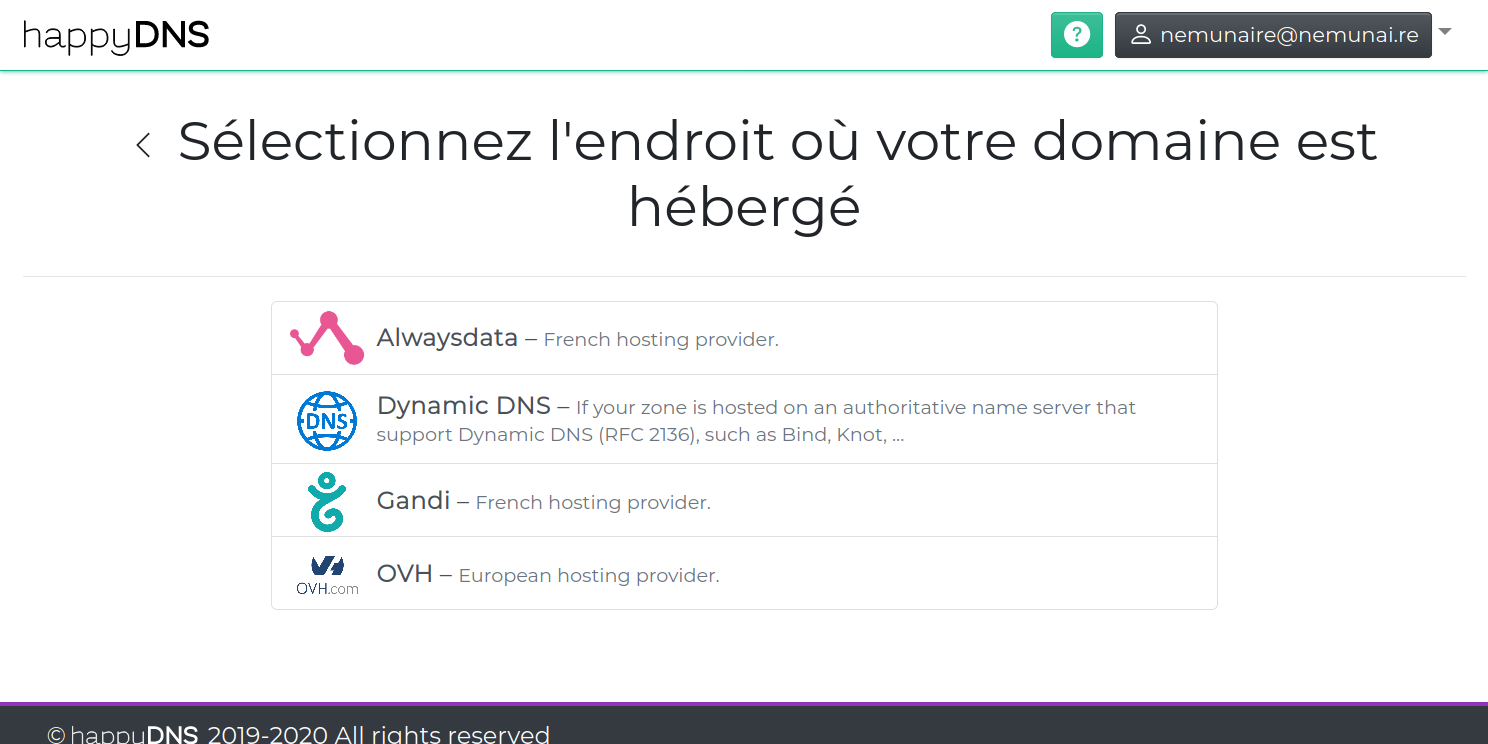
Add a provider
You access this screen by clicking on the “My domain providers” link in the top menu, then by clicking on the “+ Add a new domain host” button.
Compatible registries and domain hosts
When you want to add a domain, the first step is to determine at which host it is located.
In this screen, you will be asked to select the host among the list of compatible hosts where you have your:
More will be added later, if you can’t find yours, contact us!
Hosting provider settings
You access this screen either:
when you want to add a host, after having selected the provider,
when you want to change the connection settings between happyDomain and a host, for example on the home page.
Connection name
In order to find you among the different hosts, the first field you are asked for is a name.
This name will only be used to allow you to easily identify the host of your domain, if you have several.
Other fields
Each host needs different information to establish a connection with happyDomain.
Follow the instructions on each screen.
Provider features
Not every DNS provider supports the same set of capabilities. Some can list the domains in your account automatically, others handle only the most common record types, and a few support more specialised records such as CAA or TLSA. The Supported providers page presents this information as a single comparison table so you can pick the right provider, or understand why a given service is unavailable for one of your domains.
Reading the feature matrix
The page lists every provider happyDomain integrates with, one per row, with its logo and name. Each column corresponds to a capability, and the cell shows whether that provider supports it:
a green check mark means the capability is supported;
a red cross means it is not supported.
The table scrolls horizontally if it is wider than your screen, and the header row stays visible while you scroll, so you can always tell which capability each column refers to.
The capabilities
The matrix compares the following capabilities:
Column
Meaning
Supported providers
The provider can automatically list the domains in your account, so you can import them without typing each name. When unsupported, you add domains manually.
Common types
The provider supports the everyday record types (such as A, AAAA, MX, TXT, CNAME). This is what most domains need.
CAA
Support for CAA records, which declare the certificate authorities allowed to issue certificates for your domain.
OPENPGPKEY
Support for OPENPGPKEY records, used to publish OpenPGP public keys in DNS.
PTR
Support for PTR records, used mainly for reverse DNS (mapping an IP address back to a name).
SRV
Support for SRV records, which advertise the location of a service (port and host) for protocols that rely on them.
SSHFP
Support for SSHFP records, which publish SSH host key fingerprints in DNS.
TLSA
Support for TLSA records, used by DANE to bind a certificate to a name.
Why this matters
When you add a service to a subdomain, happyDomain only offers the service types your provider can actually publish. If a service you expect is greyed out, the feature matrix is the place to confirm whether the underlying record type is supported by that provider.
Choosing a provider
If you are still deciding where to host your DNS, use this page to make sure the provider you have in mind covers the record types you need. A provider that supports the Common types is enough for most websites and email setups; the specialised columns matter only if you rely on the corresponding features (DANE, reverse DNS, SSH fingerprints, and so on).
Once you have picked a provider, head over to add it to happyDomain.
Import a domain
Importing a domain into happyDomain does not make happyDomain the owner of your domain. This action does not involve any changes to your usual hosting provider. happyDomain will contact your hosting provider or server to check which services are currently registered.
You can see on this screen the different hosts you have already configured.
If your domain is part of one of the listed accounts, just click on it, it will be added automatically.
If you haven’t added the host yet, you can do it now by following the link “Add now!”.
Using the zone editor
The zone editor is the main screen for working with a domain. It presents the content of your zone grouped by subdomain, and lets you add, edit and delete the services and records that make up your zone, all without touching your hosting provider until you decide to publish changes.
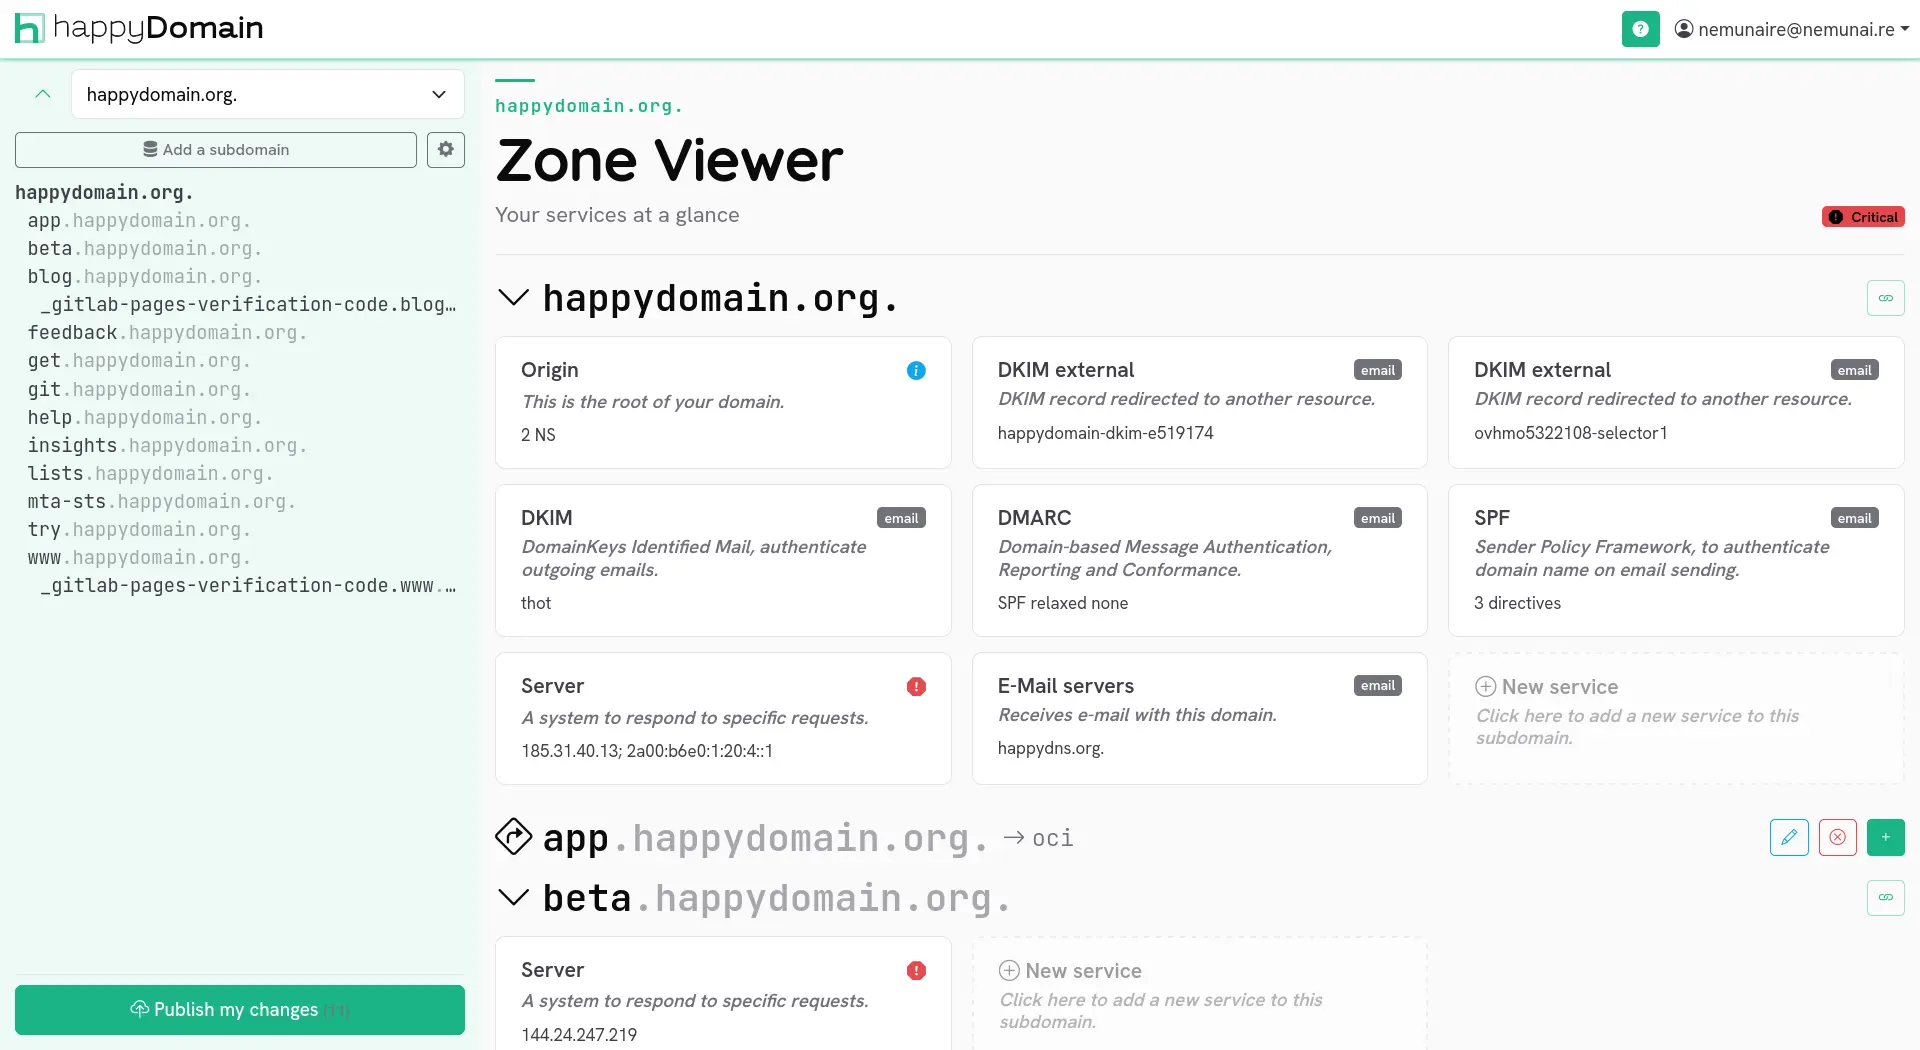
The editor layout
When you open a domain, the screen is split in two parts:
On the left, a sidebar lists every subdomain of the zone. It also gives access to domain-wide actions (history, audit log, checks, WHOIS, import/export, etc.).
On the right, the Zone Viewer displays the content of the zone, one block per subdomain.
At the very top of the sidebar you will find the Add a subdomain button and a gear menu grouping the other actions. The button used to send your changes to your provider (Publish my changes) is also reachable from here; see this page for details.
Nothing is sent automatically
Every change you make in the editor is kept locally in happyDomain. It is only transmitted to your hosting provider once you explicitly publish it.
Browsing the zone
The zone is organised by subdomain. The root of the domain is shown first (displayed with the bare domain name), followed by each subdomain. Intermediate subdomains that hold no service of their own are still shown, marked with a dotted icon, so you can always see the full tree.
Click a subdomain heading to expand or collapse it and reveal the services it contains.
When a block is collapsed, a badge shows how many services it holds; hover it to get a quick summary.
Use the sidebar to jump straight to a subdomain: it mirrors the list and scrolls the viewer to the matching block.
Aliases pointing to a subdomain are shown next to its heading with a + N aliases badge.
Records and services
happyDomain does not show you a raw list of DNS records by default. Instead, it groups related records into services, higher-level objects that are easier to reason about (a mail server, a website, a delegation, etc.). Each service expands into the actual records it generates.
If you prefer to work directly with individual records, you can switch the zone view mode in your account settings. The editor then offers an Add a record button instead of Add a service.
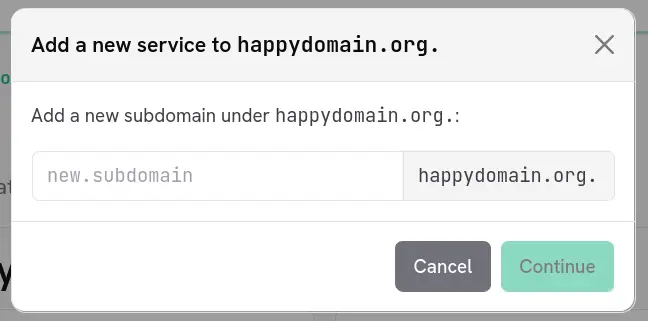
Adding a subdomain
Click Add a subdomain at the top of the sidebar.
Enter the name of the subdomain to create (relative to your domain).
happyDomain then proposes to add a first service on that subdomain right away.
A subdomain only really exists once it carries at least one service, so the two steps are chained together.
Adding a service
To add a service to an existing subdomain:
Locate the subdomain block (or the domain root) in the viewer.
Click the + button on the subdomain heading, or use the Add a service action.
Pick the service type from the selector. The list adapts to what already exists on that subdomain (for instance, you cannot add two conflicting services).
Fill in the form for the chosen service, then save.
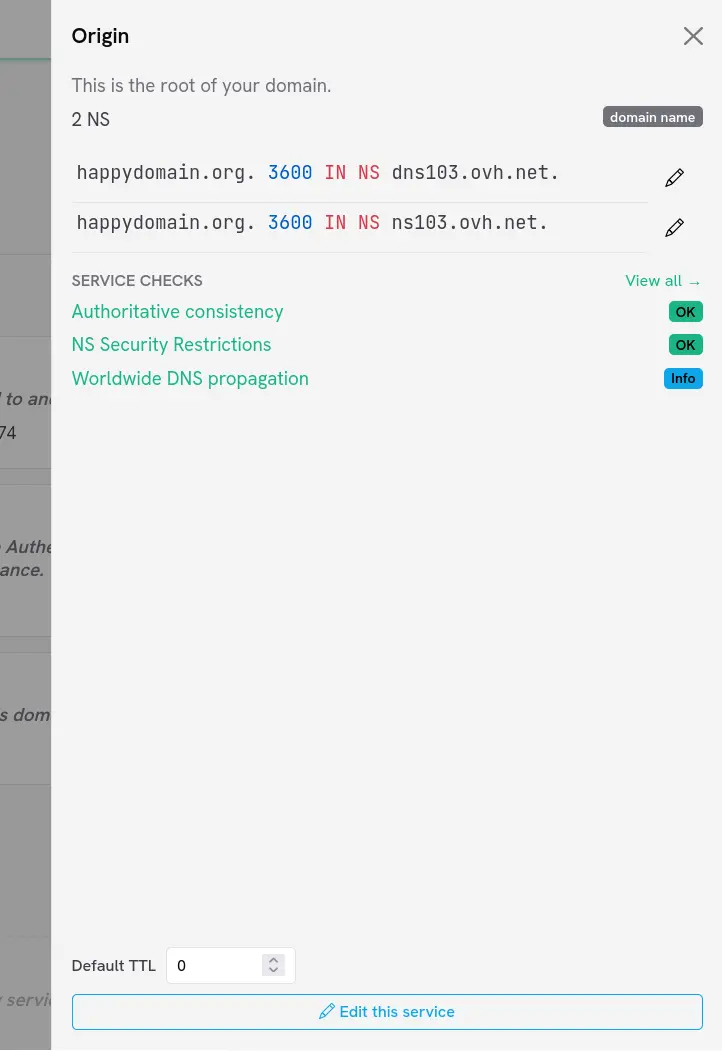
Inspecting a service
Click a service to open the details panel that slides in from the right. It shows:
A description of the service type and any comment you set.
The concrete DNS records the service produces.
The propagation status (when the change was last published).
Any health checks attached to that service (see /en/pages/checks/).
From this panel you can also adjust the default TTL of the service, edit it, or delete it.
Editing a service
Open the service details panel, then click Edit this service; or use the pencil button shown on simple services such as aliases.
happyDomain opens the full editing form for the service.
Make your changes and save. The viewer refreshes to reflect them.
Deleting a service
Open the service details panel.
Click Delete this service.
The service and all the records it generated are removed from your working copy of the zone.
Some services cannot be removed
The origin service of a zone (the one carrying the SOA and the authoritative name servers) is essential and cannot be deleted from the editor.
For aliases (CNAME) and reverse pointers (PTR), a dedicated delete button is available directly on the subdomain heading.
Aliases
When a subdomain holds services, you can attach an alias to it using the link button on its heading. The alias makes another name resolve to this subdomain.
Next steps
None of the above changes anything at your hosting provider yet. When you are happy with your edits:
Review what will change, then send the changes; see /en/pages/publish-changes/.
You can also re-import the live zone, or import/export it as a standard zone file: see /en/pages/import-export/.
Subdomains
A domain is rarely flat: it is made of a root (the apex, written @) and a hierarchy of subdomains such as www, mail, or blog.staging. happyDomain presents this hierarchy in a clear, navigable way so you can quickly find and manage each part of your zone.
The subdomain list
When you open a domain, the left sidebar shows the list of subdomains for the currently selected zone version. Each entry is displayed as a path relative to the domain, with the apex shown as the domain name itself.
The list behaves like a table of contents:
It is indented to reflect the hierarchy: a subdomain is shifted to the right according to its depth in the tree, so blog.staging appears nested under staging.
Clicking an entry scrolls the main panel to the corresponding subdomain.
As you scroll through the zone, the sidebar highlights the subdomain you are currently looking at and follows along automatically.
Intermediate levels that do not carry any service of their own are still shown, so the tree remains coherent and easy to read. (For reverse zones, only the actual entries are listed.)
Managing a subdomain
Each subdomain in the main panel groups the services attached to it. From there you can add, edit, or remove services. Adding a service to an existing subdomain is covered in detail in Services.
Creating a new subdomain path
To create a brand-new subdomain (one that does not exist yet in your zone), use the Add a subdomain action at the top of the sidebar.
1. Enter the subdomain name
A dialog opens asking for the new subdomain to create under your domain. Type the name relative to the domain: for example, enter www to create www.example.com, or blog.staging to create a nested path in one step.
The name is validated as you type. You only need to provide the part to the left of your domain name; happyDomain appends the domain for you.
Apex and nested paths
Leave the field empty (or use @) to target the domain apex itself. You can also create several levels at once by typing a dotted path such as a.b.c: the intermediate levels are created as needed.
2. Add a first service
Creating a subdomain only makes sense if it carries at least one service, so happyDomain chains directly into the service selector once you confirm the name. Pick the service type and fill in its form exactly as described in Services.
The new subdomain then appears in the sidebar and in the main panel, with the service you just added.
Changes are staged
Creating a subdomain and its service does not contact your DNS provider immediately. Like every other change, it is staged locally and only sent to your provider when you publish the zone. See the abstract view for how to review and apply your changes.
Other domain actions
Next to the Add a subdomain button, a menu gives access to domain-wide actions, including:
viewing or re-importing the zone, or uploading a zone file;
removing the domain from happyDomain.
Services
happyDomain does not ask you to think in terms of individual DNS records. Instead, it groups the records that belong together into a single, meaningful service: a mailbox, a website, a delegation, a CAA policy, and so on. This is the foundation of the abstract view of your zone.
What is a service?
A service is a higher-level object that hides the complexity of one or several DNS records behind a clear, purpose-driven form.
For example, instead of editing a raw MX record, a couple of A/AAAA records and an SPFTXT record separately, you fill in a single email service. happyDomain takes care of generating the right records, with the right names and the right syntax.
Each service belongs to a family:
Services (abstract): the recommended, human-friendly objects (email, website, CAA, delegation, …). They map to one or more records automatically.
Providers: services tied to a specific third party that publishes its own helper (for example a hosted service that needs a predefined set of records).
Raw DNS resources: a fallback that lets you add a single record (A, TXT, SRV, …) directly, when no abstract service fits your need.
Why services instead of records?
Working with services means you do not have to remember the exact record types, their order, or their syntax. happyDomain validates your input and generates valid DNS for you, which greatly reduces the risk of a misconfiguration.
The service view of a subdomain
When you open a domain, each subdomain is displayed as a list of the services attached to it. A subdomain can hold several services at once: for instance the apex (@) of a domain often carries an email service, a website service and a CAA policy together.
From this view you can:
Add a new service to the subdomain.
Edit an existing service to change its values.
Delete a service you no longer need.
All these changes are staged locally and only applied to your provider when you publish them. See the abstract view for how editing and propagation work.
Adding a service to a subdomain
To attach a new service, start from the subdomain where you want it (see Subdomains for navigating the zone), then follow these steps.
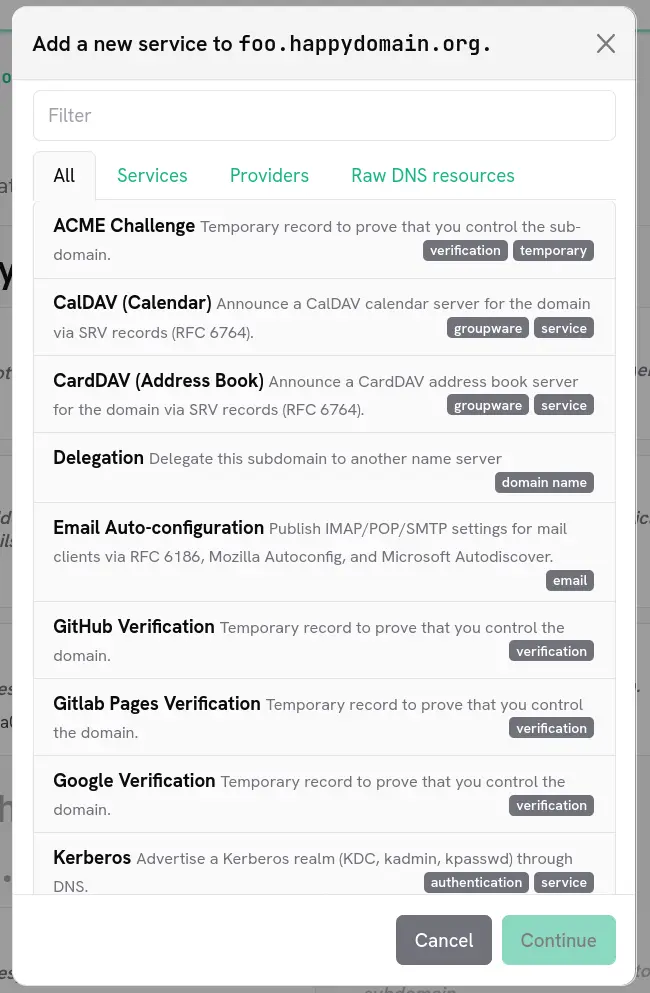
1. Open the service selector
Click the Add service action on the subdomain. A selector opens, listing every service type you can add.
The selector is organised in tabs so you can narrow down the list:
All: every available service type.
Services: the abstract, high-level services (recommended).
Providers: services specific to a provider.
Raw DNS resources: a single record type when you need full control.
You can also type in the search box at the top to filter the list by name. Pressing Enter selects the first available match.
Greyed-out entries
Some service types may appear disabled. This happens when the service cannot be added in the current context: for example because your DNS provider does not support the underlying record type, or because that service already exists on this subdomain and only one instance is allowed. Hover over a disabled entry to see the reason.
2. Choose the service type
Select the service that matches what you want to publish. happyDomain knows which record types your provider supports, so only the relevant choices are offered. To check what a given provider can handle, see the Provider features page.
3. Fill in the service form
happyDomain then presents a form tailored to the chosen service. Each field corresponds to a meaningful piece of information (a target host, a priority, a public key, a policy value, …) rather than to raw record syntax.
Fill in the fields, then confirm to add the service to the subdomain.
4. Review the generated records
Once the form is validated, happyDomain converts your input into the corresponding DNS records and adds them to the staged zone. You can review them in the abstract view before publishing your changes to your provider.
Trying services without an account
happyDomain also offers a public record generator where you can build and preview the DNS records produced by a service without signing in. Pick a service type, enter a domain name, fill in the form, and the generated zone-file entries are displayed instantly.
This is a handy way to discover how a given service maps to actual DNS records, or to grab a record you will paste elsewhere.
Publishing changes
When you make a change in happyDomain, it is not sent to your hosting provider straight away. Your edits accumulate in a working copy, and nothing reaches your provider until you decide to publish. Before that happens, happyDomain lets you review the exact list of changes that your edits produce, fine-tune what will be applied, and record a message for your history.
Opening the diff
In the zone editor, the Publish my changes button shows a small counter with the number of pending changes detected for your zone. Click it to open the review window.
happyDomain computes the difference between the zone as it currently lives at your provider and the working copy you have been editing. If everything is already in sync, you will simply see a message telling you there is nothing to apply.
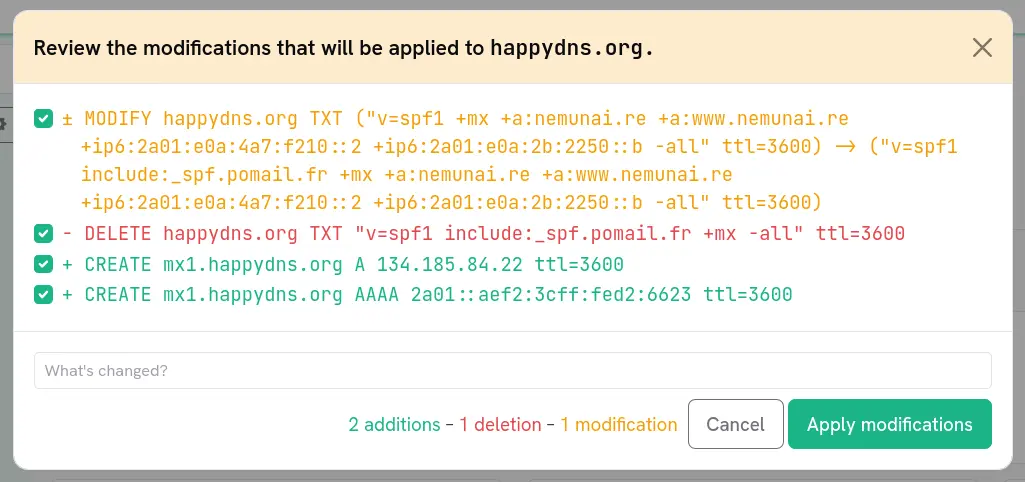
Understanding the diff
Each line of the diff describes one concrete correction, written in a human-readable form and colour-coded by its nature:
Colour
Meaning
Green
An addition (a record being created)
Red
A deletion (a record being removed)
Yellow
A modification (an existing record being changed)
Blue
Another kind of change (for example a reordering or provider-specific operation)
At the bottom of the window, a summary recaps how many additions, deletions and modifications are currently selected.
Selecting which changes to apply
Every line in the diff has a checkbox. By default the changes are listed for your review, and you decide which ones to keep:
Uncheck any change you do not want to apply right now. It stays in your working copy and will reappear next time.
Keep checked only the changes you are confident about.
This is useful when you have made several unrelated edits but only want to publish some of them, or when you want to roll out a sensitive change separately.
The summary and the apply button update live to reflect your current selection. If nothing is selected, the apply button stays disabled.
Writing a commit message
Before applying, enter a message in the What’s changed? field. This message is recorded in your history alongside the changes.
Describe the intent, not the IPs
The diff describes the technical operations, but your message is what makes your history readable later on. When you need to look back at what you did, “Move mail to a new provider” is far easier to understand than re-deriving meaning from a list of IP changes.
A confirmation step for safety
Depending on your account preferences, happyDomain may show an extra confirmation screen after you choose to apply:
It asks your provider to prepare the corrections, then shows you exactly how many operations the provider will actually run for your selection.
If that number differs from what you selected (for instance because a change was already applied, or the provider expands one change into several), a warning is displayed so you can double-check before confirming.
You can configure whether this confirmation appears always, never, or only when the prepared corrections do not match your selection.
After publishing
Once you confirm, happyDomain sends the selected changes to your provider and records the operation, with your message, in the domain’s log. From there you can review past deployments at any time, and roll back to an earlier state if needed; see /en/pages/domain-history/.
To inspect the resulting zone itself rather than the diff, or to keep a copy as a standard zone file, see /en/pages/import-export/.
View change history
Every time you publish changes with happyDomain, they are recorded in a log. This log allows you to easily retrieve the status of your domains as they were previously deployed, and to see when you made each change.
Opening the history
From your domain’s page, open the History entry in the menu. happyDomain displays every recorded version of the zone, from the most recent at the top to the oldest at the bottom.
To keep the list readable, versions are grouped by month. A heading marks the beginning of each month so you can quickly locate a change by its time period.
Reading a version
Each version is identified by the moment it was last modified, along with the avatar and email address of the author who made the change.
Three dates may be shown for a version:
Published on: when this version was deployed to your DNS provider. A version without this date was saved but never published.
Committed on: when the version was committed (saved as a definitive state of the zone).
Modified on: when the version was last edited.
If a message was attached when the changes were published, it appears below the dates, much like a commit message in version control.
Viewing the zone at a given time
To inspect the full content of the zone as it was for a given version, click the eye button next to its date. happyDomain opens that version in read-only mode, so you can browse all the records exactly as they were at that moment.
Comparing two versions
Under each version (except the oldest one), the View differences section lets you compare it with the version that immediately precedes it.
Expand the section to reveal the changes: added records, deleted records, and modified records are highlighted, so you can see at a glance what each publication changed. The most recent comparison is expanded automatically when you open the page.
No history yet?
A domain only builds up a history once you start publishing changes to it. If you have just imported a domain, its history will fill in as you make and publish your first modifications.
Importing and exporting a zone
happyDomain can exchange your zone with the rest of the DNS world using the standard zone file format (the well-known BIND format). You can import a zone file to populate your working copy, and export the current zone to read it, copy it, or keep it elsewhere.
These actions are available from the gear menu at the top of the zone editor sidebar.
Re-importing the live zone
Before working with files, it is worth knowing that you can always pull the current zone back from your provider. In the gear menu, choose Retrieve the current zone.
This contacts your hosting provider, reads the zone as it stands right now, and refreshes your working copy from it. Use it when the zone may have been changed outside happyDomain, or to start again from a clean state.
This replaces unpublished edits
Re-importing the live zone fetches the provider’s version. Any local change you had not yet published may be superseded, so review your pending changes first (see /en/pages/publish-changes/) if you want to keep them.
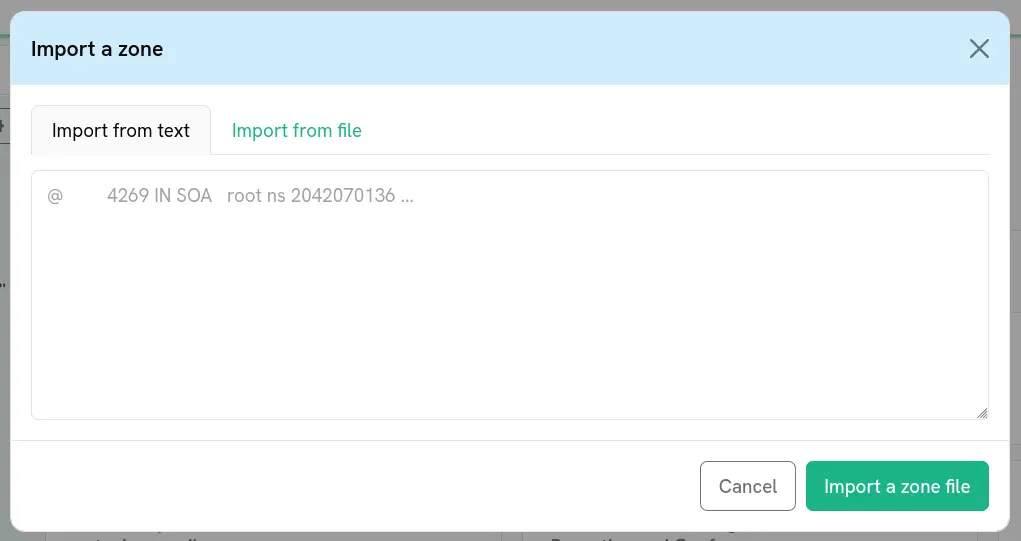
Importing a zone file
To load a zone from a standard zone file:
Open the gear menu in the sidebar and choose the upload / import a zone action.
A dialog opens with two tabs:
From text – paste the content of a zone file directly into the text area.
From a zone file – select a file from your computer.
Click the upload button to send it.
happyDomain parses the zone file, recognises the records, and groups them back into services in your working copy. As with every other edit, the imported content stays local until you publish it.
Standard format
The expected format is the standard textual zone file, the same one BIND and most DNS tools use. A line such as @ 4269 IN SOA root ns 2042070136 ... is a typical example of what you can paste.
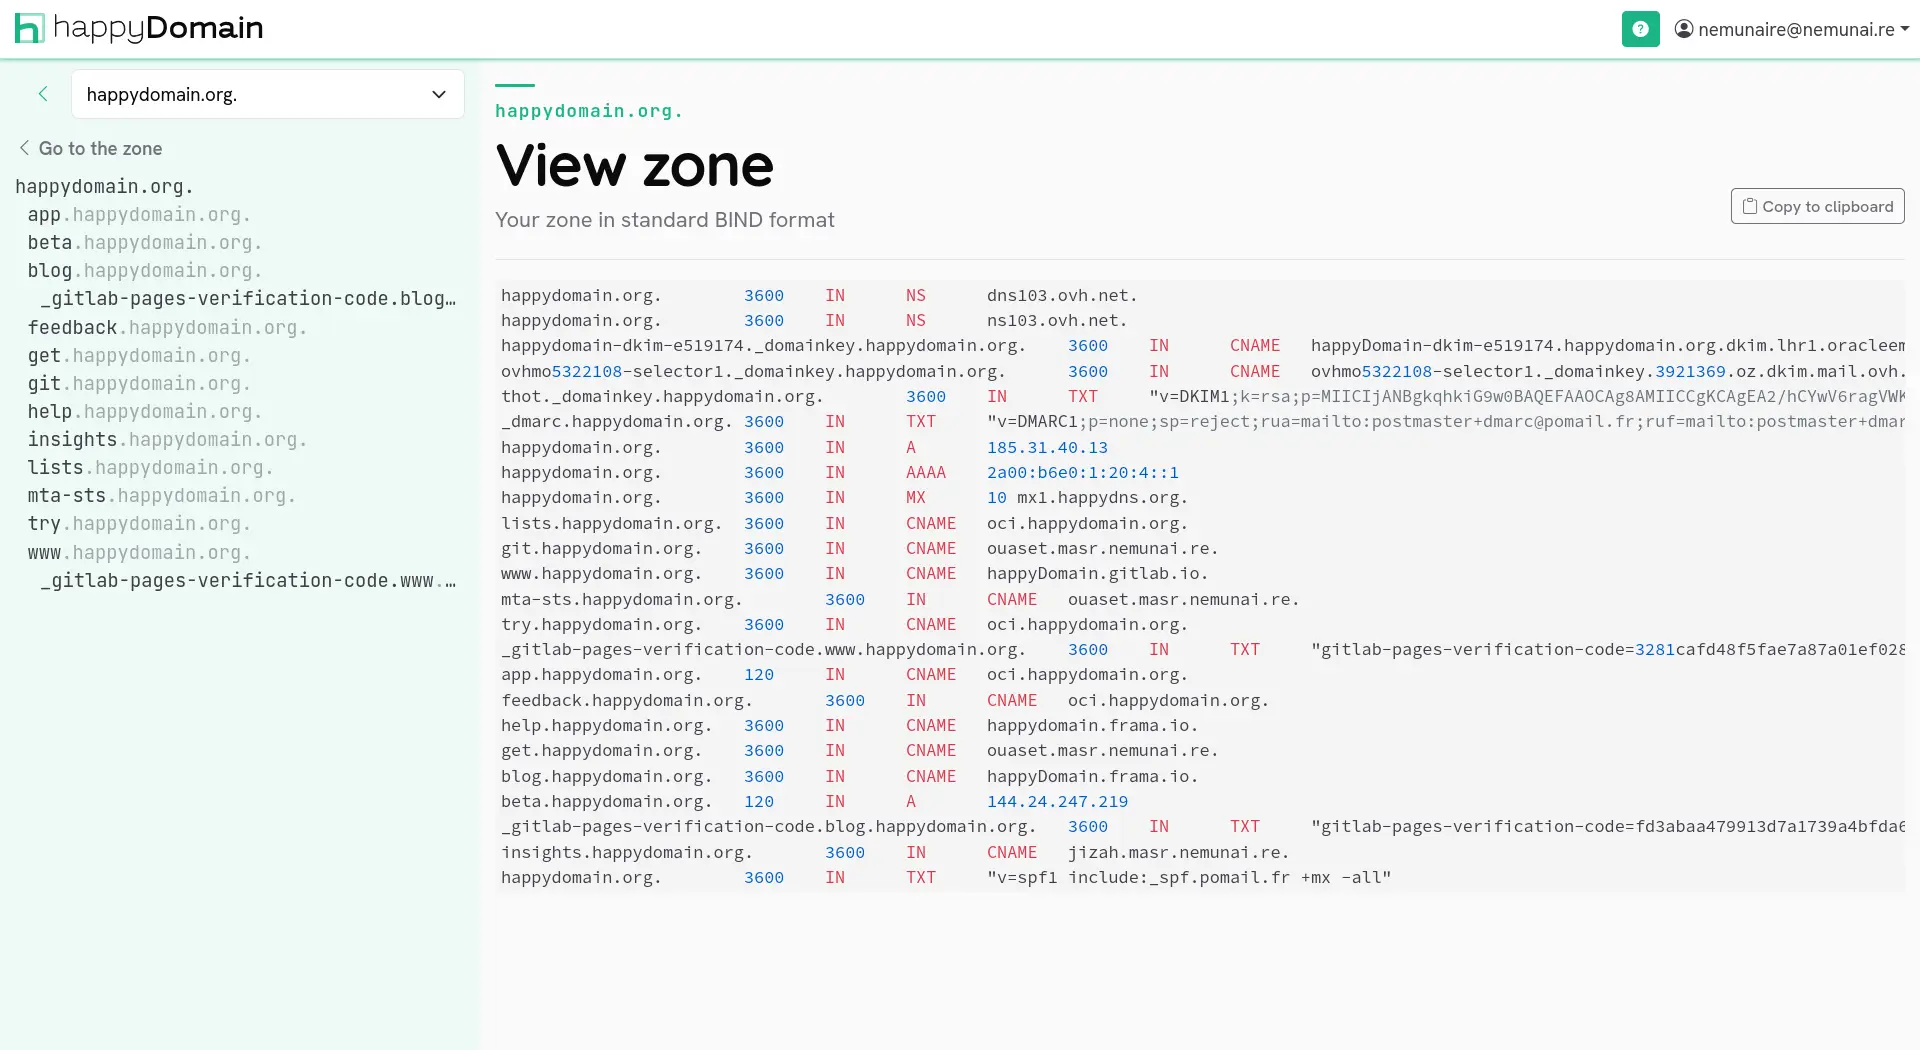
Exporting / viewing the zone
To obtain your zone as a standard zone file:
Open the gear menu and choose View my zone.
happyDomain renders the current zone in standard BIND format, with syntax highlighting.
Use the Copy to clipboard button to grab the whole file in one click.
This view always reflects the zone you are currently looking at. If you are browsing a past version from the /en/pages/domain-history/, the export shows that historical version, which is handy for comparing or restoring an earlier state.
Typical workflows
Migrating from another tool: export the zone from your previous tool as a zone file, then import it here with From a zone file.
Keeping a backup: open View my zone and copy the content somewhere safe.
Bulk editing: export, edit the file in your favourite editor, then re-import the result.
After importing
Importing only changes your working copy. To make it effective at your provider:
Review the resulting diff and publish the changes (see /en/pages/publish-changes/).
Monitoring & Checks
happyDomain includes a built-in monitoring system that lets you run automated health checks on your domains and services. Checkers periodically collect data (such as ping response times, domain expiry dates, or DNS audit results), evaluate it against thresholds you define, and report a clear status: OK, Warning, Critical, or Error.
Browsing available checkers
You can see all available checkers by navigating to the Checkers page from the main menu.
Each checker is labelled with the scope it applies to:
Domain-level: checks that concern the domain itself, independent of DNS records (e.g. domain expiry via WHOIS).
Zone-level: checks that need the full zone content (e.g. DNSSEC validation).
Service-level: checks that target a specific service on a subdomain (e.g. ping, HTTP check).
Use the search bar to filter checkers by name. Click on a checker to see its description and configuration options.
Configuring a checker for your domain
To set up a checker on one of your domains:
Go to your domain’s page and open the Checks tab.
You will see a table of checkers available for this domain. Click Configure next to the checker you want to set up.
On the configuration page, you will find several sections:
Checker options
Options are grouped by category:
Admin Options – system-wide settings controlled by the administrator (read-only for regular users).
Configuration – user-level preferences such as warning and critical thresholds. These are the main settings you will adjust.
Domain-specific Settings – values automatically filled in based on the domain being checked (e.g. the domain name itself).
Fill in or adjust the options to match your needs, then click Save.
Rules
Each checker comes with one or more rules that evaluate different aspects of the collected data. For example, a ping checker might have separate rules for latency and packet loss.
You can enable or disable individual rules using the toggle switches. Each rule may also have its own specific options that you can configure.
Scheduling automatic checks
Once a checker is configured, you can schedule it to run automatically at a regular interval.
In the Schedule section of the checker configuration page:
Toggle Run automatically to enable scheduling.
Set the Check interval (in hours) – this determines how often the check runs.
The Next scheduled run time is displayed so you know when the next execution will happen.
Click Save to apply the schedule.
Interval limits
Each checker defines minimum and maximum intervals to prevent overloading external services. The interface will respect these bounds when you configure the schedule.
When scheduling is disabled, the checker can still be run manually at any time.
Running a check manually
You can trigger a check at any time without waiting for the schedule:
Navigate to the checker’s Executions page (from the domain checks list, click View Results).
Click Run Check Now.
A dialog opens where you can:
Select which rules to run for this execution.
Override options temporarily (these overrides are not saved).
Click Run Check to start the execution.
A confirmation message will appear with the execution ID. The result will show up in the executions list once the check completes.
Viewing check results
All past executions are listed on the checker’s Executions page, accessible from your domain’s Checks tab by clicking View Results.
The executions table shows:
Column
Description
Executed at
When the check ran
Status
The result: OK, Warning, Critical, Error, or Unknown
Message
A summary of the findings
Duration
How long the check took to complete
Type
Whether it was a scheduled or manual run
Click View on any execution to see its detailed results.
Understanding execution details
The execution detail page presents the results in the most appropriate format depending on what the checker provides.
Metrics
When a checker produces metrics (e.g. response time, packet loss percentage), the detail page shows:
A line chart plotting the metric values over time across recent executions.
A data table listing each metric with its name, value, and unit.
HTML reports
Some checkers generate rich HTML reports (e.g. detailed DNS audit results). These are rendered directly in the page.
Raw data
You can always switch to the Raw JSON view to inspect the full observation data collected during the execution. Use the view toggle at the top of the report section to switch between Metrics, HTML Report, and Raw JSON.
Rule evaluations
Each rule that ran during the execution reports its own status and message. You can see the per-rule breakdown to understand which specific aspect triggered a warning or critical status.
Service-level checks
Checkers that apply at the service level are configured from the service’s own page rather than the domain-level Checks tab.
Navigate to your domain, then to the specific subdomain and service.
Open the Checks tab for that service.
The workflow is the same as for domain-level checkers: configure options, set up scheduling, run checks, and view results.
Service-level checkers automatically receive information about the service they are attached to (such as IP addresses from a Server service), so they require less manual configuration.
Managing check results
From the executions list, you can:
Delete a single result by clicking the delete action on a specific execution.
Delete all results for a checker using the bulk delete option (a confirmation dialog will appear).
This can be useful to clean up old data or reset after configuration changes.
Status reference
Checkers report one of the following statuses, in order of severity:
Status
Meaning
OK
Everything is within acceptable parameters
Info
Informational finding, no action needed
Warning
A threshold is approaching; attention recommended
Critical
A threshold has been exceeded; action required
Error
The check itself failed (collection error, bad configuration)
Unknown
The check could not determine a result
Domain availability & lookups
happyDomain bundles a few diagnostic tools that work on any domain name, whether or not you manage it in happyDomain. They let you check if a name is available for registration, look up its registration details (WHOIS), and query its DNS records directly (resolver).
Availability checker
The Availability page lets you keep an eye on one or more domain names you would like to register, and be told as soon as one becomes available.
Watching a domain
To start watching a name:
Type the domain you are interested in (for example mydomain.example) in the input at the top of the page.
Click Add.
The name is added to your watch list and an immediate check is launched in the background, so you do not have to wait for the next automatic check to see its current state.
Reading the status
Each watched domain shows a badge reflecting the result of the last check:
Badge
Meaning
Available
The name appears to be free and can probably be registered.
Registered
The name is already taken.
(error message)
The check could not be completed (for example the extension is unsupported, or the registry could not be reached).
Never checked
No result is available yet.
The time of the last check is displayed next to the status.
Rechecking and removing
Click Check now next to a domain to trigger a fresh check immediately. A spinner is shown while the check runs in the background, and the status updates automatically once it finishes.
Click the trash icon to stop watching a domain. A confirmation is asked before removal.
Availability is a best effort
The availability result is only an indication. Some extensions cannot be checked reliably, and a name that appears free may still be reserved or blocked at registration time. Always confirm with a registrar before counting on a name.
WHOIS lookup
The WHOIS tool shows the public registration information of a domain: its registrar, important dates and current status.
Enter a domain name and run the lookup. happyDomain then displays a clear summary of the collected information:
Status: the registration statuses returned for the domain (for example active, clientTransferProhibited, a hold state, etc.), shown as colour-coded badges.
Creation date and Expiration date: when the domain was first registered and when its registration is due to expire. The expiration is accompanied by a progress bar and a countdown, which turns orange then red as the date approaches.
Registrar: the company through which the domain is registered, with a link to its website when available.
Nameservers: the authoritative nameservers declared for the domain.
If the name is not registered, a message tells you the domain was not found. If the lookup itself fails, the error is shown.
WHOIS and the availability checker
The availability checker relies on the same underlying registration data as the WHOIS lookup. If you want the full registration picture for a name, use the WHOIS tool; if you simply want to know whether a name is free (and be notified later), add it to your availability watch list.
DNS resolver
The DNS resolver lets you query the live DNS of any domain, exactly as it is published on the Internet right now. This is handy to confirm that a change has propagated, or to inspect a domain you do not manage.
Enter a domain name and run the query. By default, every record type is requested (ANY). Open the Advanced options to refine the query:
Field (record type): restrict the query to a single record type (A, AAAA, MX, TXT, etc.).
Resolver: choose which DNS resolver to send the query to. Several well-known public resolvers are offered, and you can pick Custom to enter the address of any resolver you want to test against.
Show DNSSEC records: include the DNSSEC-related records (RRSIG, NSEC, NSEC3) in the results, which are hidden by default.
If you manage domains in happyDomain, their names are suggested as you type the domain to query.
Results are grouped by record type, and each entry shows its fields together with its TTL. When the domain exists but has no record of the requested type, a message says so explicitly.
Resolver vs. your zone in happyDomain
The resolver shows what is currently published by the authoritative servers, which may differ from a draft zone you are editing in happyDomain until you publish your changes.
Test a domain
Please, help us to write this Documentation page
Your account and settings
happyDomain lets you manage your account and tailor how the interface behaves. Your preferences are saved with your account, so you find them again on every device you connect from.
You reach this page from the My Account link in the top menu. Each option is described below.
Language
Choose the language used throughout the interface. The list contains every language currently available in your happyDomain instance. Changing it takes effect as soon as you save.
Field hints
Form fields often come with a short help text. This setting controls how that help is displayed:
Hide – no help text is shown.
Tooltip near field – the help appears as a tooltip when you hover the field.
Under field when focused – the help appears below the field, but only while you are editing it.
Under field, always – the help is permanently displayed below each field.
Pick the level of guidance that suits your familiarity with DNS.
Confirmation before applying
When you publish changes to your DNS provider, happyDomain can show a confirmation step beforehand. This setting decides when:
Ask on unexpected differences – the confirmation appears only when the changes differ from what was expected.
Always ask – a confirmation is always shown before applying.
Never ask, overwrite on publish – changes are applied directly, without a confirmation step.
Grid view (easiest) – the most visual and approachable layout.
List view (fastest) – a compact list, quicker to scan.
List with records (advanced) – a list that also exposes the underlying DNS records, for advanced users.
Show DNS record types
This switch shows the resource record type (A, MX, CNAME, etc.) associated with each service. It is meant for users who are already familiar with DNS and want to see the technical record types behind the friendly service names.
Newsletter
The option to receive news about future improvements is proposed when you create your account. To change your subscription afterwards, refer to the unsubscribe link included in the messages you receive.
Saving
When your preferences are set, click Save settings. A confirmation message appears and the new settings take effect immediately, including a language change if you made one.
Change password
A dedicated part of the page lets you change the password of your account.
Change account email address
It is currently not possible to change the email address of your account. We invite you to contact us if you wish to change it.
Delete your account
The last part of the page allows you to delete your happyDomain account.
Once the deletion is validated, your account will no longer be accessible and all data belonging to you will be deleted shortly after, during a regular database cleanup.
From the moment you delete your account, your domains will continue to respond according to the last update you made on happyDomain. The deletion will not affect the distributed data.
Sessions & API access
happyDomain does not have a separate “API keys” feature. Instead, every way of accessing the platform, whether through the web interface or the REST API, relies on the same kind of session token. Managing your sessions therefore also means managing your API access.
You manage your sessions from the security section of your account, under Active Sessions.
Listing your active sessions
The list shows every session currently open on your account. For each one you see:
its description (the name given when it was created), followed by a short fingerprint derived from the token;
a current session badge on the session you are using right now;
when it was created, when it was last used, and when it expires.
Sessions are sorted with the most recently used first.
Creating a token for API access
To obtain a token you can use to call the API:
Click Create API key.
Give the session a description (for example the name of the script or machine that will use it). This helps you recognise it later in the list.
Validate the creation.
The token secret is then displayed once. Use the eye button to reveal it and the copy button to put it on your clipboard.
Copy the secret immediately
The session secret is shown only at creation time and is never displayed again. Copy it and store it somewhere safe before closing the dialog. If you lose it, delete the session and create a new one.
Using a token with the REST API
The token is passed in the HTTP Authorization header as a Bearer token. For example, to list your domains:
Replace YOUR_SECRET_TOKEN with the secret you copied, and the host with the address of your happyDomain instance. Any API endpoint is reached the same way, by sending this header with each request.
Revoking a session
To revoke a session (and the token associated with it), click the delete button on its row. The token stops working immediately. You cannot delete the session you are currently using from this list; to end it, simply log out, or use the option below.
Terminate all sessions
The Terminate all sessions button closes every session at once, including the one you are using. This is useful if you suspect a token has leaked: all existing tokens become invalid and you are sent back to the login page. You will then need to log in again and recreate any API tokens you still need.
Notifications
happyDomain can notify you when something changes on your domains. Notifications are driven by the monitoring & checks system: whenever a checker changes status (for example from OK to Warning, or back to OK after a problem), happyDomain can deliver an alert to the channels you have configured.
You manage notifications from the Notifications page in your account settings. It is organised into three tabs: Channels, Preferences and History.
What triggers a notification
Notifications are tied to your checkers. happyDomain watches the status reported by each check and sends a notification when:
a check degrades to (or beyond) a severity you care about, for example reaching Warning, Critical or Error;
a check recovers, returning to a healthy state, if you have asked to be notified of recoveries.
Each notification therefore describes a status transition (the previous status and the new status) for a given target. Which transitions reach you, and through which channels, is entirely controlled by your preferences (see below).
Channels
A channel is a destination where notifications are sent. Open the Channels tab to manage them.
To add one, click Add, choose a Type, give it a Name (so you can recognise it later) and fill in the type-specific fields. A channel can be enabled or disabled with a switch without deleting it.
happyDomain offers the following channel types out of the box:
Email
Sends notifications to an email address.
Email address: the recipient. If left empty, the notification is sent to your account’s email address.
Webhook
Sends an HTTP request to a URL of your choice, which is useful to integrate happyDomain with chat tools, automation platforms or your own services.
Webhook URL (required): the endpoint that will receive the notification.
Webhook headers: optional custom HTTP headers (name/value pairs) to add to the request, for example an authorization header.
Webhook secret: an optional secret used to sign the request so the receiver can verify it really comes from happyDomain.
UnifiedPush
Delivers push notifications to your devices through a UnifiedPush distributor.
UnifiedPush endpoint (required): the endpoint URL provided by your UnifiedPush application.
Other channel types
The list of available types depends on what the instance administrator has enabled. For types that happyDomain does not provide a dedicated form for, the editor falls back to a raw JSON configuration field.
Testing a channel
Once a channel is created and enabled, use the send/test button next to it to deliver a test notification. This confirms the configuration works before relying on it for real alerts.
Preferences
Channels say where notifications go; preferences say what gets sent and when. Open the Preferences tab and click Add to create a rule.
A preference combines the following settings:
Scope
Choose how broadly the rule applies:
Global: applies to all your domains and services.
Domain: applies to a single domain you select.
Service: applies to a specific service (you select the domain and provide the service identifier).
Channels
Select one or more of your configured channels to receive the notifications matching this preference. If you have no channels yet, create one first in the Channels tab.
Minimum status
Pick the lowest severity that should trigger a notification. The available levels, in increasing severity, are OK, Info, Warning, Critical and Error. Only status changes that reach this level (or higher) are notified. For example, choosing Warning means you are alerted on Warning, Critical and Error, but not on purely informational changes.
Notify on recovery
When enabled, you also receive a notification when a previously degraded check returns to a healthy state, so you know when a problem has been resolved.
Quiet hours
Optionally define a period during which notifications are held back, for instance overnight. Set a start hour and an end hour (0 to 23). When quiet hours are active, alerts raised within that window are not sent immediately.
Enabled
Each preference can be turned on or off with a switch, letting you temporarily suspend a rule without deleting it.
Start simple
A common setup is a single Global preference, pointing at one channel, with a minimum status of Warning and recovery notifications enabled. You can later add more specific per-domain or per-service rules as your needs grow.
History
The History tab lists the notifications happyDomain has attempted to send. For each entry you can see:
the target concerned;
the status transition (previous status → new status);
whether delivery succeeded or failed (with the error message when it failed).
Use Load more to page back through older entries. This view is the place to check why an expected alert did not reach you, for example a channel misconfiguration causing repeated failures.
Quotas & limits
A happyDomain instance can apply quotas to each account. Quotas are limits set by the person running the instance (the administrator), not by you. They exist mainly to keep a shared instance fair and to avoid overloading the servers, and they apply above all to the monitoring & checks system.
Quotas are managed by the administrator
Quotas are read-only for regular users. There is no screen in your account where you can view or change your own quota: they are configured server-side and adjusted only through the administration interface. If a limit is getting in your way, the right course of action is to contact the administrator of your instance.
What quotas can cover
On a default happyDomain instance, quotas relate to how the monitoring scheduler works for your account. An administrator may set, per account or instance-wide:
Maximum checks per day: a cap on how many checker executions are run automatically for you each day. Once the cap is reached, further scheduled checks wait until the next day.
Result retention: how long the results of your checks are kept before old executions are automatically cleaned up.
Inactivity pause: after a period without logging in, the scheduler may stop running your automatic checks until you sign in again. This keeps the instance from spending resources on abandoned accounts.
Scheduling pause: an administrator can entirely pause automatic scheduling for an account.
Each of these can be left at the instance default, set to a specific value for your account, or explicitly made unlimited, at the administrator’s discretion.
No fixed limit on the number of domains
On a standard happyDomain instance, the quota system does not impose a built-in cap on the number of domains you can manage. If a particular instance does restrict this, it is a policy of that instance; ask its administrator for the details that apply to you.
What you see when a limit is reached
Quotas mostly act in the background. You will not usually see a quota screen; instead you notice their effects:
Automatic checks stop running: if your daily check cap is reached, or your account is in an inactivity or scheduling pause, scheduled checks simply do not run until the condition clears. You can still trigger a check manually from the checks interface.
Older results disappear: with a retention limit, executions older than the allowed age are removed during routine cleanup, so the history only goes back so far.
An action is refused: where an operation would exceed a limit, the interface shows an error message explaining what went wrong.
If you are unsure whether a behaviour is caused by a quota, or you need a limit raised, contact the administrator of your instance.
The Start Of Authority (SOA) record is defined by RFC 1035. It is mandatory and unique: exactly one SOA must sit at the apex (the root) of every DNS zone. Its presence declares that the name server is authoritative for the zone and carries the parameters that govern how the zone is replicated between servers and cached by resolvers.
Fields of the SOA record
The SOA record gathers seven values:
Field
Description
MNAME (primary name server)
The hostname of the primary (master) name server for the zone.
RNAME (responsible party)
The email address of the person responsible for the zone, encoded in DNS form: the @ is replaced by a dot (for example hostmaster.example.com. means hostmaster@example.com).
Serial
A version number for the zone. It must increase every time the zone changes, so that secondary servers know they need to transfer the new content.
Refresh
How often (in seconds) a secondary server checks the primary for an updated serial.
Retry
How long (in seconds) a secondary waits before retrying a failed refresh.
Expire
How long (in seconds) a secondary keeps serving the zone when it cannot reach the primary, before considering the data stale.
Minimum (negative-cache TTL)
The duration for which resolvers cache negative answers (NXDOMAIN), per RFC 2308.
The SOA in happyDomain
happyDomain does not present the SOA as a standalone record to edit field by field. Instead, the apex of your zone is modelled as an Origin service, which groups the SOA together with the zone’s name servers (NS records). You will therefore find the SOA at the root of your domain, alongside the list of authoritative name servers, rather than in a separate form.
The serial is, in most cases, handled automatically. When you publish your changes, many DNS providers manage the serial themselves: happyDomain detects this capability and re-reads the zone after publication to reflect the serial the provider actually assigned. You normally do not need (nor are you expected) to set it by hand.
What you can and cannot change
The exact behaviour depends on your DNS provider. Some providers expose the full SOA and let happyDomain submit its values; others manage the SOA serial — and sometimes the other timers — on their side. When the provider takes care of the serial, any value happyDomain shows for it simply reflects the published state and is refreshed automatically.
For more on how the apex and other groupings are represented, see the /en/reference/services/ chapter.
TXT
A TXT record (defined in RFC 1035) attaches one or more free-form text strings to a name in your zone. It carries no predefined meaning of its own, which makes it one of the most versatile record types: any application is free to define its own convention for the text it stores there.
Common uses
Because a TXT record can hold arbitrary text, it has become the carrier for many widespread conventions:
Domain ownership and site verification — a provider asks you to publish a token so it can confirm you control the domain.
SPF — declares which servers are allowed to send e-mail for your domain.
DKIM — publishes the public key used to sign your outgoing e-mail.
DMARC — sets the policy applied when SPF or DKIM checks fail.
Various other key or policy publications defined by different tools.
For most of these purposes, happyDomain offers dedicated, higher-level services (SPF, DKIM, DMARC, site verification, and more) that are easier and safer to use than a raw TXT record: they guide you with the right fields and validate the syntax for you. Browse them in the /en/reference/services/ chapter, in particular the e-mail-related services. Prefer those services whenever one matches your need.
When a TXT record becomes a service
When happyDomain reads your zone, it recognises TXT records that follow a known convention (SPF, DKIM, DMARC, …) and presents them as their dedicated service rather than as a plain Text Record. Only TXT records without a recognised prefix or syntax are shown as a raw Text Record.
Editing a TXT record in happyDomain
In the zone editor, a plain TXT record appears as a Text Record service. It is intentionally minimal: a single field holds the text content of the record.
To work with one:
Open the subdomain where the record should live (the apex of the zone, or any subdomain such as www).
Add or open the Text Record service.
Type the full text string in its only field.
Adjust the TTL if needed, then publish your changes to apply them.
The value you enter is stored verbatim. Editing it and publishing updates the corresponding TXT record on that subdomain.
Long strings
A single text string inside a TXT record cannot exceed 255 bytes at the DNS protocol level. Longer values are automatically split into 255-byte chunks for you. You simply enter the complete string in happyDomain — no manual splitting is required.
The E-Mail service lets you declare the mail servers responsible for a zone, and points you to the companion services that control how mail is sent and authenticated for that domain.
In happyDomain, this service is named E-Mail servers: its single job is to publish the MX records that tell the rest of the Internet where to deliver mail addressed to your domain. Everything that protects outgoing mail (proving that a message really comes from you) is handled by separate, dedicated services described further down.
Receiving mail: MX records
An MX (Mail eXchanger) record names a host that accepts mail for the domain. A zone usually publishes several of them so that delivery keeps working if one server is unavailable.
Each entry has two parts:
Priority — a number that orders the servers. Sending servers try the lowest number first; higher numbers are used only as fallbacks. Two records sharing the same priority are treated as equivalent and load-balanced.
Mail server — the hostname of the machine that receives the mail (for example mx1.example.com.). This host must itself resolve to an address; it should not be a bare IP.
A common setup looks like this:
Priority
Mail server
10
mx1.example.com.
20
mx2.example.com.
Here mx1 is tried first, and mx2 is the backup.
One E-Mail service per subdomain
The E-Mail servers service is single: a given subdomain can hold only one such service, which gathers all of its MX records together. To declare mail servers for both the apex (example.com) and a subdomain (mail.example.com), add the service to each of them separately.
Sending mail: authentication and anti-spoofing
Publishing MX records is enough to receive mail, but it says nothing about which servers are allowed to send mail on your behalf. Without that, anyone can forge messages using your domain. happyDomain offers several dedicated services, each managing its own DNS records, to establish that posture:
SPF (Sender Policy Framework) — a TXT record, usually at the zone apex, that lists the servers authorized to send mail for the domain. Receivers compare the sending server against this list.
DKIM (DomainKeys Identified Mail) — publishes the public half of a signing key as a TXT record under a ._domainkey selector. Your mail servers sign outgoing messages, and receivers verify the signature against this published key.
DMARC (Domain-based Message Authentication, Reporting and Conformance) — a TXT record at _dmarc that tells receivers what to do with messages failing SPF or DKIM checks (let them through, quarantine, or reject), and where to send aggregate reports.
Two further services cover transport security and reporting:
MTA-STS — declares that mail to your domain must be delivered over a secured (TLS) connection.
TLS-RPT — collects reports about TLS delivery problems encountered by sending servers.
These services are independent of the E-Mail servers service. You can add only the ones you need, but a complete and well-protected mail configuration typically combines MX, SPF, DKIM and DMARC.
In the zone editor
To configure mail for a subdomain in the happyDomain zone editor:
Add the E-Mail servers service to the subdomain and fill in one line per mail server, with its priority and hostname.
Add SPF, DKIM and DMARC as their own services on the relevant subdomain (SPF and DMARC usually at the apex). Each one presents a dedicated form rather than raw record text.
Because each of these is a distinct abstract service, you manage them separately even though they all work together to make mail for your domain both deliverable and trustworthy. See the /en/reference/services/ chapter for the full list of available services.
Checkers
Checkers are the building blocks of happyDomain’s monitoring system. Each one collects data about a domain, a zone or a service, evaluates it against a set of rules, and reports a clear status (OK, Warning, Critical or Error).
This chapter documents every checker shipped with happyDomain: what it verifies, the scope it applies to, the options you can tune, and the rules it evaluates. For the day-to-day workflow of configuring, scheduling and reading checks in the interface, see /en/pages/checks/.
Scopes
Every checker declares the scope it operates on:
Domain-level — concerns the domain itself, independent of its DNS records (registration status, expiry, transfer lock…).
Zone-level — needs the full zone content (DNSSEC validation, delegation consistency…).
Service-level — targets a specific service published on a subdomain (HTTP, TLS, ping…), and is configured from that service’s own Checks tab.
Statuses
Checkers report one of the following statuses, in order of severity:
Status
Meaning
OK
Everything is within acceptable parameters
Info
Informational finding, no action needed
Warning
A threshold is approaching; attention recommended
Critical
A threshold has been exceeded; action required
Error
The check itself failed (collection error, bad configuration)
The Domain expiry checker watches the registration expiry date of a domain name and warns you before it lapses. Letting a domain expire can mean losing it to another registrant, so this is one of the most important domain-level checks.
This is a domain-level checker: it concerns the domain registration itself, not its DNS records. The expiry date is obtained from the registry through a WHOIS/RDAP lookup, together with the registrar name.
What it checks
A single rule, domain_expiry_check, compares the number of days remaining until expiry against two thresholds and reports the corresponding status.
Status
Condition
Critical
Days remaining ≤ critical threshold
Warning
Days remaining ≤ warning threshold (but above critical)
OK
Days remaining above the warning threshold
Error
The WHOIS/RDAP lookup failed or no expiry date is available
The message always reports how many days remain until expiry, regardless of status.
The checker also exposes a metric, domain_expiry_days_remaining, labelled with the registrar, so the time left can be tracked over time.
Options
Option
Meaning
Default
Warning threshold (days)
Days before expiry at which a warning is raised. Must be positive.
30
Critical threshold (days)
Days before expiry at which a critical alert is raised. Must be positive.
7
Critical must be lower than warning
The critical threshold must be strictly smaller than the warning threshold. happyDomain rejects a configuration where critical_days is greater than or equal to warning_days.
In happyDomain
Enable this checker from the domain’s Checks view; see /en/pages/checks/ for how to configure and schedule checks. The domain name is filled in automatically.
For the inverse situation, watching a domain you do not yet own so you can register it once it lapses, see the /en/reference/checkers/domain-availability/ checker and /en/pages/domain-availability/. Related domain-level checkers include /en/reference/checkers/domain-lock/ and /en/reference/checkers/domain-contact/.
Domain transfer lock
The Domain transfer lock checker verifies that a domain carries the EPP status codes that protect it against unauthorized transfers, updates or deletions. A locked domain (for example one bearing clientTransferProhibited) cannot be transferred away without first removing the lock, which is a key defence against domain hijacking.
This is a domain-level checker: the status codes are read from the registry through a WHOIS/RDAP lookup, not from the zone’s DNS records.
What it checks
A single rule, domain_lock_check, compares the EPP status codes reported by the registry against the list of statuses you require.
Status
Condition
OK
Every required status is present on the domain
Critical
One or more required statuses are missing (the missing codes are listed)
Unknown
No required status is configured (nothing to check)
Error
The WHOIS/RDAP lookup failed
Comparison is tolerant of formatting: spaces, dashes and underscores are ignored and case does not matter, so clientTransferProhibited, client-transfer-prohibited and client transfer prohibited are all treated as equal.
Options
Option
Meaning
Default
Required lock statuses
Comma-separated list of EPP status codes that must be present on the domain (for example clientTransferProhibited, clientUpdateProhibited, clientDeleteProhibited). At least one code must be supplied.
clientTransferProhibited
In happyDomain
Enable this checker from the domain’s Checks view; see /en/pages/checks/ for how to configure and schedule checks. The domain name is filled in automatically.
This checker pairs naturally with /en/reference/checkers/domain-expiry/ and /en/reference/checkers/domain-contact/ to keep the registration of a domain under control.
Domain contacts
The Domain contacts checker compares the contact information registered for a domain (registrant, administrative and technical contacts) against the values you expect. An unexpected change to a contact, especially the registrant, can be an early sign of a hijack or of an administrative mistake.
This is a domain-level checker: the contact data is read from the registry through a WHOIS/RDAP lookup. Many registries redact contact fields for privacy; this checker detects redaction and reports it rather than treating it as a mismatch.
What it checks
A single rule, domain_contact_check, evaluates each contact role you selected and emits one result per role.
Status
Condition
OK
The role’s contact matches every expected value provided
Warning
A field does not match the expected value, or the role is missing from the record
Info
The contact is privacy-protected (redacted) so it cannot be compared
Unknown
No expected value is configured, or no role is selected (nothing to check)
Error
The WHOIS/RDAP lookup failed
Comparisons are case-insensitive and exact. Redaction is detected from common markers in the contact fields such as redacted, privacy, withheld, not disclosed, data protected, contact privacy and whoisguard.
Options
Option
Meaning
Default
Expected registrant name
If set, the configured roles must report this exact name (case-insensitive).
(empty)
Expected organization
If set, the configured roles must report this exact organization (case-insensitive).
(empty)
Expected email
If set, the configured roles must report this exact email (case-insensitive).
(empty)
Contact roles to check
Comma-separated list of roles among registrant, admin, tech.
registrant
At least one expected value is required
If none of the expected name, organization or email is set, the checker has nothing to compare and reports an Unknown status. Set at least one expected value for the check to be meaningful.
In happyDomain
Enable this checker from the domain’s Checks view; see /en/pages/checks/ for how to configure and schedule checks. The domain name is filled in automatically.
This checker complements /en/reference/checkers/domain-expiry/ and /en/reference/checkers/domain-lock/, which together keep the registration of a domain under watch.
Domain availability
The Domain availability checker watches a domain name you do not own and notifies you the moment it becomes available for registration. It is the counterpart of /en/reference/checkers/domain-expiry/: instead of protecting a domain you hold, it lets you grab one as soon as it lapses.
This is a domain-level checker: registration status is determined from the registry through a WHOIS/RDAP lookup. A domain is considered available when the registry reports that it does not exist.
What it checks
A single rule, domain_availability_check, reports whether the watched domain is still registered or has become free.
Status
Condition
Critical
The domain is now available for registration
OK
The domain is still registered (the registrar and expiry date are reported when known)
Error
The availability lookup failed
Why available is reported as Critical
The status is intentionally inverted compared with the usual convention. Reporting Critical when the domain becomes available makes the registered → available transition cross the notification threshold, so you are alerted exactly once when the domain frees up.
Options
This checker has no user-tunable options. The watched domain name is supplied automatically.
In happyDomain
Unlike the other domain-level checkers, Domain availability is not scheduled on the domains you manage. It is driven by the dedicated availability-watch list. See /en/pages/domain-availability/ for how to add a domain to watch, and /en/pages/checks/ for the general checks workflow.
External-reference expiry
The External-reference expiry checker looks up the registration facts of the external domains your zone refers to. When a record points at a name you do not own (a CNAME to a third-party service, an MX to an external provider, an NS delegation…), the safety of your zone depends on that external domain staying registered. If it expires and is re-registered by someone else, the pointer can be hijacked.
This is a zone-level checker: it enumerates the external targets discovered in the zone and performs one WHOIS/RDAP lookup per distinct registrable domain. Targets sharing the same registrable domain reuse a single lookup, and lookups run with a bounded concurrency so a large zone does not overwhelm the registry.
What it checks
This checker is primarily a collector. It gathers per-target WHOIS facts (registrable name, expiry date, creation date, registrar, status) and publishes them for the dangling-reference checker, which is where the actionable verdicts about expiration, redemption or recent re-registration are emitted.
Its own rule, external_whois_collected, reports only how the collection went:
Status
Condition
OK
WHOIS was collected for every external target
Info
Some lookups succeeded and some failed (a partial result), or no external target was reported at all
Warning
The WHOIS lookup failed for all external targets
Error
The external WHOIS observation could not be read
Verdicts live in the dangling-reference checker
This checker does not decide whether an external domain is dangerously close to expiry. It only retrieves the facts. The expiry, redemption and re-registration verdicts are surfaced by the companion dangling-reference checker, which consumes the facts collected here.
Options
This checker has no user-tunable options. The list of external targets is supplied automatically from the zone’s discovered references.
In happyDomain
Enable this checker from the zone’s Checks view; see /en/pages/checks/ for how to configure and schedule checks. The discovery of external targets is automatic.
For the registration of the domains you own directly, see /en/reference/checkers/domain-expiry/.
DNSSEC validation
The DNSSEC checker audits the operational hygiene of a signed zone. It does not re-validate the cryptographic chain of trust end to end (that work is delegated to a dedicated DNSViz-based checker); instead it focuses on the policy and day-to-day operational aspects of signing: which algorithms and key sizes are in use, whether signatures are fresh and valid, how negative answers are denied (NSEC vs NSEC3), and whether every authoritative server serves a consistent view.
This checker is domain-level: it operates on the zone apex. From a bootstrap recursive resolver it discovers the apex name servers and looks up the parent DS, then queries each authoritative server directly.
What it checks
The checker evaluates the following rules. Several of them are governed by the options described further down.
Chain and key material
Rule
Verifies
Severity
dnssec_zone_signed
The parent advertises a DS but the apex serves no DNSKEY (a broken signed zone).
Critical
dnssec_dnskey_consistent
Every authoritative server returns the same DNSKEY RRset.
Critical
dnssec_dnskey_query_ok
Every authoritative server answered the DNSKEY query.
Critical
dnssec_ksk_present
At least one DNSKEY carries the SEP bit (a Key Signing Key).
Critical
dnssec_dnskey_count
Warns when too many DNSKEYs are published, inflating responses and amplification potential.
Warning
Algorithms and key strength
Rule
Verifies
Severity
dnssec_algorithm_allowed
No DNSKEY uses a forbidden algorithm or one outside the allowed list.
Critical
dnssec_algorithm_modern
Recommends ECDSAP256SHA256 (13) or Ed25519 (15) over RSA.
Warning
dnssec_rsa_keysize
RSA DNSKEYs reach the minimum modulus size.
Critical
Signatures
Rule
Verifies
Severity
dnssec_rrsig_present_dnskey
The DNSKEY RRset is signed.
Critical
dnssec_rrsig_present_soa
The SOA RRset is signed.
Critical
dnssec_rrsig_validity_window
Every observed RRSIG is currently within its inception/expiration window.
Critical
dnssec_rrsig_freshness
Pre-emptive alert when RRSIGs are close to expiring (catches stuck signers).
Critical
Denial of existence (NSEC / NSEC3)
Rule
Verifies
Severity
dnssec_denial_uses_nsec3
Warns when the zone uses bare NSEC, which makes the zone walkable (RFC 5155 / RFC 7129).
Warning
dnssec_nsec3_iterations
NSEC3PARAM.Iterations is at most the configured ceiling (RFC 9276 §3.1 recommends 0).
Critical
dnssec_nsec3_salt_empty
NSEC3PARAM.SaltLength is 0 (RFC 9276 §3.1: a salt buys no measurable protection).
Warning
dnssec_nsec3_optout_only_when_signed_delegations
Informational note when the OPT-OUT flag is set in a leaf zone.
Info
dnssec_denial_consistent
Every authoritative server uses the same denial-of-existence scheme.
Warning
TTL hygiene
Rule
Verifies
Severity
dnssec_dnskey_ttl_min
Warns when the DNSKEY TTL is too short to be useful for caching.
Warning
Options
Option
Meaning
Default
nsec3IterationsMax
RFC 9276 §3.1 ceiling on NSEC3PARAM.Iterations. Raise only if your signer cannot publish 0 yet.
0
nsec3IterationsSeverity
Severity when iterations exceed the ceiling. Set crit to enforce RFC 9276 strictly.
warn
signatureFreshness
Warn when the closest RRSIG expires in fewer than this many days.
7
signatureFreshnessCrit
Critical when the closest RRSIG expires in fewer than this many days.
1
minRSAKeySize
Minimum acceptable RSA modulus size, in bits.
2048
requireSEP
Require at least one DNSKEY with the SEP bit (KSK).
true
dnskeyTTLMin
Minimum DNSKEY TTL, in seconds; shorter TTLs hurt cacheability.
3600
The administrator can also set a bootstrap resolver (host:port) used to discover the apex name servers and look up the parent DS; it defaults to /etc/resolv.conf.
What this checker does not do
The DNSSEC checker does not verify the full cryptographic chain of trust from the root. For that end-to-end validation, use the DNSViz-based checker. This checker complements it by catching policy and operational problems (weak algorithms, expiring signatures, NSEC walkability) that a chain validation alone would not surface.
In happyDomain
Enable the DNSSEC checker on a domain from its Checks view. See /en/pages/checks/ for the full workflow of adding, scheduling and reading checks. For delegation-side DS/DNSKEY hand-off, see the /en/reference/checkers/delegation/ checker.
Delegation
The Delegation checker audits how a zone is delegated from its parent. It cross-examines the parent zone and the child name servers to confirm that the hand-off is coherent: that the parent and child agree on the NS set, that glue records are correct, that the DNSSEC DS/DNSKEY chain lines up, and that every delegated server is reachable and actually authoritative for the zone.
This checker is service-level: it targets a Delegation service (abstract.Delegation) published on a subdomain, and is configured from that service’s own Checks tab.
What it checks
Each rule emits a stable finding code so results can be matched deterministically.
Name-server count and parent discovery
Finding code
What it verifies
delegation_too_few_ns
The zone declares at least minNameServersNS records (RFC 1034 recommends ≥ 2).
delegation_no_parent_ns
The parent zone and its authoritative name servers can be discovered.
delegation_parent_query_failed
Each parent name server answers the NS query for the delegated zone.
delegation_parent_tcp_failed
Each parent name server is reachable over TCP (RFC 7766).
NS and glue at the parent
Finding code
What it verifies
delegation_ns_mismatch
The NS RRset at the parent matches the NS set declared by the service.
delegation_missing_glue
In-bailiwick name servers have glue (A/AAAA) at the parent.
delegation_unnecessary_glue
Out-of-bailiwick name servers do not carry unnecessary glue.
DNSSEC hand-off
Finding code
What it verifies
delegation_ds_query_failed
The DS RRset can be queried from the parent name servers.
delegation_ds_mismatch
The DS RRset at the parent matches the DS set declared by the service.
delegation_ds_missing
DS records are present at the parent when DNSSEC is expected (gated by requireDS).
delegation_ds_rrsig_invalid
The DS RRset is covered by a valid RRSIG at the parent.
delegation_dnskey_query_failed
The DNSKEY RRset can be queried from each child name server.
delegation_dnskey_no_match
At least one child DNSKEY matches a DS digest published at the parent.
Child reachability and authoritativeness
Finding code
What it verifies
delegation_ns_unresolvable
Each declared name server name resolves to at least one address.
delegation_unreachable
Each child name server answers DNS queries on its advertised addresses.
delegation_lame
Each child name server is authoritative for the zone (no lame delegation).
delegation_no_authoritative_answer
Each child name server sets the AA flag in its answers for the zone.
delegation_tcp_failed
Each child name server answers over TCP (gated by requireTCP).
delegation_soa_serial_drift
The SOA serial is consistent across all child name servers.
delegation_ns_drift
The NS RRset returned by each child matches the NS RRset at the parent.
delegation_glue_mismatch
Glue addresses at the child match those at the parent (gated by allowGlueMismatch).
Options
Option
Meaning
Default
requireDS
When enabled, missing DS records at the parent are treated as critical (otherwise informational).
false
requireTCP
When enabled, name servers that fail to answer over TCP are reported as critical (otherwise warning).
true
minNameServers
Below this count, the delegation is reported as a warning (RFC 1034 recommends at least 2).
2
allowGlueMismatch
When disabled, glue/address mismatches between parent and child are reported as critical.
false
In happyDomain
Enable the Delegation checker from the Checks tab of a Delegation service. See /en/pages/checks/ for the full workflow. For consistency between the authoritative servers of the apex itself (rather than the parent/child hand-off), see /en/reference/checkers/authoritative-consistency/; for the DNSSEC hygiene of the signed zone, see /en/reference/checkers/dnssec/.
Authoritative consistency
The Authoritative consistency checker probes every authoritative name server of a zone and verifies that they agree — with one another and with the parent delegation. Where the /en/reference/checkers/delegation/ checker focuses on the parent/child hand-off, this checker concentrates on the apex itself: do all the servers serve the same NS and SOA, are they all reachable over UDP and TCP, do they support EDNS0, do they answer authoritatively, and how fast do they respond?
This checker is service-level: it targets an Origin or NS-only Origin service (abstract.Origin, abstract.NSOnlyOrigin) and is configured from that service’s Checks tab.
What it checks
Each rule emits a finding code. Several severities depend on the options below.
Finding code
Default severity
Condition
authoritative_consistency_no_ns
Critical
No name servers could be discovered (declared list empty and parent query returned nothing).
authoritative_consistency_too_few_ns
Warning
Fewer name servers declared than minNameServers (RFC 1034 recommends at least 2).
authoritative_consistency_parent_query_failed
Warning
The parent delegation query failed (network error, REFUSED…).
authoritative_consistency_parent_drift
Warning
The parent’s NS RRset does not match the NS declared in the service.
authoritative_consistency_ns_unresolvable
Critical
A declared name server has no A or AAAA record.
authoritative_consistency_ns_udp_failed
Critical
A name server did not answer any SOA query over UDP/53.
authoritative_consistency_ns_tcp_failed
Critical with requireTCP, else Warning
A name server did not answer over TCP/53 (required by RFC 7766 and DNSSEC).
authoritative_consistency_lame
Critical
A name server answered without the AA bit for the zone (lame delegation).
authoritative_consistency_no_soa
Critical
A name server is authoritative but returned no SOA.
authoritative_consistency_edns_unsupported
Warning
A name server drops or mishandles EDNS0 queries (RFC 6891).
authoritative_consistency_slow_ns
Info
A name server’s response time exceeded latencyThresholdMs.
authoritative_consistency_serial_drift
Warning
Authoritative servers disagree on the SOA serial (zone not fully propagated).
authoritative_consistency_serial_stale_vs_saved
Warning
The serial saved in happyDomain is newer than what the servers publish (likely un-pushed change).
authoritative_consistency_serial_ahead_of_saved
Info
The servers publish a serial newer than the saved one (out-of-band change).
authoritative_consistency_soa_fields_drift
Warning
Servers disagree on SOA fields (MNAME, RNAME, refresh, retry, expire, minimum).
authoritative_consistency_ns_rrset_drift
Warning
Servers disagree on the NS RRset they publish at the apex.
The published NS RRset does not match the NS declared in the service.
Options
Option
Meaning
Default
requireTCP
When enabled, a server that fails over TCP is critical (otherwise warning). TCP/53 is required by RFC 7766 and DNSSEC.
true
checkEDNS
Probe each name server for EDNS0 (RFC 6891). Servers that mishandle EDNS0 break DNSSEC and large answers.
true
checkLatency
Measure response time of every name server and warn on slow responders.
true
latencyThresholdMs
Response times above this value trigger a slow-server warning.
500
useParentNS
Query the parent for the delegation NS RRset and compare it to the service’s declared name servers.
true
warnOnStaleSaved
Warn when the saved SOA serial is newer than what authoritative servers publish.
true
minNameServers
Below this count, a warning is emitted (RFC 1034 recommends at least 2).
2
In happyDomain
Enable the Authoritative consistency checker from the Checks tab of an Origin service. See /en/pages/checks/ for the full workflow. To compare what recursive resolvers around the world see against the authoritative answer, pair it with /en/reference/checkers/resolver-propagation/.
Name-server restrictions
The Name-server restrictions checker verifies that the authoritative name servers of a zone are properly locked down. For each declared name server it resolves the host name, then runs a set of DNS probes against every returned IPv4 and IPv6 address (IPv6 targets are skipped gracefully when the host has no IPv6 connectivity). The goal is to catch common misconfigurations that leak data or turn a name server into an abuse vector: open zone transfers, open recursion, and unbounded ANY responses.
This checker is service-level: it targets an Origin or NS-only Origin service (abstract.Origin, abstract.NSOnlyOrigin) and is configured from that service’s Checks tab.
What it checks
Each rule emits one finding per probed name-server address, with a stable code.
Rule
Verifies
Severity on failure
ns_resolution
Every NS host name declared in the delegation resolves to at least one IP address.
Critical
ns_axfr_refused
AXFR zone transfers are refused by every authoritative name server.
Critical
ns_ixfr_refused
IXFR zone transfers are refused by every authoritative name server.
Warning
ns_no_recursion
Authoritative name servers do not advertise recursion (RA bit unset).
Warning
ns_any_handled
ANY queries are handled per RFC 8482 (HINFO or a minimal answer rather than the full zone contents).
Warning
ns_is_authoritative
Name servers answer authoritatively (AA bit set) for the zone.
Info
Why these matter
An open AXFR lets anyone download the entire zone, exposing your internal naming. Open recursion turns your authoritative server into an amplification relay and cache-poisoning target. Unbounded ANY responses are a classic amplification vector that RFC 8482 was written to neutralise.
Options
This checker has no user-tunable options: it runs a fixed set of probes against each resolved name-server address.
In happyDomain
Enable the Name-server restrictions checker from the Checks tab of an Origin service. See /en/pages/checks/ for the full workflow. For the broader health and agreement of those same authoritative servers, see /en/reference/checkers/authoritative-consistency/.
Resolver propagation
The Resolver propagation checker measures how a zone is seen from the outside, across the public internet. It probes a curated catalog of public recursive resolvers (Cloudflare, Google, Quad9, OpenDNS, Yandex, regional ISPs and more) over several transports (UDP, TCP, DoT, DoH) and from multiple regions, then compares their answers both to each other and to the zone’s authoritative name servers. This surfaces propagation gaps, regional splits, SOA serial drift, stale caches, DNSSEC validation failures, SERVFAIL/NXDOMAIN inconsistencies and resolver filtering.
This checker is service-level: it targets an Origin or NS-only Origin service (abstract.Origin, abstract.NSOnlyOrigin) and is configured from that service’s Checks tab.
What it checks
Finding code
What it checks
Severity
resolver_propagation.selection
The current option set selects at least one public resolver.
Critical
resolver_propagation.reachable
At least one selected resolver answered a query.
Critical
resolver_propagation.latency
Resolvers that are unreachable or whose average response time exceeds the threshold.
Warning
resolver_propagation.filtered_hit
Filtered resolvers returning a different answer than the consensus (typical blocklist behaviour).
Info
resolver_propagation.consensus
Public resolvers agree on a single answer for each probed RRset.
Warning
resolver_propagation.matches_authoritative
The public consensus matches the answer served by the zone’s authoritative servers.
Critical
resolver_propagation.nxdomain
RRsets for which some resolvers return NXDOMAIN while others return NOERROR.
Critical
resolver_propagation.servfail
RRsets for which any resolver returns SERVFAIL (usually DNSSEC or reachability failure).
Critical
resolver_propagation.regional_split
Regions where every resolver agrees on an answer that differs from the global consensus.
Warning
resolver_propagation.serial_drift
Disagreement on the SOA serial across unfiltered resolvers.
Warning
resolver_propagation.stale_cache
Resolvers still serving an SOA serial below the one saved by happyDomain.
Info
resolver_propagation.dnssec
Validating resolvers successfully validate the zone’s DNSSEC chain.
Critical
Options
Option
Meaning
Default
recordTypes
Comma-separated RR types to probe at every owner. Empty = derive from the working zone (SOA/NS at the apex plus the RR types actually defined on each owner).
derived from zone
subdomains
Comma-separated owner names to probe in addition to the apex (e.g. www,mail,@). Empty = apex only.
www
includeFiltered
Probe filtering resolvers (malware/family/adblock). Their answers diverge by design; enable only when diagnosing a blocklist hit.
false
region
Restrict to a region: all, global, na, eu, asia, ru, me.
all
transports
Comma-separated transports to probe: udp, tcp, dot, doh. Encrypted transports are only used where published.
udp
resolverAllowlist
Comma-separated resolver IDs or IPs to probe exclusively (e.g. cloudflare,google,9.9.9.9). Empty = catalog selection.
(empty)
latencyThresholdMs
Resolvers averaging above this value emit an info finding.
500
runTimeoutSeconds
Hard wall-clock budget for one propagation run. Slower resolvers report as unreachable.
30
In happyDomain
Enable the Resolver propagation checker from the Checks tab of an Origin service. See /en/pages/checks/ for the full workflow. This checker is the outward-facing counterpart to /en/reference/checkers/authoritative-consistency/, which examines the authoritative servers directly; running both gives you the picture from the origin and from the resolvers that query it.
Reverse zone
The Reverse zone checker inspects the PTR records of a reverse DNS zone (in-addr.arpa or ip6.arpa) and validates that they are well formed and consistent with forward DNS. It verifies Forward-Confirmed Reverse DNS (FCrDNS), that targets resolve and are syntactically valid host names, flags generic or auto-generated names and short TTLs, and catches multiple-PTR-per-IP violations (RFC 1912 §2.1). Correct reverse DNS matters in practice: mail servers and SSH endpoints routinely reject or downgrade connections from IPs without proper FCrDNS.
This checker is zone-level: it operates on the full content of a reverse zone (it applies to the domain and reads the whole zone).
What it checks
Finding code
What it verifies
Severity
reverse_zone.is_reverse_arpa
The zone is under in-addr.arpa or ip6.arpa.
Critical
reverse_zone.has_ptrs
The reverse zone declares at least one PTR record.
Warning
reverse_zone.fcrdns
Every PTR target’s A/AAAA round-trips back to the original IP (Forward-Confirmed Reverse DNS).
Critical
reverse_zone.target_resolves
Every PTR target resolves to at least one A or AAAA record.
Critical
reverse_zone.single_ptr_per_ip
Flags IPs with multiple PTR records (RFC 1912 §2.1 recommends exactly one).
Warning
reverse_zone.target_syntax
Every PTR target is a syntactically valid host name.
Critical
reverse_zone.generic_hostname
Flags PTR targets that embed the IP or match common ISP auto-generated patterns.
Warning
reverse_zone.ttl_hygiene
Flags PTR records whose TTL is below the configured minimum.
Warning
reverse_zone.truncated
Reports when the zone has more PTRs than the configured cap allows to inspect.
Info
Options
Option
Meaning
Default
requireForwardMatch
When enabled, a PTR whose target does not resolve back to the original IP is critical (otherwise warning). Mail and SSH servers require FCrDNS.
true
allowMultiplePTR
When disabled, more than one PTR at the same owner is reported as warning (RFC 1912 §2.1 recommends a single PTR per IP).
false
minTTL
PTR records with a TTL below this threshold (in seconds) are flagged as warning.
300
flagGenericPTR
When enabled, PTR targets that embed the dotted IP or match common ISP auto-generated patterns are flagged as warning.
true
maxPTRsToCheck
Caps the number of PTR records inspected per run, protecting the checker against very large reverse zones.
1024
Forward-Confirmed Reverse DNS
FCrDNS means the PTR target, looked up forward, resolves back to the original IP address. A PTR that points to a host whose A/AAAA does not include that IP fails the round-trip and is treated as a misconfiguration by many mail and SSH servers.
In happyDomain
Enable the Reverse zone checker on a reverse (in-addr.arpa / ip6.arpa) domain from its Checks view. See /en/pages/checks/ for the full workflow.
PTR records
The PTR / Reverse DNS checker verifies that an IP address has a correct, usable reverse-DNS record. A PTR maps an IP back to a hostname; mail servers, SSH daemons and many logging tools rely on it, and a missing or inconsistent PTR is one of the most common reasons outgoing mail is rejected.
This is a service-level checker: it runs on a PTR service and is configured from that service’s own Checks tab. It locates the reverse zone (under in-addr.arpa or ip6.arpa), queries the authoritative servers, and inspects what they actually serve — both for IPv4 and IPv6 addresses.
What it checks
The checker runs a chain of rules, from structural sanity through query success to target hygiene and Forward-Confirmed Reverse DNS (FCrDNS).
Rule
What it verifies
Severity
ptr.in_reverse_arpa
The PTR owner lies under in-addr.arpa or ip6.arpa.
Critical
ptr.owner_decodable
The reverse-arpa owner name decodes back to an IP address.
Critical
ptr.reverse_zone_located
The reverse zone serving the owner can be located (SOA found).
Critical
ptr.query_succeeded
The PTR query returns NOERROR from the authoritative servers.
Critical
ptr.record_present
At least one PTR record is served at the owner name.
Critical
ptr.single_record
Flags more than one PTR on the same IP (RFC 1912 §2.1 recommends exactly one).
Warning
ptr.declared_match
The PTR target served authoritatively matches the target declared in happyDomain.
Critical
ptr.target_syntax_valid
The PTR target is a syntactically valid hostname (RFC 952/1123).
Critical
ptr.generic_hostname
Flags PTR targets that embed the IP or match common ISP auto-generated patterns.
Warning
ptr.target_resolves
The PTR target resolves to at least one A or AAAA record.
Critical / Warning
ptr.fcrdns_match
The PTR target’s A/AAAA resolves back to the original IP (FCrDNS).
Critical / Warning
ptr.ipv6
Reports whether the PTR concerns an IPv6 (ip6.arpa) address, and that a PTR is present for it.
Critical
ptr.ttl_hygiene
The PTR TTL is at or above the configured minimum.
Warning
The ptr.target_resolves and ptr.fcrdns_match rules are critical by default but drop to a warning when Require forward-confirmed reverse DNS is turned off.
FCrDNS, the round-trip rule
Forward-Confirmed Reverse DNS means the chain rounds back to itself: the IP’s PTR points to a hostname, and that hostname’s A/AAAA includes the original IP. Mail servers reject connections from IPs that fail this round-trip, so leave Require forward-confirmed reverse DNS enabled for any host that sends mail.
Options
Option
Meaning
Default
Require forward-confirmed reverse DNS (FCrDNS)
When enabled, a PTR whose target does not resolve back to the original IP is critical; otherwise a warning.
true
Allow multiple PTR records on the same IP
When disabled, more than one PTR at the same owner is flagged as a warning (RFC 1912 §2.1).
false
Minimum PTR TTL (seconds)
PTR records with a TTL below this threshold are flagged as a warning.
300
Flag generic-looking PTR hostnames
When enabled, PTR targets embedding the dotted IP or matching common ISP auto-generated patterns warn.
true
In happyDomain
Add the PTR service to the subdomain holding the reverse record, then enable this checker from that service’s Checks tab. See /en/pages/checks/ for configuring and scheduling checks. The reverse zone, the PTR record and the declared target are filled in automatically from the service.
For the forward side of alias and hostname resolution, see the related /en/reference/checkers/alias/ checker.
Alias chain
The CNAME / DNAME / ALIAS chain checker follows the alias chain of a name and verifies that it resolves cleanly: no loops, not too many hops, sane TTLs, a resolvable final target, no forbidden record coexistence, and a properly signed CNAME RRset when the zone uses DNSSEC.
This is a service-level checker: it runs on a CNAME (or special CNAME) service and is configured from that service’s own Checks tab. Starting from the queried name it locates the zone apex, walks each CNAME/DNAME hop, and finally resolves the chain’s target to A/AAAA records.
What it checks
Each rule emits a finding code. Some severities are softened by the options below.
Rule
What it verifies / flags
Severity
apex_lookup
The zone apex (SOA) for the queried name can be located.
Critical
chain_loop
A CNAME/DNAME cycle in the resolution chain.
Critical
chain_length
The chain exceeds Maximum chain length hops.
Critical
chain_query_error
A DNS query fails while walking the chain (network error, timeout).
Warning
chain_rcode
A non-NOERROR response code mid-chain or on the final A/AAAA lookup.
Critical (mid-chain) / Warning (final)
hop_ttl
A CNAME/DNAME hop has a TTL below Minimum target TTL.
Warning
cname_at_apex
A CNAME exists at the zone apex, conflicting with SOA/NS (RFC 1912 §2.4).
Critical / Warning
apex_flattening
A/AAAA coexist with SOA/NS at the apex without a CNAME (provider-side ALIAS/ANAME flattening).
Info
cname_coexistence
Other RRsets (beyond A/AAAA) coexist at a CNAME owner, violating RFC 1034 §3.6.2 / RFC 2181 §10.1.
Critical / Warning at apex
cname_dnssec
The zone is DNSSEC-signed but the CNAME RRset lacks an RRSIG.
Critical
target_resolvable
The final target of the chain has no A or AAAA record.
Critical
multiple_records
An owner in the chain carries more than one CNAME/DNAME record (malformed).
Critical
Why a CNAME at the apex is a problem
A CNAME owner may carry no other record type, but the zone apex must always hold SOA and NS records. The two requirements are mutually exclusive, so a CNAME at the apex is invalid (RFC 1912 §2.4). Some providers work around this with server-side ALIAS/ANAME “flattening” that publishes plain A/AAAA at the apex; the apex_flattening rule recognises that pattern as intentional when Recognize ALIAS/ANAME flattening is enabled.
Options
Option
Meaning
Default
Maximum chain length
Above this number of hops the chain is reported as critical.
8
Minimum target TTL
Hops with a TTL below this threshold (seconds) are flagged as a warning.
60
Allow CNAME at apex
When enabled, a CNAME at a zone apex and its coexistence violations are downgraded to warnings. RFC 1912 forbids this, so leaving it off is strongly recommended.
false
Recognize ALIAS/ANAME flattening
When enabled, providers serving A/AAAA at the apex (ALIAS/ANAME pseudo-records) are recognised as intentional and excused from coexistence violations.
true
In happyDomain
Add the CNAME service to the subdomain, then enable this checker from that service’s Checks tab. See /en/pages/checks/ for configuring and scheduling checks. The parent domain and subdomain are filled in automatically.
Related checkers: /en/reference/checkers/dangling/ watches for alias targets that have become unregistered or NXDOMAIN, and /en/reference/checkers/ptr/ covers the reverse-DNS side.
Dangling records
The Dangling subdomains checker scans a zone for pointer records (CNAME, MX, SRV, NS) whose targets have gone stale: they resolve to NXDOMAIN, or their external registrable domain has expired, is in pendingDelete, or was recently re-registered. This is the subdomain-takeover attack class popularised in 2017, where institutions ended up serving hostile content from CNAMEs pointing at decommissioned third-party services after attackers re-registered the lapsed targets.
This is a zone-level checker: it needs the full zone content and runs a single pass over it, consolidating findings by owner rather than producing one result per record.
What it checks
The checker walks every service in the working zone and extracts pointer records from CNAME, special CNAME, MX, unknown SRV and orphan (bare NS/CNAME/MX) bodies. For each (owner, type, target) triple it classifies the target as in-zone or external (relative to the zone’s registrable domain), performs a single time-bounded DNS resolution to detect immediate breakage, and publishes a discovery entry so a companion domain_expiry checker can run RDAP/WHOIS on external targets.
It emits one finding per impacted owner, ranked by descending severity:
Signal
Severity
Source
Target NXDOMAIN
Critical
Local DNS resolution
Target SERVFAIL
Warning
Local DNS resolution
Target NOERROR with empty answer
Info
Local DNS resolution
Registrable domain expired
Critical
whois related observation
Registrable status pendingDelete / redemptionPeriod
Critical
whois related observation
Registrable domain registered within the last 90 days
Warning
whois related observation
WHOIS signals need a companion checker
The DNS-resolution signals (NXDOMAIN, SERVFAIL, empty answer) work on their own. The WHOIS-driven signals (expired, pendingDelete, recently registered) only fire when the host’s domain_expiry checker subscribes to this checker’s external-target discovery entries and publishes a per-target whois observation. Without that wiring, the checker still works as a DNS-only dangling detector.
Options
Option
Meaning
Default
Skip live DNS resolution
When set, the checker only reports the static structure of pointer records (offline analysis), without resolving targets.
false
In happyDomain
Enable this checker on the domain from the /en/pages/checks/ view; the domain name and zone content are filled in automatically. Because it is zone-scoped, it runs over the whole zone in a single pass.
Related checkers: /en/reference/checkers/alias/ validates the structure of individual alias chains, and /en/reference/checkers/domain-expiry/ watches your own domains’ expiry — the same WHOIS machinery that powers this checker’s external-target signals.
CAA
The CAA Compliance checker verifies that the TLS certificates actually deployed on a domain were issued by a Certification Authority that the domain’s CAA records authorize. A CAA (Certification Authority Authorization) record lets a domain declare which CAs may issue certificates for it; this checker confirms reality matches that policy.
This is a service-level checker: it runs on a CAA policy service. It performs no network probes of its own — it reads the parsed CAA policy from the service body and the TLS certificates observed by the /en/reference/checkers/dane/ / checker-tls family, then maps each observed issuer to its CAA identifier domain using the Common CA Database (CCADB).
What it checks
A single rule, caa_compliance, loads the zone’s CAA issue / issuewild policy, gathers every TLS probe observed on the target, resolves each certificate’s issuer (by Authority Key Identifier, falling back to the issuer Distinguished Name) against the embedded CCADB “CAA Identifiers” mapping, and compares the result against the allow list.
Outcome
Meaning
Status
caa_ok
Every observed issuer is authorized by the CAA policy.
OK
caa_no_tls
No TLS probes related to this target have been published yet.
Unknown
caa_not_authorized
CCADB mapped an observed issuer to a domain the policy does not list.
Critical
caa_issuance_disallowed
The policy contains CAA 0 issue ";" (issuance explicitly forbidden) but a certificate was still observed.
Critical
caa_issuer_unknown
CCADB has no mapping for the observed issuer (AKI + DN).
Info
Eventual consistency with TLS probes
The caa_no_tls state is a normal steady state, not an error: until checker-tls has probed an endpoint on the target and published a certificate, the CAA checker has nothing to compare against and reports Unknown. Once probes arrive, the check resolves on its next run. The caa_issuer_unknown outcome means the CA simply isn’t in the current CCADB snapshot; the fix is to file a CCADB update, not to change your zone.
The issuer-to-CAA-domain mapping comes from an embedded snapshot of CCADB’s “CAA Identifiers (V2)” report. Refreshing it only requires re-embedding a newer CSV and recompiling — no code change and no network dependency at build time.
Options
This checker has no user-tunable options. Both inputs are filled in automatically:
Option
Meaning
Domain
The domain being checked (auto-filled, required).
Service
The CAA policy service body (auto-filled).
In happyDomain
Add the CAA policy service to the relevant subdomain (usually the apex), then enable this checker from that service’s Checks tab. See /en/pages/checks/ for configuring and scheduling checks. For the comparison to produce a verdict, a TLS-probing checker such as /en/reference/checkers/dane/ (or the standalone checker-tls) must have observed certificates on the target.
DANE / TLSA
The DANE / TLSA checker verifies that the TLSA records published for a service correctly pin the TLS certificate that the matching endpoint actually presents. DANE (DNS-based Authentication of Named Entities) lets a domain bind a certificate or public key to a name through DNS, secured by DNSSEC; this checker confirms the binding holds.
This is a service-level checker: it runs on a TLSAs service. It groups the declared TLSA records by (port, proto, base), publishes one TLS endpoint discovery entry per endpoint so checker-tls probes it, then matches each TLSA against the observed certificate chain following RFC 6698.
What it checks
Rule
What it verifies / flags
Severity
dane.has_records
At least one TLSA record is declared on the service.
—
dane.dnssec_validated
The TLSA records were fetched via a DNSSEC-validating resolver (AD bit set).
—
dane.probe_available
A TLS probe is available for every DANE endpoint so the chain can be compared.
—
dane.handshake_ok
The TLS handshake succeeds on every DANE endpoint.
—
dane.records_match_chain
At least one TLSA record matches the certificate chain presented by each endpoint.
—
dane.pkix_chain_valid
When usages 0 or 1 are published, the chain also validates against system trust roots.
—
dane.usage_coherent
Flags TLSA records whose declared usage does not match the chain slot they actually hash (e.g. usage 3 matching an intermediate).
—
How the TLSA fields are interpreted
Usage 0 (PKIX-TA) / 1 (PKIX-EE) — the TLSA must match and the chain must validate against the public PKIX trust roots.
Usage 2 (DANE-TA) / 3 (DANE-EE) — the TLSA itself acts as the trust anchor; PKIX validity is informational.
Selector 0 (full certificate) or 1 (Subject Public Key Info), and matching type 0 (full) / 1 (SHA-256) / 2 (SHA-512), are matched against the chain slot implied by the usage.
DANE relies on DNSSEC
DANE is only trustworthy when the TLSA records are served from a DNSSEC-signed zone and validated by the resolver. The dane.dnssec_validated rule checks that the records arrived with the AD (Authenticated Data) bit set; without DNSSEC, a TLSA record could be forged and the whole binding is meaningless.
Options
Option
Meaning
Default
Probe timeout (ms)
Forwarded to checker-tls as the per-endpoint TLS probe timeout.
checker-tls default
STARTTLS override
A map keyed by "<port>/<proto>" overriding the STARTTLS application used when probing. Common STARTTLS ports (25, 110, 143, 389, 587, 5222, 5269) are auto-mapped; set this only for non-standard ports.
(auto)
The domain, subdomain and TLSAs service are filled in automatically.
In happyDomain
Add the TLSA service to the subdomain, then enable this checker from that service’s Checks tab. See /en/pages/checks/ for configuring and scheduling checks. The checker publishes its endpoints for checker-tls to probe, so allow a probe cycle before the first match result appears.
Related checker: /en/reference/checkers/caa/ verifies, on the same certificates, that the issuing CA was authorized by the domain’s CAA policy.
TLS posture
The TLS checker (internal name TLS) evaluates the transport-security posture of every TLS endpoint exposed by a domain. It does not scan ports on its own: it consumes discovery entries of type tls.endpoint.v1 published by other service checkers (XMPP, SRV, CalDAV, CardDAV, SMTP…). For each discovered endpoint it performs a real TCP dial, an optional protocol-specific STARTTLS upgrade, and a full TLS handshake, then reports a per-endpoint posture.
Scope: domain-level. The checker runs against the whole domain and folds in the endpoints that every other service checker has advertised. A given endpoint is therefore only probed if some service checker (for example /en/reference/checkers/smtp/) published it.
What it checks
Rule
Verifies
Severity
tls.endpoints_discovered
At least one TLS endpoint has been discovered for this target.
Info
tls.reachability
Every discovered endpoint accepts a TCP connection.
Critical
tls.handshake
The TLS handshake completes on every reachable endpoint.
Critical
tls.starttls_advertised
STARTTLS endpoints advertise the upgrade capability.
Critical
tls.starttls_dialect_supported
The discovered STARTTLS dialect is implemented by the checker.
Critical
tls.peer_certificate_present
The server presented a certificate during the handshake.
Critical
tls.chain_validity
The presented chain validates against the system trust store.
Critical
tls.hostname_match
The leaf certificate covers the probed hostname (SNI).
Critical
tls.expiry
Flags expired or soon-to-expire leaf certificates.
Critical
tls.version
Flags endpoints negotiating a TLS version below TLS 1.2.
Warning
tls.cipher_suite
Reports the cipher suite negotiated on each endpoint.
Info
tls.enum.versions
Flags endpoints that still accept TLS versions below TLS 1.2 (enumeration option).
STARTTLS upgrades are supported for SMTP/submission, IMAP, POP3, and XMPP (c2s and s2s). When a service checker marks an endpoint as requiring STARTTLS, the absence of the upgrade is reported as Critical; otherwise it is treated as opportunistic and reported as Warning.
Options
Option
Meaning
Default
Per-endpoint probe timeout (ms) (probeTimeoutMs)
Maximum time allowed for dial + STARTTLS + TLS handshake on a single endpoint.
10000
Enumerate accepted TLS versions and cipher suites (enumerateCiphers)
When enabled, each direct-TLS endpoint is swept with one ClientHello per (version, cipher) pair to discover the exact set the server accepts. Adds roughly 50 handshakes per endpoint.
false
The list of discovery entries is filled automatically from what other checkers publish and is not user-editable.
In happyDomain
The TLS checker is a domain-level check: enable it from the domain’s checks view. Because it works on endpoints discovered by other checkers, it pairs naturally with service-level checkers that publish TLS endpoints, such as /en/reference/checkers/smtp/.
TLS posture vs DANE
This checker validates the live certificate against the system trust store. Pinning the certificate in DNS through TLSA records is a separate concern, handled by the /en/reference/checkers/dane/ checker.
For the general workflow of configuring and reading checks, see /en/pages/checks/.
HTTP / HTTPS
The HTTP / HTTPS checker probes the web server declared by a Server service over plain HTTP (port 80) and HTTPS (port 443), then evaluates a battery of independent rules on the responses: reachability, the HTTP→HTTPS redirect chain, and the modern set of HTTP security headers (HSTS, CSP, frame options, cross-origin isolation…) along with cookie hygiene.
Scope: service-level. It attaches to services of type abstract.Server (a subdomain that publishes A/AAAA records) and is configured from that service’s Checks tab.
Deep TLS and certificate analysis is intentionally delegated to the /en/reference/checkers/tls/ checker; this checker relies on TLS only as a transport.
What it checks
Rule
Verifies
Severity
http.tcp_reachable
Every probed IP accepts an HTTP connection on port 80.
Critical
https.tcp_reachable
Every probed IP accepts an HTTPS connection on port 443.
Critical
http.https_redirect
Plain HTTP redirects to an HTTPS URL on the same host.
Warning
http.redirect_chain
The redirect chain has no loops, excessive length, or scheme downgrades.
Warning
http.redirect_permanence
HTTP→HTTPS upgrade uses 301 or 308 (permanent) rather than 302/307.
Warning
http.hsts
Presence and quality of the Strict-Transport-Security header on HTTPS.
Warning
http.csp
Presence and quality of the Content-Security-Policy header on HTTPS.
Warning
http.x_frame_options
Responses set X-Frame-Options or a CSP frame-ancestors directive.
Warning
http.x_content_type_options
Responses set X-Content-Type-Options: nosniff.
Warning
http.x_xss_protection
Reports the legacy X-XSS-Protection header value (CSP is the proper replacement).
Info
http.referrer_policy
Responses set a privacy-preserving Referrer-Policy header.
Warning
http.permissions_policy
The Permissions-Policy header restricts powerful APIs (camera, microphone, geolocation…).
Warning
http.coop
The Cross-Origin-Opener-Policy header is set for cross-origin process isolation.
Warning
http.coep
The Cross-Origin-Embedder-Policy header is set (required with COOP for cross-origin isolation).
Warning
http.corp
The Cross-Origin-Resource-Policy header restricts cross-origin embedding.
Warning
http.cookie_flags
Cookies set over HTTPS use the Secure, HttpOnly and SameSite attributes.
Warning
http.cookie_prefixes
Cookies using the __Secure- / __Host- prefixes meet the RFC 6265bis constraints.
Warning
http.cookie_size
Flags Set-Cookie lines exceeding the 4096-byte minimum browsers must support.
Reports whether /.well-known/security.txt (RFC 9116) is published.
Warning
Options
Option
Meaning
Default
Per-request timeout (ms) (probeTimeoutMs)
Maximum time allowed for a single HTTP/HTTPS request.
10000
Max redirects to follow (maxRedirects)
Stop following redirects after this many hops.
5
User-Agent (userAgent)
User-Agent header sent with every request.
happyDomain-checker-http/1.0
Require HTTPS (requireHTTPS)
Plain HTTP must redirect to HTTPS.
true
Require HSTS (requireHSTS)
HTTPS responses must include a Strict-Transport-Security header.
true
Min HSTS max-age (days) (minHSTSMaxAgeDays)
Minimum acceptable HSTS max-age, in days.
180
Require Content-Security-Policy (requireCSP)
HTTPS responses must include a Content-Security-Policy header.
false
In happyDomain
This is a service-level checker: configure it from the Checks tab of the Server service on the relevant subdomain. For deep certificate posture, add the /en/reference/checkers/tls/ checker as well. For the general workflow of configuring and reading checks, see /en/pages/checks/.
Ping
The Ping (ICMP) checker measures basic network reachability for the addresses behind a service. It sends a small number of ICMP echo requests to each A/AAAA address and reports whether the target replied, its average round-trip time (RTT), the observed packet-loss ratio, and whether at least one IPv6 address answered.
Scope: service-level. It attaches to services of type abstract.Server (a subdomain that publishes A/AAAA records) and is configured from that service’s Checks tab.
What it checks
Rule
Verifies
Warn / Critical conditions
ping.reachable
Every target replied to at least one ICMP probe.
Critical when a target never replies.
ping.rtt
Average round-trip time stays within thresholds.
Warning above the warning RTT, Critical above the critical RTT.
ping.ipv6_reachable
At least one IPv6 target replied to an ICMP probe.
Warning when no IPv6 address answers.
ping.packet_loss
Packet-loss ratio stays within thresholds.
Warning above the warning loss ratio, Critical above the critical loss ratio.
Options
Option
Meaning
Default
Warning RTT threshold (ms) (warningRTT)
Average RTT above which the check warns.
100
Critical RTT threshold (ms) (criticalRTT)
Average RTT above which the check is critical.
500
Warning packet loss threshold (%) (warningPacketLoss)
Packet-loss ratio above which the check warns.
10
Critical packet loss threshold (%) (criticalPacketLoss)
Packet-loss ratio above which the check is critical.
50
Number of pings to send (count)
ICMP echo requests sent per target.
5
In happyDomain
This is a service-level checker: configure it from the Checks tab of the Server service on the relevant subdomain. Its short default interval makes it well suited to lightweight, frequent reachability monitoring. For the general workflow of configuring and reading checks, see /en/pages/checks/.
SMTP
The Inbound SMTP (MX posture) checker exercises the inbound side of a domain’s mail service. For every MX target of the zone it performs the live probes a human operator would run with swaks or telnet … 25: TCP connect, ESMTP banner and EHLO, STARTTLS negotiation, mail-transaction probes (null sender, postmaster, open-relay), reverse DNS / FCrDNS, extension inventory, and IPv4/IPv6 coverage. The result is an actionable HTML report.
Scope: service-level. It attaches to services of type svcs.MXs (the DNS-level MX record set) and is configured from that service’s Checks tab.
The probe answers “can this domain receive mail correctly?”. It does not test outbound deliverability (SPF/DKIM/DMARC alignment, spam scoring, blacklist status), which is the job of the /en/reference/checkers/happydeliver/ checker. Mail-transaction probes always stop at RCPT and emit RSET: no DATA is sent, so no mail is delivered.
What it checks
Rule
Verifies
Severity
smtp.null_mx
Reports whether the domain publishes a null MX (RFC 7505).
Info
smtp.mx_present
The domain publishes at least one MX record (or a null MX).
Certificate posture itself is out of scope here: each MX target is published as a tls.endpoint.v1 discovery entry (opportunistic STARTTLS), and the /en/reference/checkers/tls/ checker runs certificate analysis on the same connection. Its findings are folded back into the smtp.tls_quality rule and the HTML report.
Options
Option
Meaning
Default
Domain (domain)
Domain to test. Auto-filled from the service.
(from service)
Per-endpoint timeout (seconds) (timeout)
Per-endpoint connection timeout.
12
EHLO hostname (helo_name)
Hostname announced in EHLO/HELO. Use a name that resolves and has a valid PTR.
Probe a recipient outside the tested domain to detect open relays.
true
Open-relay probe recipient (test_probe_address)
Mailbox (outside the tested domain) used for the open-relay probe.
postmaster@example.com
In happyDomain
This is a service-level checker: configure it from the Checks tab of the E-Mail servers (MX) service. To confirm that mail your domain sends lands in the inbox, pair it with the /en/reference/checkers/happydeliver/ checker. For the general workflow of configuring and reading checks, see /en/pages/checks/.
Outbound deliverability (happyDeliver)
The Outbound deliverability checker (named Outbound deliverability (via happyDeliver) in happyDomain) measures how a message sent from your domain would actually fare on its way to a recipient’s inbox. Rather than inspecting DNS records in isolation, it drives an external happyDeliver instance to perform an end-to-end test.
This checker is service-level: it is attached to a service (typically the mail configuration of a subdomain) and needs SMTP credentials to send the test message on your behalf.
How it works
For each run, the checker:
Allocates a fresh recipient address on the configured happyDeliver instance.
Sends a real test email from the tested domain to that address, using the SMTP submission server and credentials you provide.
Polls happyDeliver until the message has been received and analysed.
Stores happyDeliver’s report and exposes one score per section as a metric.
happyDeliver grades the message across several sections (DNS, authentication, spam filters, blacklists, headers, content) and computes an overall score. The checker turns each section into a rule.
An external happyDeliver instance is required
This checker does nothing on its own: it needs a reachable happyDeliver instance, identified by its API URL and bearer token. Those are usually configured once by the administrator and can be overridden per domain.
What it checks
Each section rule compares happyDeliver’s score for that section against a configurable minimum. The check is Critical when the score falls below the minimum, otherwise OK.
Rule
What it verifies
Default minimum
happydeliver.score.overall
happyDeliver’s Overall score
70
happydeliver.score.dns
DNS configuration score
70
happydeliver.score.authentication
Authentication score (SPF / DKIM / DMARC)
80
happydeliver.score.spam
Spam-filter score
70
happydeliver.score.blacklist
Blacklist score
90
happydeliver.score.header
Header score
70
happydeliver.score.content
Content score
60
A separate happydeliver.lifecycle rule reports the outcome of the run itself: OK when the message was analysed, Critical when the test address could not be allocated, the message could not be sent, or happyDeliver returned a wait/fetch/parse error, and Warning when the message was not analysed before the timeout elapsed.
Each section minimum can be tuned through its own min_score_<section> rule option in the happyDomain interface.
Options
Sending (per domain)
Option
Meaning
Default
Sending SMTP host (smtp_host)
Hostname or IP of the submission server used to send the test email. Required.
(none)
Sending SMTP port (smtp_port)
Submission port (587 for STARTTLS, 465 for implicit TLS, 25 for plain).
587
SMTP username (smtp_username)
Username for the submission server (omit for anonymous submission).
(none)
SMTP password (smtp_password)
Password for the submission server.
(none)
TLS mode (smtp_tls)
How to negotiate TLS: starttls, tls, or none.
starttls
From address (from_address)
Address used in the From header; must belong to the tested domain.
no-reply@<domain>
Message content (per domain)
Option
Meaning
Default
Subject (subject_override)
Override the default test subject.
(built-in)
Plain-text body (body_text_override)
Override the default plain-text body.
(built-in)
HTML body (body_html_override)
Override the default HTML body.
(built-in)
Timing (per domain)
Option
Meaning
Default
Wait timeout (wait_timeout)
Seconds to wait for happyDeliver to receive and analyse the message.
900
Poll interval (poll_interval)
Seconds between status polls (clamped to the 2–60 range).
5
Instance (admin, overridable per domain)
Option
Meaning
Default
happyDeliver instance URL (happydeliver_url)
Base URL of the happyDeliver API.
(admin)
happyDeliver API token (happydeliver_token)
Bearer token for the happyDeliver API.
(admin)
In happyDomain
Enable this checker from the service’s Checks tab and provide the SMTP submission details so happyDomain can send the test message. See /en/pages/checks/ for the general workflow of scheduling and reading checks.
Because deliverability depends heavily on your anti-spoofing posture, pair this checker with a well-configured /en/reference/services/email/ setup (SPF, DKIM and DMARC). For the DNSSEC half of your domain’s trust chain, see /en/reference/checkers/dnssec/.
Mail autoconfiguration
The Mail Autoconfiguration checker verifies that mail clients can automatically discover how to connect to your mail servers. When autoconfiguration is published correctly, a user only types their email address and password, and their client (Thunderbird, Outlook, mobile mail apps…) finds the right IMAP/POP and SMTP hosts, ports and security settings on its own.
This checker is service-level: it applies to the mail-autoconfiguration and RFC 6186 services of a domain. For each run it probes the discovery mechanisms used by real-world clients:
Thunderbird autoconfig (Bucksch draft): https://autoconfig.<domain>/mail/config-v1.1.xml as the primary URL, with the https://<domain>/.well-known/autoconfig/... apex fallback, an optional plain-HTTP variant, the Mozilla ISPDB fallback, and MX-parent fallbacks.
Microsoft Autodiscover (POX): https://autodiscover.<domain>/autodiscover/autodiscover.xml.
MX resolution, for context and MX-based discovery.
It parses every response, cross-checks the servers advertised by the different sources, and produces an HTML report with paste-ready remediation snippets for the most common failure modes.
What it checks
Rule
What it verifies
Severity on failure
autoconfig_presence
At least one autoconfiguration discovery method answers for the domain.
Critical
autoconfig_preferred_endpoint
The primary URL https://autoconfig.<domain>/mail/config-v1.1.xml is reachable and serves a valid clientConfig.
Warning
autoconfig_tls
Autoconfig endpoints are served over HTTPS with a valid TLS certificate.
Critical
autoconfig_server_encryption
Servers advertised by autoconfig use SSL or STARTTLS and a non-cleartext authentication method.
Critical
autoconfig_consistency
Hostnames and ports reported by autoconfig, Autodiscover and SRV records agree with each other.
Warning
autoconfig_srv_records
RFC 6186 SRV records complement the autoconfig XML.
Warning
autoconfig_autodiscover
Whether Microsoft Autodiscover (POX) responds on the domain.
Warning
When a check fails, the report’s “Fix this first” section provides ready-to-copy snippets: a sample config-v1.1.xml and its canonical URLs when nothing is published, a nudge to add the autoconfig. subdomain when only .well-known answers, an HTTPS redirect hint, a certificate-coverage hint, a port cheat-sheet for plaintext servers (SSL 993/465, STARTTLS 143/587), and a ready-to-paste SRV zone excerpt.
Options
Per user
Option
Meaning
Default
Local-part used in probes (probeEmail)
Local part sent in the autoconfig URL query string (before @). Most servers ignore it.
test
HTTP timeout (httpTimeout)
Per-request timeout, in seconds, when probing endpoints.
8
Try Mozilla ISPDB fallback (tryISPDB)
When the domain publishes no autoconfig file, also query Mozilla’s public Thunderbird ISPDB.
Enable this checker from the Checks tab of the relevant mail-autoconfiguration service. See /en/pages/checks/ for scheduling and reading checks.
This checker is the natural companion to a full mail setup: see /en/reference/services/email/ for the MX, SPF, DKIM and DMARC services that govern how mail is delivered and authenticated.
Mail keys (DKIM / OpenPGP)
The Mail keys checker (named OPENPGPKEY & SMIMEA in happyDomain) validates the cryptographic keys a domain publishes in DNS so that correspondents can encrypt mail to its users. It covers two DANE-style record types:
OPENPGPKEY (RFC 7929) — an individual user’s OpenPGP public key, published under an owner-hashed name below ._openpgpkey.<zone>.
SMIMEA (RFC 8162) — a user’s S/MIME certificate, published under an owner-hashed name below ._smimecert.<zone>.
This checker is service-level: it applies to the OpenPGP and S/MIME services of a subdomain and runs a comprehensive test suite, then renders an HTML report whose top block points to the fix for the most common failure scenarios.
Publication and structure, not cryptographic trust
This checker validates DNS publication and the structure and metadata of the keys it finds. It does not cryptographically verify them: OpenPGP signatures (self-signatures, third-party certifications) are not verified, and S/MIME chains are not built or validated against any trust anchor (no CRL/OCSP). Authenticity of the records themselves is delegated to a validating resolver via the DNSSEC AD flag. Treat a green report as “the record is well-formed and DNSSEC-signed”, not as “the key is trustworthy”.
What it checks
DNS and DNSSEC
Rule
What it verifies
Severity
dns_query_failed
The DNS lookup for the record succeeds.
Critical
dns_no_record
A record is published at the expected owner name.
Critical
dns_record_mismatch
The record returned by DNS matches the service-declared record.
Warning
dnssec_not_validated
The record is authenticated by DNSSEC (AD flag set).
Critical (Warning if DNSSEC not required)
owner_hash_mismatch
The owner-name first label equals hex(sha256(username))[:28].
Critical
OpenPGP (OPENPGPKEY)
Rule
What it verifies
Severity
pgp_parse_error
The record decodes as a valid OpenPGP key.
Critical
pgp_primary_revoked
The primary key carries no revocation signature.
Critical
pgp_primary_expired
The primary key has not passed its self-signature expiry.
Critical
pgp_primary_expiring_soon
The primary key does not expire within the configured window.
Warning
pgp_weak_algorithm
No legacy algorithm (DSA/ElGamal) is used.
Warning
pgp_weak_key_size
RSA keys meet the minimum 2048-bit size (3072+ preferred).
Critical
pgp_no_encryption_subkey
At least one active key advertises encryption capability.
Critical
pgp_no_identity
The key carries at least one self-signed User ID.
Warning
pgp_uid_mismatch
At least one UID references <username@...>.
Info
pgp_multiple_entities
The record carries a single OpenPGP entity (RFC 7929).
Warning
pgp_record_too_large
The record stays below 4 KiB to fit typical UDP answers.
Warning
S/MIME (SMIMEA)
Rule
What it verifies
Severity
smimea_bad_usage
The usage field is 0, 1, 2 or 3.
Critical
smimea_bad_selector
The selector field is 0 (Cert) or 1 (SPKI).
Critical
smimea_bad_match_type
The matching type is 0 (Full), 1 (SHA-256) or 2 (SHA-512).
Critical
smimea_cert_parse_error
The record decodes as a valid X.509 certificate or SPKI.
Critical
smimea_cert_not_yet_valid
The certificate’s NotBefore is in the past.
Critical
smimea_cert_expired
The certificate’s NotAfter is in the future.
Critical
smimea_cert_expiring_soon
The certificate does not expire within the configured window.
Warning
smimea_no_email_protection_eku
The certificate advertises the emailProtection EKU.
Critical (Warning if not required)
smimea_missing_key_usage
The certificate carries digitalSignature and/or keyEncipherment key usage.
Warning
smimea_weak_signature_algorithm
The certificate is not signed with a deprecated algorithm (MD2/MD5/SHA-1).
Critical
smimea_weak_key_size
RSA keys meet the minimum 2048-bit size (3072+ preferred).
Critical
smimea_self_signed
Flags self-signed certificates paired with PKIX-EE (usage 1).
Info
smimea_email_mismatch
At least one email SAN begins with <username>@.
Info
smimea_hash_only
Notes that matching types 1/2 transport only a digest, preventing certificate inspection.
Info
Options
Option
Meaning
Default
DNS resolver (resolver)
Validating resolver to query (comma-separated list accepted). Empty uses the system resolver.
(system)
certExpiryWarnDays
Window, in days, for the expiring_soon warnings (PGP and S/MIME).
30
requireDNSSEC
When false, a missing AD flag is a Warning instead of Critical.
true
requireEmailProtection
When false, a missing emailProtection EKU is a Warning instead of Critical.
true
The domain origin, subdomain, service and service type are auto-filled by happyDomain.
Query a validating resolver
Because record authenticity is delegated to DNSSEC, run this checker against a resolver you trust to perform DNSSEC validation, so the AD flag reflects a real validation.
In happyDomain
Enable this checker from the Checks tab of the relevant OpenPGP or S/MIME service. See /en/pages/checks/ for the general workflow.
These records share their security model with DNSSEC: to confirm your zone’s signing chain is itself sound, see /en/reference/checkers/dnssec/. For the surrounding mail configuration, see /en/reference/services/email/.
CalDAV / CardDAV
The CalDAV and CardDAV checkers verify that a domain’s calendar (RFC 4791) and contacts (RFC 6352) servers are discoverable, reachable, and correctly advertise the WebDAV extensions that clients rely on. They are two distinct checkers sharing the same logic: caldav attaches to a CalDAV service (abstract.CalDAV), carddav to a CardDAV service (abstract.CardDAV). The only behavioural difference is the required DAV capability (calendar-access vs addressbook) and a CalDAV-only scheduling check.
Both checkers are service-level: they target the corresponding service published on a subdomain and are configured from that service’s own Checks tab. Discovery follows RFC 6764: the checker resolves a context URL from /.well-known/{caldav,carddav} and from _caldavs._tcp / _carddavs._tcp SRV records (with an optional path= TXT hint), then probes that endpoint.
When no credentials are supplied, only the anonymous phase runs (discovery, transport, OPTIONS). Supplying a username and password unlocks the authenticated phase: principal discovery, home-set, collection enumeration and the REPORT probe.
TLS posture is out of scope
These checkers confirm only that an HTTPS session can be established to the context URL. Certificate validation (chain, hostname, expiry, ciphers) is deliberately left to the dedicated TLS checker. See /en/reference/checkers/tls/.
What it checks
Rule
What it verifies
Conditions
dav_discovery
A context URL resolves via /.well-known or SRV.
Critical if no context URL can be resolved. Warning when /.well-known returns 200 instead of a 301/302 redirect (legal but many clients won’t follow it). Info when the URL was resolved via SRV but /.well-known is broken.
dav_transport
The HTTPS connection to the context URL is reachable.
Critical if the connection fails.
dav_options
An HTTP OPTIONS request advertises the required DAV capability (calendar-access for CalDAV, addressbook for CardDAV) and the PROPFIND/REPORT methods.
Critical if OPTIONS fails or the capability is missing. Warning if the Allow header lacks PROPFIND or REPORT.
dav_principal
The current-user principal URL is discovered via authenticated PROPFIND.
Critical on failure. Unknown when no credentials are supplied (phase skipped).
dav_home_set
The calendar/addressbook home-set is discovered from the principal.
Critical on failure. Unknown when skipped.
dav_collections
Calendar/addressbook collections enumerate and expose their properties (supported component set, supported address data, display name…).
Critical on failure. Warning if the home-set is empty. Unknown when skipped.
dav_report
The server accepts a minimal calendar-query / addressbook-queryREPORT against the first collection.
Critical on failure. Warning if the query returns an unexpected response. Unknown when skipped.
caldav_scheduling
(CalDAV only) When calendar-schedule is advertised, the principal exposes schedule-inbox-URL and schedule-outbox-URL.
Warning if advertised but the URLs are missing or the probe fails. Info when scheduling is not advertised. Unknown when skipped.
The HTML report surfaces the most common misconfigurations as callouts: /.well-known returning 200, no SRV and no well-known (service unreachable), a plaintext SRV record without a secure counterpart, a server not advertising the required DAV class, and the authenticated phase being skipped for lack of credentials.
Optional. Paired with the username for HTTP Basic authentication.
(empty)
Explicit context URL
Optional. Bypasses /.well-known and SRV discovery; use for servers with a non-standard layout.
(empty)
Domain name
The domain to probe (auto-filled from the service scope).
(auto)
Timeout (seconds)
Per-request HTTP timeout.
10
In happyDomain
Enable the CalDAV or CardDAV checker from the Checks tab of a CalDAV or CardDAV service. The domain name is filled in automatically; add credentials only if you want the authenticated collection and REPORT checks to run. See /en/pages/checks/ for the full workflow, and /en/reference/checkers/tls/ for the certificate posture of the same endpoints.
LDAP
The LDAP checker probes a domain’s LDAP directory deployment from end to end. Starting from SRV discovery (_ldap._tcp, _ldaps._tcp), it tests reachability of every endpoint, confirms an encrypted channel is available (StartTLS per RFC 2830 or implicit TLS on port 636), introspects the RootDSE, looks for anonymous information disclosure, verifies the directory refuses cleartext binds, and — when credentials are supplied — performs an authenticated bind over TLS with an optional read test on a base DN.
This checker is service-level: it targets an LDAP service (abstract.LDAP) published on a subdomain and is configured from that service’s own Checks tab. For each transport it probes _ldap._tcp (falling back to port 389) and _ldaps._tcp (falling back to port 636), testing each resolved A/AAAA address per IP family.
TLS posture is folded in, not duplicated
The LDAP checker confirms only that a TLS session can be established, recording the negotiated version and cipher for context. Each probed endpoint is published as a tls.endpoint.v1 discovery entry so the dedicated TLS checker can verify the certificate chain, hostname match and expiry. Those findings are folded back onto the LDAP service page through the ldap.tls_quality rule — a bad certificate on an LDAP endpoint shows up here, not only in a separate TLS view. See /en/reference/checkers/tls/.
What it checks
Rule
What it verifies
Severity
ldap.has_srv
_ldap._tcp / _ldaps._tcp SRV records are published and resolvable.
Warning
ldap.endpoint_reachable
Every discovered LDAP endpoint accepts a TCP connection.
Critical
ldap.has_encrypted_transport
At least one reachable endpoint offers an encrypted channel (LDAPS or StartTLS).
Critical
ldap.starttls_supported
StartTLS is offered and the upgrade succeeds on every reachable plain LDAP endpoint.
Critical
ldap.ldaps_handshake
The direct TLS handshake succeeds on every LDAPS endpoint.
Critical
ldap.starttls_on_ldaps
Flags servers that needlessly advertise StartTLS on the implicit-TLS LDAPS port.
Info
ldap.ipv6_reachable
At least one endpoint is reachable over IPv6.
Info
ldap.refuses_plain_bind
The directory refuses authentication over a cleartext channel (confidentialityRequired, resultCode 13, per RFC 4513 §5.1.2).
Critical
ldap.anonymous_search_blocked
Flags directories that allow an anonymous baseObject search of the naming context (information disclosure).
Warning
ldap.rootdse_readable
The RootDSE is readable over TLS and advertises naming contexts.
Warning
ldap.sasl_mechanisms
Reviews supportedSASLMechanisms: presence of strong mechanisms (SCRAM-*, EXTERNAL, GSSAPI), absence of password-equivalent ones (PLAIN/LOGIN only).
Warning
ldap.protocol_version
Flags servers that still advertise the deprecated LDAPv2 protocol.
Warning
ldap.bind_credentials
The supplied bind credentials are accepted by the directory (only runs when bind_dn is set).
Critical
ldap.base_dn_read
The bound account can read the supplied base DN (only runs when base_dn is set and the bind succeeded).
Critical
ldap.tls_quality
Folds the downstream TLS checker findings (certificate chain, hostname match, expiry) onto the LDAP service.
Critical
The HTML report leads with the most common failures and includes server-specific remediation (OpenLDAP olcSecurity, 389-ds require_tls…): no encrypted endpoint reachable, StartTLS missing on 389, a StartTLS handshake that fails, a cleartext bind accepted on 389, an LDAPS handshake that fails, anonymous search exposing the DIT, PLAIN/LOGIN-only SASL, lingering LDAPv2, and rejected bind credentials.
Options
Option
Meaning
Default
Domain
The directory’s domain (auto-filled from the service scope). Required.
(auto)
Per-endpoint timeout (seconds)
Connection/probe timeout for each endpoint.
10
Bind DN
Optional. DN to bind as; used only when a bind password is also set, and only over a TLS-protected channel.
(empty)
Bind password
Optional, secret. The password is not persisted in the observation payload and is never sent over cleartext.
(empty)
Base DN (read test)
Optional. After a successful bind, a baseObject search on this DN confirms the account has read access. Falls back to an anonymous baseObject search when no bind DN is supplied.
(empty)
In happyDomain
Enable the LDAP checker from the Checks tab of an LDAP service. The domain is filled in automatically; supply a bind DN and password only if you want the authenticated bind and base-DN read tests to run. See /en/pages/checks/ for the full workflow, and /en/reference/checkers/tls/ for the certificate posture of the same endpoints.
Kerberos
The Kerberos checker audits a Kerberos realm starting from its DNS records. From the realm name (derived in uppercase from the domain) and the SRV records grouped under the Kerberos service, it runs a series of anonymous probes and, when credentials are supplied, an optional authenticated round-trip — giving a combined picture of the realm’s availability and security posture.
This checker is service-level: it targets a Kerberos service (abstract.Kerberos) published on a subdomain and is configured from that service’s own Checks tab. It inspects the SRV layout (_kerberos._tcp, _kerberos._udp, _kerberos-master._tcp, _kerberos-adm._tcp, _kpasswd._tcp, _kpasswd._udp), forward-resolves every SRV target (A + AAAA), tests TCP reachability of each KDC/kadmin/kpasswd host and UDP reachability of the KDC via a real AS-REQ. The anonymous AS-REQ probe confirms the realm, reads the supported enctypes from ETYPE-INFO2, detects a PKINIT hint (PA-PK-AS-REQ) and measures clock skew.
Credentials are forwarded to the KDC
When a principal and password are supplied, they are used once to obtain a TGT and then a TGS-REQ for the target service; they are forwarded to the KDC over the network and are never stored by the checker. Leave them blank to run anonymous probes only.
What it checks
Rule
What it verifies
Severity
kerberos.srv_present
At least one _kerberos._tcp / _kerberos._udp SRV record is published for the realm.
Critical
kerberos.kdc_reachable
At least one KDC endpoint (TCP/UDP 88) accepts a connection.
Critical
kerberos.as_probe
The anonymous AS-REQ probe received a sane reply (KRB-ERROR or AS-REP).
Critical
kerberos.realm_match
The KDC answers for the expected realm name.
Critical
kerberos.preauth_required
Flags KDCs that return an AS-REP without requiring pre-authentication (AS-REP roasting exposure).
Warning
kerberos.clock_skew
The KDC clock is within tolerance of the checker’s clock.
Critical
kerberos.enctypes
Reviews the encryption types advertised by the KDC, flagging DES/RC4-only configurations.
Critical
kerberos.kadmin_reachable
Flags kadmin endpoints published via SRV but not reachable.
Warning
kerberos.kpasswd_reachable
Flags kpasswd endpoints published via SRV but not reachable.
Warning
kerberos.auth_tgt
The supplied principal/password can obtain a TGT (only runs when credentials are supplied).
Critical
kerberos.auth_tgs
A TGS-REQ succeeds for the supplied target service (only runs when credentials and a target service are supplied).
Warning
The HTML report surfaces the most common misconfigurations with a direct remediation hint: no SRV records (publish _kerberos._tcp.REALM. SRV …), an SRV target with no A/AAAA, port 88 unreachable (open TCP+UDP 88), clock skew above the maximum (run ntpd/chrony), weak-enctype-only realms (switch to aes256-cts-hmac-sha1-96), the wrong realm in the reply, and AS-REP roasting exposure (enable requires_preauth).
Options
Option
Meaning
Default
Kerberos realm
DNS domain advertising the realm (auto-filled from the service scope; the realm name is derived in uppercase). Required.
(auto)
Principal
Optional. Supply to run an authenticated round-trip; leave blank for anonymous probes only.
(empty)
Password
Optional, secret. Password for the principal above; used once per run and never stored.
(empty)
Service to request (TGS)
Optional. SPN requested via TGS-REQ once a TGT is acquired. Defaults to krbtgt (realm self-test).
(empty)
Per-probe timeout (seconds)
Timeout for each probe.
5
Require strong enctypes
When enabled, realms advertising only DES/RC4 are flagged as Critical.
Enable the Kerberos checker from the Checks tab of a Kerberos service. The realm domain is filled in automatically; supply a principal and password only if you want the authenticated TGT/TGS round-trip to run. See /en/pages/checks/ for the full workflow.
SIP
The SIP checker probes a domain’s SIP/VoIP deployment from its DNS records, following RFC 3263 resolution: NAPTR → SRV (_sip._udp, _sip._tcp, _sips._tcp) → A/AAAA. It tests reachability on every resolved target:port over UDP, TCP and TLS, then sends a raw SIP OPTIONS ping and inspects the reply (status line, Server/User-Agent, advertised Allow methods, round-trip time).
This checker is service-level: it targets a SIP service (abstract.SIP) published on a subdomain and is configured from that service’s own Checks tab. When no SRV record is published, the checker falls back to <domain>:5060 / <domain>:5061, with a visible info marker in the report.
TLS posture is folded in, not duplicated
For the TLS handshake the checker uses InsecureSkipVerify: it confirms only that a TLS session can be established. Every _sips._tcp target is published as a tls.endpoint.v1 discovery entry so the dedicated TLS checker can verify the certificate chain, hostname match, expiry and cipher posture. Those findings are folded back onto the SIP service page through the sip.tls_quality rule. See /en/reference/checkers/tls/.
What it checks
Rule
What it verifies
Severity
sip.srv_present
_sip._udp / _sip._tcp / _sips._tcp SRV records are published and resolvable.
Critical
sip.transport_diversity
Modern SIP transports (TCP, and ideally TLS) are published alongside legacy UDP.
Warning
sip.srv_targets_resolvable
Every SRV target resolves to at least one A or AAAA address.
Critical
sip.endpoint_reachable
Every discovered SIP endpoint accepts a connection on its transport.
Critical
sip.options_response
Every reachable SIP endpoint answers OPTIONS with a 2xx response.
Critical
sip.options_capabilities
Reviews the Allow header advertised in OPTIONS replies (INVITE support, presence of Allow).
Warning
sip.ipv6_coverage
At least one SIP endpoint is reachable over IPv6.
Info
sip.tls_quality
Folds the downstream TLS checker findings (chain, hostname match, expiry) onto the SIP service.
Critical
The checker performs, in order: the NAPTR lookup (SIP+D2U, SIP+D2T, SIPS+D2T), the SRV lookup for the three transports (with the 5060/5061 fallback), A/AAAA resolution of every SRV target, TCP connect / UDP send / TLS handshake, and the SIP OPTIONS request with its status, headers and Allow parsed.
Options
Option
Meaning
Default
SIP domain
The domain to test (auto-filled from the service scope). Required.
(auto)
Per-endpoint timeout (seconds)
Probe timeout for each endpoint.
5
Probe _sip._udp
Whether to probe the UDP transport. Disable if UDP is firewalled or the checker host cannot send UDP.
true
Probe _sip._tcp
Whether to probe the TCP transport.
true
Probe _sips._tcp (TLS)
Whether to probe the TLS transport.
true
In happyDomain
Enable the SIP checker from the Checks tab of a SIP service. The domain is filled in automatically. See /en/pages/checks/ for the full workflow, and /en/reference/checkers/tls/ for the certificate posture of the _sips._tcp endpoints.
SSH
The SSH checker produces a comprehensive security audit of the SSH service exposed by a Server. It connects to the advertised SSH port(s) on every A/AAAA address and reports reachability, banner-to-CVE matches, the full algorithm posture (key exchange, host-key, cipher, MAC, compression), the observed host keys, SSHFP fingerprint alignment, and the authentication methods the server exposes. Results are presented as a “fix me fast” HTML report.
Scope: service-level. It attaches to services of type abstract.Server (a subdomain that publishes A/AAAA and optionally SSHFP records) and is configured from that service’s Checks tab.
What it checks
Rule
Verifies
Severity
ssh.tcp_reachable
Every probed (address, port) pair accepts a TCP connection.
Critical
ssh.handshake
The SSH banner exchange and KEXINIT parse succeed on every reachable endpoint.
Critical
ssh.protocol_version
Every endpoint advertises SSH-2 and rejects legacy SSH-1.
Critical
ssh.banner_software
Flags servers whose banner is not a recognised OpenSSH build.
Info
ssh.known_vulnerabilities
Matches the advertised OpenSSH version against a curated CVE catalog (regreSSHion, Terrapin, etc.).
Compares published SSHFP records against observed host keys (match, missing, mismatch).
Critical
ssh.sshfp_hash
Flags SSHFP record sets that only publish SHA-1 (type 1) fingerprints.
Warning
CVE matching covers, among others, regreSSHion (CVE-2024-6387), the ssh-agent PKCS#11 RCE (CVE-2023-38408), Terrapin (CVE-2023-48795), and several older username-enumeration and command-injection issues.
Options
Option
Meaning
Default
Ports (ports)
Comma-separated extra TCP ports to probe. Port 22 is always probed.
(empty)
Per-endpoint probe timeout (ms) (probeTimeoutMs)
Maximum time for dial + banner + KEXINIT + handshake on a single endpoint.
Open a second connection with a dummy user to discover advertised auth methods.
true
In happyDomain
This is a service-level checker: configure it from the Checks tab of the Server service on the relevant subdomain. Its SSHFP rules cross-reference the SSHFP records published in your zone, so keeping those records in sync with the server’s host keys improves the result. For the general workflow of configuring and reading checks, see /en/pages/checks/.
XMPP
The XMPP checker probes a domain’s XMPP (Jabber) deployment end-to-end, much like xmpp.net does: it discovers the relevant SRV records, opens a stream to each endpoint, negotiates STARTTLS, inspects the offered SASL mechanisms and confirms that server-to-server federation can authenticate.
This is a service-level checker. It applies to services of type XMPP and is configured from that service’s own Checks tab. It probes the four standard service names (_xmpp-client._tcp, _xmpp-server._tcp, _xmpps-client._tcp, _xmpps-server._tcp), the legacy _jabber._tcp, and falls back to <domain>:5222 / :5269 when no SRV record is published.
TLS posture is checked separately
Certificate chain, hostname (SAN) match, expiry and cipher posture are out of scope here: a dedicated /en/reference/checkers/tls/ checker handles them. The XMPP checker only confirms that STARTTLS completes, records the negotiated TLS version and cipher for context, and folds the downstream TLS findings back onto the XMPP service report through the xmpp.tls_quality rule.
What it checks
Rule
What it verifies
Severity
xmpp.srv_c2s
Client-to-server SRV records (_xmpp-client / _xmpps-client / _jabber) are published and resolvable.
Critical
xmpp.srv_s2s
Server-to-server SRV records (_xmpp-server / _xmpps-server) are published and resolvable.
Critical
xmpp.c2s_reachable
At least one client-to-server endpoint accepts TCP and completes TLS.
Critical
xmpp.s2s_reachable
At least one server-to-server endpoint accepts TCP and completes TLS.
Critical
xmpp.starttls_required
STARTTLS is advertised and required on every reachable c2s/s2s endpoint.
Critical
xmpp.sasl_mechanisms
The c2s SASL offer is sound (SCRAM present, no password-equivalent PLAIN-only).
Critical
xmpp.s2s_dialback
Server-to-server endpoints advertise dialback or SASL EXTERNAL after TLS (federation auth).
Critical
xmpp.ipv6_reachable
Flags deployments reachable only over IPv4.
Info
xmpp.direct_tls
Flags c2s deployments that do not publish XEP-0368 direct-TLS (_xmpps-*) SRV records.
Info
xmpp.tls_quality
Folds the downstream TLS checker findings (certificate chain, hostname match, expiry) onto the XMPP service.
Critical
The probe also covers TCP reachability of A/AAAA targets, stream feature parsing and IPv4/IPv6 coverage, surfaced through the rules above and the HTML report.
Options
Option
Meaning
Default
Domain
XMPP domain (JID domain) to test. Filled in automatically from the service.
(auto-filled)
Mode
Which side to probe: c2s (client-to-server), s2s (server-to-server), or both.
both
Per-endpoint timeout (seconds)
Time budget for each probed endpoint.
10
In happyDomain
Enable this checker from the Checks tab of an XMPP service; see /en/pages/checks/ for how to configure and schedule checks. The domain is filled in automatically from the service. For the certificate side of the same endpoints, pair it with the /en/reference/checkers/tls/ checker.
Matrix federation
The Matrix federation checker verifies that a Matrix homeserver is correctly set up to federate with the rest of the Matrix network. It delegates the actual probing to a Matrix Federation Tester instance, stores the full report as an observation, and renders a rich HTML summary covering connections, certificates, well-known delegation and DNS/SRV resolution.
This is a service-level checker. It applies to services of type Matrix (instant messaging) and is configured from that service’s own Checks tab.
What it checks
Rule
What it verifies
Severity
matrix.connection_reachable
Every discovered federation endpoint accepts an inbound connection.
Critical
matrix.federation_ok
The overall federation status reported by the Matrix Federation Tester.
Critical
matrix.srv_records
The Matrix SRV lookup (_matrix-fed._tcp / _matrix._tcp) succeeded or was legitimately skipped.
Critical
matrix.tls_checks
The TLS posture on every reachable federation endpoint (certificate chain, hostname, Ed25519 key).
Critical
matrix.version
The homeserver answers /_matrix/federation/v1/version with its name and version.
Warning
matrix.well_known
/.well-known/matrix/server, when published, is valid and points at the declared server_name.
Critical
Options
Option
Meaning
Default
Matrix domain
The Matrix server_name to test. Filled in automatically from the service.
matrix.org
An additional admin-level option, federationTesterServer, sets the URL template of the Federation Tester instance to query. It is configured by the happyDomain operator, not per check, and defaults to https://federationtester.matrix.org/api/report?server_name=%s.
In happyDomain
Enable this checker from the Checks tab of a Matrix service; see /en/pages/checks/ for how to configure and schedule checks. The Matrix domain is filled in automatically from the service.
STUN / TURN
The STUN / TURN checker probes STUN and TURN servers end-to-end. STUN and TURN are the NAT-traversal servers that real-time applications (WebRTC, voice and video) rely on to establish peer-to-peer media: STUN lets a host discover its public reflexive address, while TURN relays media when a direct path cannot be opened.
This is a service-level checker. It runs SRV discovery (or uses an explicit URI), checks TCP/UDP reachability and the TLS/DTLS handshake, issues a STUN binding request, verifies that the TURN server requires authentication, performs an authenticated TURN Allocate, and finally exercises the relay path with a CreatePermission + Send round-trip.
What it checks
Rule
What it verifies
Severity
stun_turn.discovery
At least one STUN/TURN endpoint could be discovered (explicit URI or SRV lookup).
Critical
stun_turn.srv_stun
At least one STUN endpoint is available via SRV (_stun / _stuns) or explicit URI.
Warning
stun_turn.srv_turn
At least one TURN endpoint is available via SRV (_turn / _turns) or explicit URI.
Critical
stun_turn.dial
Every discovered endpoint accepts a connection (TCP/TLS handshake or UDP socket).
Critical
stun_turn.tls_transport
At least one TLS/DTLS transport (stuns / turns) succeeds when present.
Critical
stun_turn.ipv6_coverage
At least one STUN/TURN hostname resolves to an IPv6 address.
Warning
stun_turn.stun_binding
The STUN Binding request receives a XOR-MAPPED-ADDRESS reply.
Critical
stun_turn.reflexive_public
Flags endpoints returning a private/loopback reflexive address (server unaware of its public IP).
Critical
stun_turn.stun_latency
Compares the STUN Binding RTT against the warning/critical thresholds.
Critical
stun_turn.turn_open_relay
The TURN server requires authentication (challenges an unauthenticated Allocate with 401).
Critical
stun_turn.turn_auth
The supplied TURN credentials (or REST shared secret) yield a successful Allocate.
Critical
stun_turn.relay_public
Flags TURN servers whose allocated relay address is private/loopback (missing public relay IP).
Critical
stun_turn.relay_echo
The TURN relay path can carry traffic to the configured probe peer (CreatePermission + Send).
Warning
Options
Option
Meaning
Default
Zone
Zone used for SRV-based discovery (_stun._udp / _turn._udp / _turns._tcp) when no explicit URI is given. Filled in automatically.
(auto-filled)
Server URI
Explicit STUN/TURN URI (RFC 7064/7065). Overrides SRV-based discovery.
—
Mode
auto probes both STUN and TURN; stun skips TURN allocation tests; turn requires TURN allocation.
auto
TURN username
Username for long-term TURN credentials.
—
TURN password
Password for long-term TURN credentials (secret).
—
REST API shared secret
Shared secret to derive ephemeral credentials (draft-uberti-rtcweb-turn-rest); takes precedence over username/password (secret).
—
Realm
Optional explicit TURN realm.
—
Transports
Comma-separated transports to test among udp, tcp, tls, dtls.
udp,tcp,tls
Relay echo target
host:port used to validate the relay path; a CreatePermission + Send is issued, no payload data is exchanged.
1.1.1.1:53
Also test ChannelBind
Additionally exercise ChannelBind through the relay connection.
false
RTT warning threshold (ms)
STUN Binding round-trip time above which a warning is raised.
200
RTT critical threshold (ms)
STUN Binding round-trip time above which a critical alert is raised.
1000
Per-probe timeout (s)
Time budget for each individual probe.
5
Credentials are needed for the TURN tests
The authentication, relay-public and relay-echo rules only run when valid TURN credentials are provided — either a username/password pair or a REST API shared secret. Without them, the checker still validates discovery, reachability, TLS and STUN binding, but cannot exercise the TURN relay path.
In happyDomain
Enable this checker from the Checks tab of the relevant service; see /en/pages/checks/ for how to configure and schedule checks. The zone is filled in automatically; supply a server URI and TURN credentials as needed for your deployment.
Blacklist (DNSBL)
The Blacklist & reputation checker flags whether a domain is currently listed on widely-used reputation systems. It queries a range of sources in parallel and produces a diagnosis-first HTML report whose “Action required” section lists the most impactful listings with a per-operator removal procedure.
Scope: domain-level. The check targets the domain name itself, independent of its DNS records, and is enabled from the domain’s checks view.
What it checks
Each configured source contributes its own per-source rule; a listing on any of them raises the domain’s status. The sources fall into three families:
DNS-based domain blocklists (DBL/RHSBL) — queried over DNS, no API key required: Spamhaus DBL, SURBL multi, URIBL multi, NordSpam DBL, SpamEatingMonkey Fresh, Tiopan DBL, SORBS RHSBL, plus any extra DNSBL zones an administrator adds.
Downloaded phishing/malware feeds — fetched and cached in memory: OpenPhish public feed, PhishTank, Botvrij.eu, Disconnect.me, OISD, and a Quad9 secure-DNS comparison.
Threat-intelligence HTTPS lookups — requiring an API key configured by an administrator: Google Safe Browsing, abuse.ch URLhaus / ThreatFox / MalwareBazaar, VirusTotal v3, AlienVault OTX, Pulsedive, Criminal IP.
When a DNSBL query is refused (many public resolvers are blocked by DBL operators) or an API quota is exhausted, the source is surfaced as a Warning so it does not pollute the OK status. A multi-vendor source such as VirusTotal reports Critical when at least one vendor flags the domain as malicious, and Warning when it is only suspicious.
Options
The only domain-level option is the target itself:
Option
Meaning
Default
Domain name (domain_name)
The domain to look up. Auto-filled from the domain.
(from domain)
All source selection and credentials are configured per source. Most sources are toggled on or off (and API keys supplied) at the administrator level; a subset of the downloaded-feed sources default to on and can be toggled by the user. See the source’s own documentation for which sources need an API key and how to obtain one.
In happyDomain
This is a domain-level checker: enable it from the domain’s checks view. Listings often reflect a compromise; treat a positive result as a signal to audit the host and rotate credentials, then follow the per-operator delisting links shown in the report. For the general workflow of configuring and reading checks, see /en/pages/checks/.
Legacy records
The Legacy DNS record types checker scans a zone for record types the IETF has deprecated, and reports every occurrence with the relevant RFC reference and a concrete migration suggestion. Deprecated types clutter a zone and, in a few cases, are silently ignored by modern resolvers — so cleaning them up keeps the zone both tidy and unambiguous.
This is a zone-level checker: it walks every service in the working zone in a single pass and consolidates findings by record type, so the report shows one picture rather than one result per record.
What it checks
A single rule, legacy_records, inspects each orphan record body for a deprecated type and groups the findings by severity. The default rule status is critical (the worst severity present bubbles to the top of the report).
Severity
Record types
Why
Critical
KEY, SIG, NXT
RFC 3755: superseded by DNSKEY / RRSIG / NSEC; modern validators ignore them.
Experimental or historical (RFC 1035, 1183, 1706, 1712…); safe to delete.
For each detected type the report names every owner where it appears, the RFC reason, the suggested replacement, and a concrete “how to fix” instruction. A clean zone produces a single OK state with the scan count; parse errors encountered during the scan are surfaced in a separate “skipped” section so a silent skip never masquerades as a clean pass.
The SPF record type, not the SPF policy
The SPFrecord type (RFC 4408) was deprecated by RFC 7208 in favour of publishing the SPF policy in a TXT record. This checker flags the obsolete SPF record type, not your SPF policy itself — which remains valid and necessary when published as a TXT record.
Options
This checker has no user-tunable options. The domain name and zone content are filled in automatically.
In happyDomain
Enable this checker on the domain from the /en/pages/checks/ view; it runs over the whole zone in a single pass and needs no configuration. Use its findings as a clean-up checklist: each card tells you which record type to remove and what, if anything, to publish instead.
DNSViz
The DNSViz checker (named DNSSEC (DNSViz) in happyDomain) assesses a domain’s DNSSEC validation chain by driving DNSViz. It analyses the queried name and every ancestor up to the root, so a recursive DNSSEC failure can be located at the exact level, and the exact record, where it broke.
This checker is domain-level: it concerns the domain and its delegation chain rather than a single service.
How it works
DNSViz is run externally (a Python tool packaged alongside the checker), and happyDomain delegates collection to that endpoint. For each run it effectively performs:
Every link of the chain (root → TLD → intermediates → leaf) is listed explicitly so the full analysis appears in the report. dnsviz grok is given a BIND-format DNSKEY trust anchor for the root zone; without it, the root has no parent to chain against and stays classified at the DNS level (NOERROR) instead of DNSSEC SECURE.
The output is parsed: per-zone errors and warnings are walked out of the nested record tree and turned into individual states tagged with the JSON path where they were found. A curated catalog of common DNSSEC failures (broken chain, expired RRSIG, DS digest mismatch, deprecated algorithm…) is matched against the findings to drive a “Fix these first” section in the HTML report.
Scope
This checker reports exactly what DNSViz reports. NSEC/NSEC3 zone-walk hardening and NSEC3PARAM iteration policy (RFC 9276) are out of scope here and handled by the dedicated DNSSEC checker — see /en/reference/checkers/dnssec/.
What it checks
Rule
What it verifies
dnsviz_overall_status
DNSViz status of the queried domain (SECURE / INSECURE / BOGUS / INDETERMINATE).
dnsviz_per_zone_status
One state per zone in the chain (root, TLD, intermediates, leaf).
dnsviz_zone_errors
Every error reported by DNSViz, scoped to the zone where it was found.
dnsviz_zone_warnings
Every warning reported by DNSViz, scoped to the zone where it was found.
dnsviz_common_failures
Pattern-matches the findings against a catalog of common DNSSEC failures.
Statuses map as follows: SECURE → OK; BOGUS → Critical; INDETERMINATE → Warning; INSECURE, NON_EXISTENT and a plain NOERROR (resolves but unsigned) → Info.
Options
Option
Meaning
Default
Probe timeout (probeTimeoutSeconds, admin)
Hard timeout for the dnsviz probe invocation; the recursive walk can be slow on some zones.
120
Domain name (domain_name)
Domain to analyse.
auto-filled
The DNSViz runtime itself requires dnsviz on the host’s PATH and a BIND-format root DNSKEY trust anchor file (auto-detected from the system’s dnssec-root / dns-root-data package, or pointed at explicitly). The packaged container image bundles these so the trust anchor is in place out of the box.
In happyDomain
Enable this checker for the domain from the Checks view. See /en/pages/checks/ for scheduling and reading checks.
DNSViz and /en/reference/checkers/dnssec/ are complementary: DNSViz validates the end-to-end chain, while the DNSSEC checker covers NSEC/NSEC3 hardening. A second opinion on the same chain is available from /en/reference/checkers/zonemaster/.
Zonemaster
The Zonemaster checker runs the Zonemaster test suite against a domain and reports its findings grouped by test category. Zonemaster is a well-established DNS health and delegation validator; this checker drives it through its JSON-RPC API, stores the full results as an observation, and renders an HTML report grouped by module and severity.
This checker is domain-level: it evaluates the domain’s delegation and zone content rather than a single service.
How it works
For each run the checker submits the domain to a Zonemaster JSON-RPC endpoint (the official public API by default), waits for the test batch to complete, and stores every message Zonemaster returns. Each message carries a module, a test case and a Zonemaster severity (INFO / NOTICE / WARNING / ERROR / CRITICAL).
Point only at a trusted Zonemaster instance
The Zonemaster API URL is an administrator option. Because the checker issues requests to whatever URL is configured and surfaces the responses, point it only at a Zonemaster instance you trust.
What it checks
The checker maps each Zonemaster test module onto a category rule. Every rule emits a <rule>.summary state, plus one state per WARNING-or-worse message (so downstream consumers can match on stable codes); INFO and NOTICE messages are folded into the summary counts.
Syntax tests (domain name syntax, hostname legality).
zonemaster.zone
Zone tests (SOA values, MX presence, mandatory records).
zonemaster.address
Address tests (nameserver IP addresses, private/reserved ranges).
zonemaster.basic
Basic/system tests (initial reachability and fundamental requirements).
Zonemaster severities are mapped onto happyDomain statuses: CRITICAL and ERROR → Critical; WARNING → Warning; NOTICE, INFO and DEBUG → Info. Each summary takes the worst status among its category’s messages. When Zonemaster returns no message for a category, that rule reports Unknown (not tested).
Options
Option
Meaning
Default
Domain name to check (domainName)
Domain submitted to Zonemaster. Required.
auto-filled
Profile (profile)
Zonemaster profile name to run the tests under.
default
Result language (language, per user)
Language of the returned messages (en, fr, de, es, sv, da, fi, nb, nl, pt).
en
Zonemaster API URL (zonemasterAPIURL, admin)
JSON-RPC endpoint to query.
https://zonemaster.net/api
In happyDomain
Enable this checker for the domain from the Checks view. See /en/pages/checks/ for scheduling and reading checks.
Zonemaster overlaps in part with /en/reference/checkers/dnsviz/ on DNSSEC, but covers a broader range of delegation, connectivity and zone-content tests. For NSEC/NSEC3 hardening specifically, see /en/reference/checkers/dnssec/.
Plugins
Plugins are external pieces of code — shared libraries loaded at startup — that extend happyDomain’s functionality without recompiling the server. An operator simply drops a .so file into a configured directory, and happyDomain picks it up automatically on the next start.
happyDomain can be extended with external checker plugins — shared libraries (.so files) that add automated diagnostics on zones, domains, services or users. A checker plugin is loaded into the running happyDomain process at startup; the operator simply drops a .so file into a configured directory, no recompilation of the server required.
A checker has two halves: it collects raw data about a target (an observation), then evaluates that data against a set of rules to produce a status. Results are stored and displayed in the happyDomain UI alongside the domain or service they concern.
Warning
A `.so` plugin is loaded into the happyDomain process and runs with the same privileges as the server. Treat the plugin directory as a trusted location: happyDomain refuses to load plugins from a directory it cannot trust (see [Security and deployment](#security-and-deployment)).
What a checker plugin must export
Plugins are built against the checker-sdk-go module, published separately from the happyDomain core. Throughout this page, checker refers to the package git.happydns.org/checker-sdk-go/checker.
happyDomain’s loader looks for a single exported symbol named NewCheckerPlugin with this exact signature:
The two return values describe the two halves of a checker:
*CheckerDefinition describes the checker: its identifier, name, version, the observation keys it relies on, the options it accepts, its rules, an optional aggregator, a scheduling interval, and whether it exposes HTML reports or metrics. See the field table below.
ObservationProvider is the data-collection half. It exposes a Key() (the observation key the rules look up) and a Collect(ctx, opts) method that returns the raw observation payload. happyDomain serialises that result to JSON and caches it per observation context.
Return a non-nil error if the plugin cannot initialise (a missing environment variable, a broken cgo dependency, …). The host logs the error and skips the file rather than aborting startup.
A single .so may export several plugin kinds. The loader runs every known plugin loader against every file, then skips any symbol it does not recognise, so one binary can ship more than one plugin.
Minimal example
This is the smallest plugin that loads. It collects a fixed observation and declares no rules. Adapt it from checker-dummy, the reference implementation.
// Command plugin is the happyDomain plugin entrypoint for the dummy checker.//
// Build with:// go build -buildmode=plugin -o checker-dummy.so ./pluginpackagemainimport (
"context""git.happydns.org/checker-sdk-go/checker")
typedummyProviderstruct{}
func (dummyProvider) Key() checker.ObservationKey { return"dummy.observation" }
func (dummyProvider) Collect(ctxcontext.Context, optschecker.CheckerOptions) (any, error) {
returnmap[string]string{"hello": "world"}, nil}
// NewCheckerPlugin is the symbol resolved by happyDomain at startup.funcNewCheckerPlugin() (*checker.CheckerDefinition, checker.ObservationProvider, error) {
def:=&checker.CheckerDefinition{
ID: "com.example.dummy",
Name: "Dummy checker",
Version: "0.1.0",
ObservationKeys: []checker.ObservationKey{"dummy.observation"},
// Add Rules / Aggregator / Options here in a real plugin. }
returndef, dummyProvider{}, nil}
Warning
A Go plugin and the host process share the same runtime. They **must** be compiled with the same Go toolchain version and the same versions of every shared dependency. Any mismatch produces a hard error at load time. See [Build constraints](#build-constraints).
CheckerDefinition fields
The *CheckerDefinition returned by NewCheckerPlugin is the description of your checker:
Field
Type
Description
ID
string
Required. Stable, persistent identifier. Pick a namespaced value (com.example.dnssec-freshness, not dnssec) and never change it: it keys stored results and user configuration.
Name
string
Human-readable name shown in the UI.
Version
string
Plugin version (e.g. "1.0.0").
Availability
CheckerAvailability
Declares which scopes the checker applies to and any provider/service restrictions (see below).
Options
CheckerOptionsDocumentation
Documents the options the checker accepts, grouped by scope (see below).
Rules
[]CheckRule
The rules evaluated against the collected observation.
Aggregator
CheckAggregator
Optional. Combines the per-rule CheckStates into a single summary state.
Set when the provider implements CheckerHTMLReporter.
HasMetrics
bool
Set when the provider implements CheckerMetricsReporter.
ObservationKeys
[]ObservationKey
The observation keys this checker reads.
Availability
CheckerAvailability controls where the checker is offered in the UI:
Field
Type
Description
ApplyToDomain
bool
Checker can run against a whole domain.
ApplyToZone
bool
Checker can run against a zone.
ApplyToService
bool
Checker can run against a specific service.
LimitToProviders
[]string
Restrict to certain DNS provider identifiers (empty = no restriction).
LimitToServices
[]string
Restrict to certain service type identifiers, e.g. "abstract.MatrixIM" (empty = no restriction).
Options
Options are declared grouped by scope, i.e. who sets them and how long they persist. Each scope is a slice of CheckerOptionDocumentation:
Scope
Who sets it
Typical use
AdminOpts
Administrator
Instance-wide settings, shared credentials.
UserOpts
User
Personal preferences (e.g. language).
DomainOpts
User
Domain-level configuration.
ServiceOpts
User
Service-level configuration.
RunOpts
User, at run time
Per-invocation parameters.
happyDomain merges the scoped values from least specific (admin) to most specific (run-time) before calling Collect, so the provider receives a single flat CheckerOptions map. Each option is a CheckerOptionField with fields such as Id, Type, Label, Default, Choices, Required, Secret, Description and AutoFill. Read typed values out of the map with the SDK helpers checker.GetOption, checker.GetIntOption, checker.GetBoolOption, …
Info
When happyDomain registers an externalisable checker, it automatically appends an `endpoint` admin option, so the administrator can delegate collection to a remote HTTP endpoint instead of running the checker in-process. Leave it empty to run locally.
The ObservationProvider
The provider is the data-collection half of the checker:
Key() returns the observation key this provider fills. It must match one of the ObservationKeys declared in the definition.
Collect performs the actual work (a DNS query, an HTTP call, …) and returns any JSON-serialisable value. happyDomain marshals it to JSON and caches it; the rules then read it back.
A provider can optionally implement additional SDK interfaces to extend its behaviour:
Interface
Purpose
CheckerHTMLReporter
GetHTMLReport(ctx ReportContext) renders the stored observation as an HTML document.
IsEligible(ctx, opts) decides, from the target’s actual data, whether running the checker is meaningful at all.
DiscoveryPublisher
DiscoverEntries(data) publishes DiscoveryEntry records other checkers can consume.
Rules return CheckState values whose Status is one of StatusOK, StatusInfo, StatusWarn, StatusCrit, StatusError or StatusUnknown.
Optional: standalone server
The SDK also provides checker.Server, HTTP scaffolding for running a checker as a remote endpoint instead of (or alongside) an in-process plugin. It exposes the routes /health and /collect, plus /definition, /evaluate and /report when the provider implements the matching optional interfaces. A provider that implements CheckerInteractive (RenderForm / ParseForm) additionally gets a human-facing form on /check, usable outside of happyDomain. See the SDK README for details; the in-process plugin path described above does not require any of this.
Build constraints
Go’s plugin package is unforgiving. To load successfully, your plugin must be built with:
the same Go toolchain version as happyDomain itself, including the same patch level;
the same versions of every shared dependency (pin them in your go.mod, vendoring the exact versions happyDomain ships);
CGO_ENABLED=1;
the same GOOS/GOARCH as the host binary.
If any of these do not match, plugin.Open fails with a (sometimes cryptic) error like “plugin was built with a different version of package …”. The host logs it and skips the file.
Go’s plugin package only works on linux, darwin and freebsd. On other platforms happyDomain is built without plugin support and the configured plugin directories are ignored, with a warning logged at startup.
Security and deployment
Directory and file permissions
Loading a .so file is arbitrary code execution as the happyDomain process, so the loader enforces strict ownership before it touches any file:
The plugin directory must not be a symbolic link — happyDomain refuses to follow one, to prevent it being redirected to an attacker-controlled path.
The plugin directory must not be group- or world-writable. A directory writable by anyone but the owner is treated as a fatal misconfiguration and aborts loading.
Any individual .so file that is group- or world-writable is skipped (logged and ignored), even inside a properly locked-down directory.
In practice: keep the directory owned by the happyDomain user, mode 0755, and the plugin files mode 0644.
The equivalent environment variable is HAPPYDOMAIN_PLUGINS_DIRECTORY.
The loader scans each configured directory and attempts to load every .so file it finds. An individual plugin that fails to load — wrong build, missing symbols, a panic in its factory — is logged and skipped without aborting startup; one bad .so never prevents the others from loading.
Checker plugins import only git.happydns.org/checker-sdk-go/checker, which is licensed under Apache-2.0. The SDK is deliberately split out of the AGPL-3.0 happyDomain core as a small, stable public API for third-party checkers.
A plugin built against this SDK is therefore not a derivative work of happyDomain, and you may distribute your checker .so under any license you choose (MIT, Apache, proprietary, AGPL — whatever fits your needs).
Reference implementation
checker-dummy is the fully working, documented template that this page mirrors. Start from it when writing your own checker.